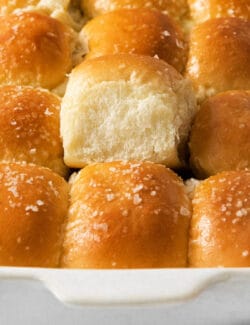
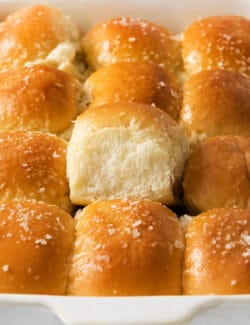
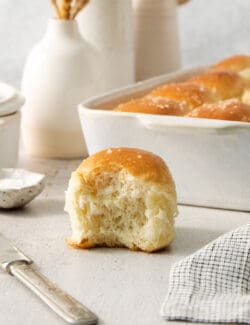
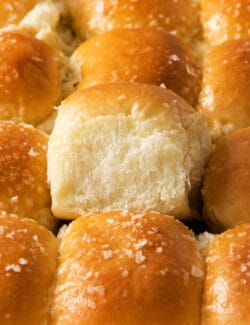
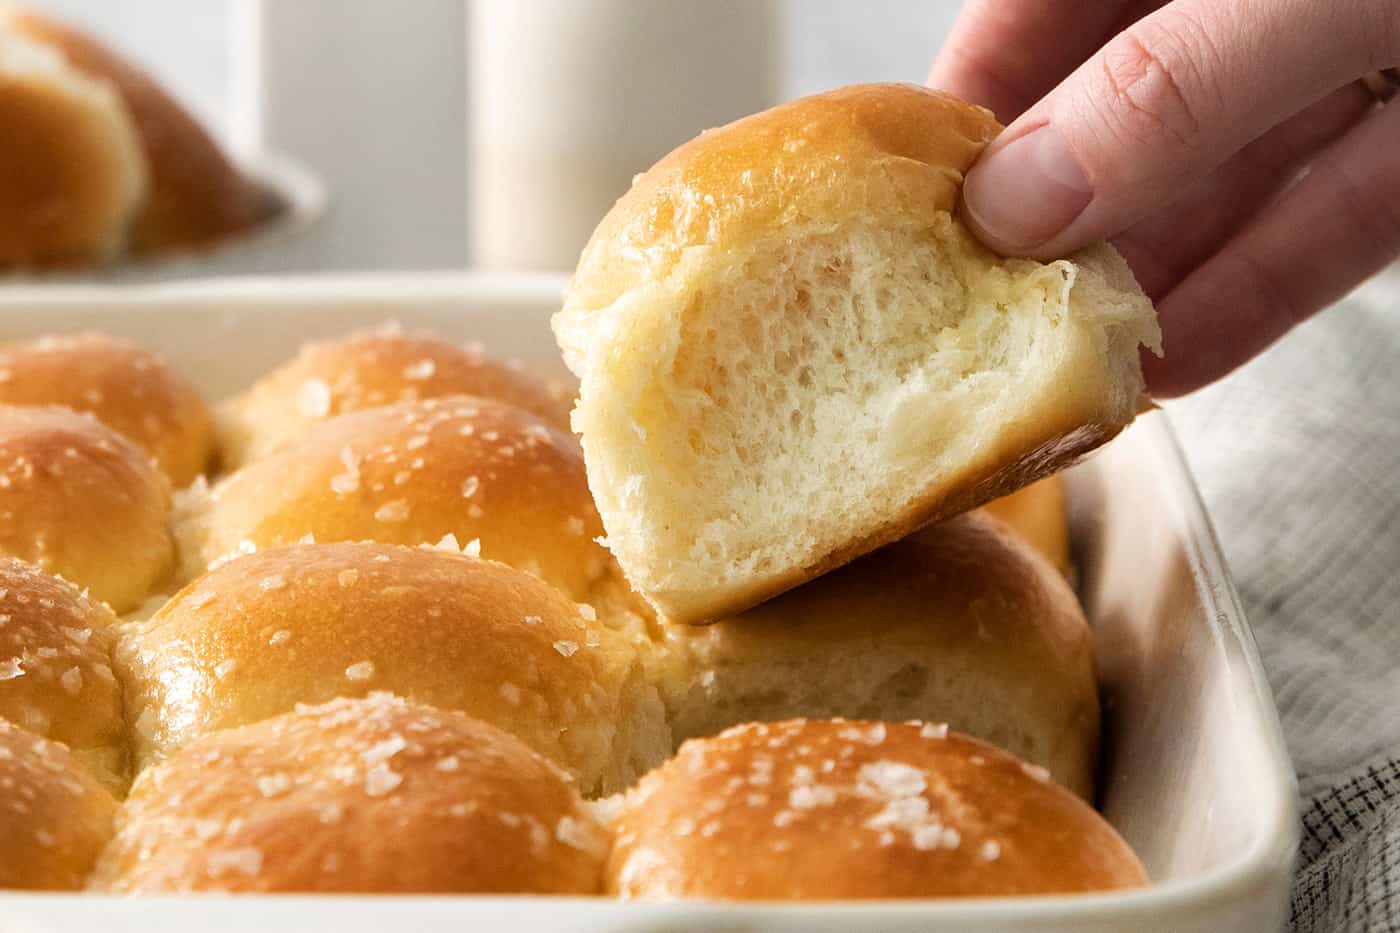
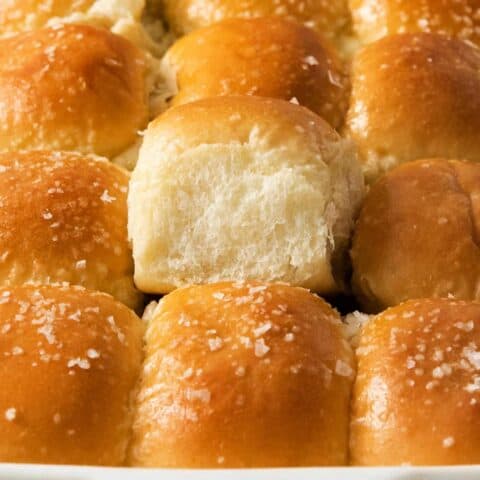
These homemade dinner rolls are a copycat of the classic Rhodes Rolls. They’re light and fluffy, with a delicately sweet and salty flavor. Plus they can be made in advance – perfect for both holidays and casual meals!
Pair these Rhodes Rolls with Sour Cream and Onion Tuna Noodle Casserole for a cozy dinner.

Copycat Rhodes Dinner Rolls
Gorgeously fluffy and delicately sweet & salty, these homemade Rhodes Rolls are exactly what your holiday meals are begging for!
With this copycat recipe, I share how easy it is to customize the dinner rolls with different flavors, plus how to make them in advance – which is perfect for entertaining. We like to eat these rolls with sweet cinnamon honey butter, alongside a holiday turkey – and they’re awesome for mopping up a bowl of soup!
Why You’ll Love These Homemade Rhodes Rolls
There’s just nothing like the smell or taste of warm yeast rolls, and these homemade rhodes rolls are absolutely heavenly! Here’s why you’ll love this rhodes rolls recipe:
- Simply wonderful homemade bread recipe. There’s just something special about serving homemade bread. Everyone loves these rhodes rolls, whether I serve them for a special holiday meal or with casual bowls of chicken wild rice soup or lasagna soup.
- Better than the store-bought. While we absolutely buy rolls from the store, these homemade rhodes dinner rolls are just so much better. They’re oh-so-fresh and tender, and make the house smell amazing while they’re baking.
- Sourdough without the sourdough. I love these rolls because they have a hint of sourdough flavor (see the secret ingredient below) but you won’t need a sourdough starter to make them!
“I can’t believe how good and how easy these were to make. I’ve tried sooo many dinner roll recipes…Thank You! This is the best! I topped them with melted butter before and after baking…can’t wait to try them with Thanksgiving ham and turkey.”
Niecy

Recipe Ingredients
Here’s what you’ll need to make these rhodes dinner rolls.
Scroll down to the printable recipe card at the end of this post for the exact ingredient amounts.
- Water – Warm water helps to activate the yeast and provides moisture to the rolls. Make sure it’s warm – but not too hot, or it will kill the yeast.
- Sugar – Sugar acts as food for the yeast, offering soft, fluffy rolls. Honey can also be used if you prefer.
- Yeast – Active dry yeast helps the dough rise and gives the rolls a delicious flavor and aroma.
- Flour – Flour gives the dough structure. Classic all-purpose flour is best for this recipe.
- Diastatic malt powder – This is the secret ingredient I mentioned! Malt powder is optional, but it gives the rolls that classic lightly sour yeasted flavor, while also providing a boost in rising and browning. I like King Arthur Flour’s diastatic malt powder. Note that diastatic malt powder is not the same as malted milk powder which is much sweeter.
- Salt – A bit of kosher salt lightly seasons the dough.
- Canola oil – This adds a touch of richness and helps keep the rolls light and tender.
How to Make Rhodes Rolls From Scratch
Making homemade bread is very therapeutic for the baker. Plus everyone will love you for it! I’ve included a summary of how to make these rolls below. The full instructions are in the recipe card at the bottom of this post.


- Activate the yeast. In a small bowl or measuring cup, combine the warm water (110° to 115° F, which is nice and warm, but not hot) and 1 teaspoon of the sugar. Sprinkle the yeast over the water and let it sit for 5-10 minutes, until it has a frothy, creamy appearance.
- Combine the dry ingredients. In the bowl of a stand mixer, combine the remaining sugar, plus the flour, malt powder, and salt.


- Create the dough. Add the activated yeast mixture and canola oil to the dry ingredients, then mix on low speed with a dough hook until a shaggy dough forms.
- Knead the dough. Knead the dough with the dough hook, on medium-low speed, until it becomes smooth and elastic, and is no longer sticky.
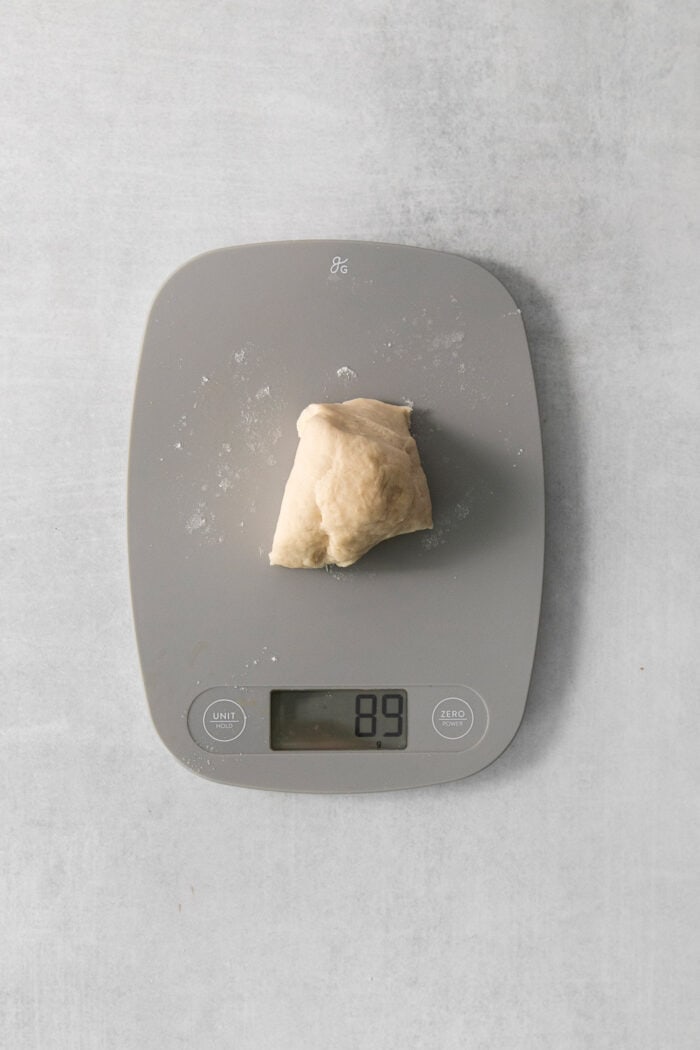
- Portion the dough. Lightly flour your work surface and divide the dough into 12 equal portions. I like to weigh all of the dough, then divide that amount by 12. This ensures that all the rolls are the same size.


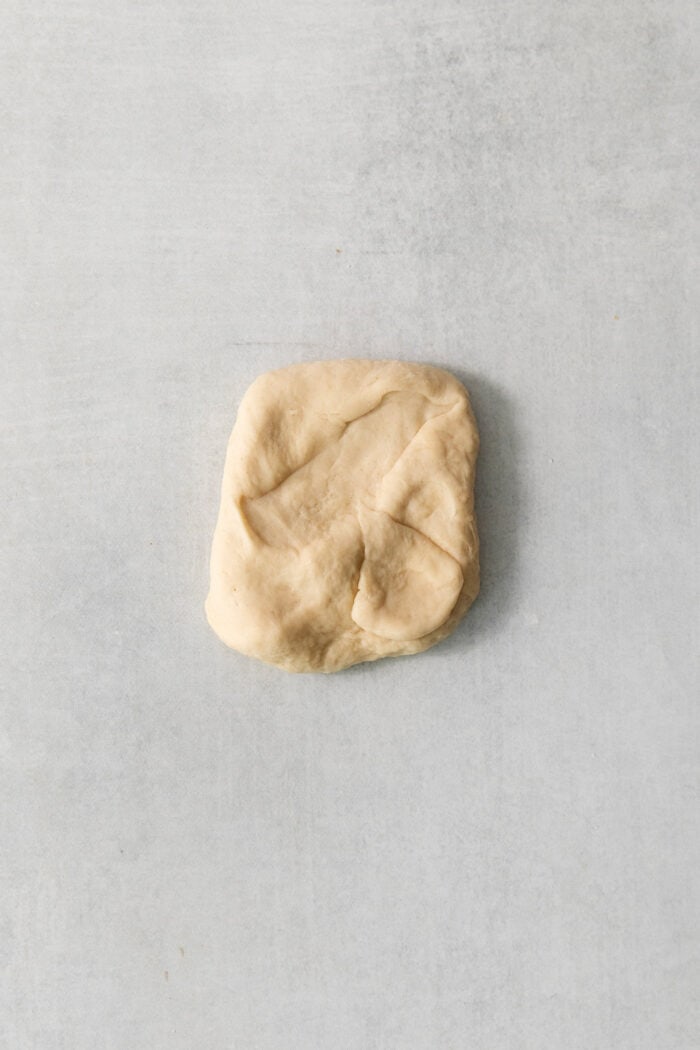
- Shape. To shape the rolls, gently flatten a piece of dough into a rough 2” square and then fold the edges over into the center. Continue pinching the edges into the center until you have a tight ball. Then pinch the center to seal it closed. Then roll the dough ball, seam side down, on the counter a few times to really seal it.


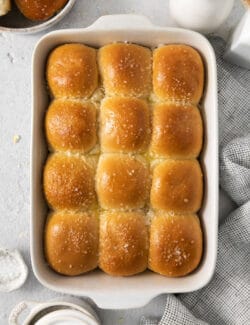
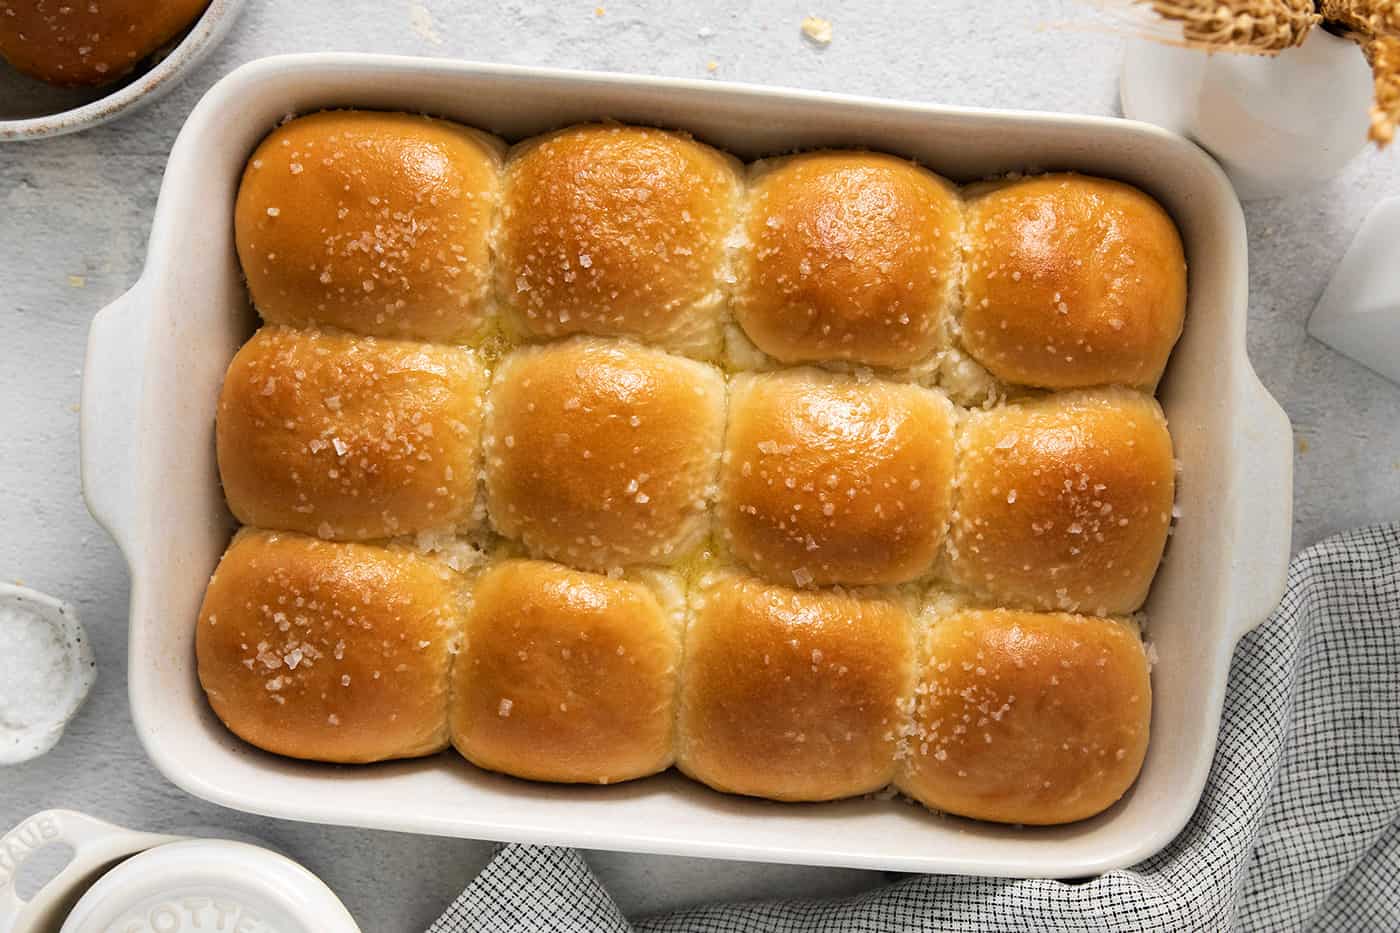
- Proof. Place the rolls in a lightly greased 9×13-inch baking dish and cover with plastic wrap (lightly spray it first, so it doesn’t stick to the dough) or a clean dish towel. Let rise in a warm spot until the rolls expand and fill the pan, nearly doubled in size.


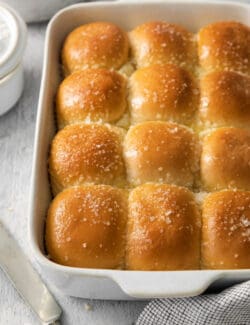
- Bake. Bake the rolls in a 375° F oven for 18-20 minutes, until they’re puffed-up and golden brown.
- Finish. Top the rolls with one of the recipe variations detailed below, if desired. The honey-butter variation is shown in the photos.

Recipe Variations
I’ve included some flavorful variation options for finishing your pan of homemade rolls below. Also feel free to try out your own ideas!
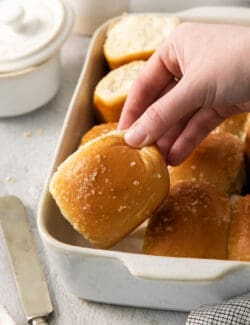
- Classic Butter: Brush the hot rolls with 3 tablespoons of melted butter and sprinkle over 1 teaspoon of flaky sea salt.
- Honey Butter: Combine 2 tablespoons of honey with 3 tablespoons of melted butter. Brush the honey butter over the hot rolls, then sprinkle 1 teaspoon of flaky sea salt over the top.
- Herb Butter: Combine 3 tablespoons melted butter, 1 teaspoon minced fresh parsley, 1 teaspoon minced fresh chives, and ½ teaspoon minced fresh rosemary. Brush this over the rolls and sprinkle with 1 teaspoon of flaky sea salt.
- Garlic-Parmesan Butter: Combine 3 tablespoons of melted butter, 1 teaspoon of minced fresh parsley, and ½ teaspoon of garlic powder (not garlic salt). Brush this over the hot rolls. Then sprinkle ¼ cup grated Parmesan cheese over the top, plus 1 teaspoon flaky sea salt.
Tip: If finishing your rolls with flaky sea salt, I recommend Maldon sea salt flakes!

Tips for Success
Here are a few easy tips that will help you make these rolls perfectly every time:
- Use fresh yeast. Yeast packages are marked with an expiration date – check to make sure your yeast is not expired.
- Measure the flour correctly. Spoon and level your flour; do not scoop it out of the bag/container with your measuring cups. This helps the flour stay fluffy and loose, so you measure it correctly and don’t add too much. Too much flour can result in a dense dough and less-than-fluffy rolls.
- Don’t over-knead. To achieve gorgeously fluffy rolls, immediately stop kneading the dough when it becomes smooth and elastic, and is no longer sticky to the touch.
- Let the dough rise in a warm place. For the ultimate fluffy rolls, the dough needs a warm environment to help it rise. If your kitchen isn’t quite warm enough, you can let the dough rise in a just-warm oven. Set the oven to heat to 200° F, and watch the temperature as it rises. When it’s at 110° F, turn the oven off, place the dough inside, with a clean towel over the top (no plastic wrap in the oven!). Then leave the oven door open just slightly, and proof the dough until it has nearly doubled in size.

How to Make Yeast Rolls Ahead of Time
There are a variety of ways for you to make these rolls in advance:
- Make the rolls the day before. To make these rolls a day in advance, follow the recipe as written. Then, in Step 7, instead of allowing the rolls to rise at room temperature, place them wrapped in plastic (lightly spray the plastic first, so it doesn’t stick to the rolls) in the fridge overnight. The next day, let the rolls rise for 1-2 hours in a warm spot, or until they’re doubled in size, and then bake as written in Step 8.
- Freeze the dough rolls (unbaked). Follow the instructions above for making the rolls ahead of time. But instead of refrigerating overnight, freeze the dough rolls in a baking pan. They won’t stick together once they’re frozen, and then you can place them in a freezer-safe bag or container for up to 2 months. To bake, place the frozen dough balls into a lightly sprayed pan and let them thaw and rise. Frozen rolls will take longer to rise, so allow 3-5 hours. Then bake according to instructions.
- Freeze the baked dinner rolls. You can also bake your rolls ahead of time, then let them cool on a wire rack. Remove them from the baking dish, place them in a freezer-safe container or baggie, and freeze for up to 3 months. To reheat, place the thawed rolls back in the baking dish, cover with foil, and warm them in the oven at 200° F.

Ways to Enjoy Your Rhodes Rolls
These rolls are a classic for holiday meals, the perfect side to turkey and mashed potatoes, or Crockpot Ham with Orange-Brown Sugar Ham Glaze and Ham Gravy. But they’re equally wonderful with simpler meals:
- To mop up soup and stew. Serve rhodes rolls with a steaming bowls of potato soup, savory squash soup, or with spicy lentil soup. Or with heartier stews, such as my Italian crockpot beef stew, Irish beef stew, or slow cooker beef barley stew recipes.
- To swipe up salad. I like a soft dinner roll to swipe up all the deliciousness of a good salad, like this roasted beet salad or my winter apple salad.
- Spread with flavored butter. We love a good schmear of butter around here. Try my cowboy butter recipe (fabulous with grilled steak!). Or a sweet butter, such cinnamon honey butter, blueberry butter, or this super delightful lemon-vanilla bean butter.
- For sandwiches. Use these fluffy rolls for sliders or breakfast sandwiches, or stuff them with tuna salad, chicken salad, ham salad, or egg salad. They also make some pretty amazing leftover turkey & cranberry sandwiches after Thanksgiving!
How to Store Extras
Here’s what to do with any leftover homemade rhodes rolls:
- Counter – Place leftover rhodes rolls in an airtight container and store them at room temperature for up to 3 days.
- Fridge – Place the rolls in an airtight container and store them in the refrigerator for up to 1 week.
- Freezer – Place the rolls in a freezer-safe baggie or container and freeze for up to 2 months. To serve, thaw the rolls in the fridge before reheating on a baking sheet in a 200° F oven.
More Easy Baking Ideas
Rhodes Rolls
Ingredients
- 1½ cups warm water 110° to 115° F, which is nice and warm, but not hot
- ¼ cup granulated sugar divided
- 2¼ teaspoons 1 packet active dry yeast
- 4 cups all-purpose flour
- 1 tablespoon diastatic malt powder not malted milk powder – I recommend King Arthur brand
- 1 teaspoon salt
- ¼ cup canola oil
Instructions
- In a small bowl or measuring cup, combine the warm water and 1 teaspoon of sugar. Sprinkle the yeast over the water and let it sit for 5 minutes until it becomes frothy on top.
- In the bowl of a stand mixer fitted with the dough hook, combine the remaining sugar, flour, malt powder, and salt.
- Pour the activated yeast mixture and canola oil into the dry ingredients, then mix on low speed until a shaggy dough forms. The dough will be stiff at first, but just keep kneading and it will come together. Press the dough down into the bowl with a rubber spatula if needed.
- Knead the dough on medium-low speed for 5-7 minutes, or until it becomes smooth and elastic, and is no longer sticky.
- Lightly flour your work surface and divide the dough into 12 equal portions. I like to weigh the dough and divide that amount by 12, to ensure all the rolls are the same size.
- To shape the rolls, gently flatten a piece of dough into a rough 2” square and then fold the edges over into the center. Continue pinching the edges into the center until you have a tight ball. Then pinch the center to seal it closed. Roll the dough ball, seam side down, on the counter a few times to really seal it.
- Place the rolls in a 9×13-inch baking dish that has been lightly greased with nonstick cooking spray and cover with plastic wrap (lightly spray the plastic first, so it doesn't stick to the rolls) or a clean dish towel. Place in a warm spot to rise, until the rolls have filled the pan and almost doubled in size, about 1-2 hours.
- Preheat oven to 375° F. Bake the rolls for 18-20 minutes, or until they are golden brown.
- Top with one of the variations below, if desired. The honey-butter variation is shown in the photos.
Notes
- Classic Butter: Brush the hot rolls with 3 tablespoons of melted butter and sprinkle over 1 teaspoon of flaky sea salt.
- Honey Butter: Combine 2 tablespoons of honey with 3 tablespoons of melted butter. Brush the honey butter over the hot rolls, then sprinkle 1 teaspoon of flaky sea salt over the top.
- Herb Butter: Combine 3 tablespoons melted butter, 1 teaspoon minced fresh parsley, 1 teaspoon minced fresh chives, and ½ teaspoon minced fresh rosemary. Brush this over the rolls and sprinkle with 1 teaspoon of flaky sea salt.
- Garlic-Parmesan Butter: Combine 3 tablespoons of melted butter, 1 teaspoon of minced fresh parsley, and ½ teaspoon of garlic powder (not garlic salt). Brush this over the hot rolls. Then sprinkle ¼ cup grated Parmesan cheese over the top, plus 1 teaspoon flaky sea salt.

Made them they were absolutely awesome. I mean they couldn’t get any better. I did notice that on my diastatic malt powder, it said use 1 teaspoon for 3 cups of flour. I noticed the rolls had a yeasty smell to them. They was delicious. They tasted good but was wondering your recipe cost for 1 tablespoon can I cut back on that so it don’t smell so yeasty
Hi Pam – I’m so glad you liked these rolls! I haven’t experimented with using less of the malt powder. If you do, please let me know how it goes. Thank you! -Brenda
Can I put them in a muffin pan to make them like Rhodes frozen rolls
Hi Heather – I have not tried this myself. But I do think it IS worth trying! If you do, please come back and let me know. Thank you! – Brenda
I made these rolls exactly like you said and they turned out absolutely perfect! Thank you so much! One question can I make a loaf of bread out of the rolls. Thank you so much, this is the only homemade bread that’s ever worked for me!!!
Hello Deborah – YAY!! I’m so happy you loved this recipe. I have not made a loaf with this recipe, but I’m betting it would work. Please come back and let me know if you give it a try. Thank you for coming back here to let me know you loved the recipe! :)
I made these again and they turned out fantastic thank you so much they’re perfect!!!
LOVE this!!! :)
Excellent flavor!!!! How can this be so easy and flavorful? Light and fluffy just like you get in restaurants. I cut the recipe in half and it still made a standard pie plate of fluffy golden brown masterpieces!! GAME CHANGER!!!
So happy to hear this! Thank you so much for coming back here to rate the recipe and let me know! :)
I can’t believe how good and how easy these were to make. I’ve tried sooo many dinner roll recipes…Thank You! This is the best! I topped them with melted butter before and after baking…can’t wait to try them with Thanksgiving ham and turkey.
I’m so happy to hear you finally found a homemade dinner roll recipe!! Happy Thanksgiving!