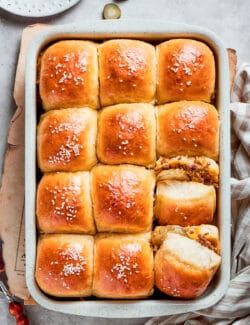

This easy Cheeseburger Sliders recipe features all the flavors of a classic cheeseburger, but with less time and effort, as you don’t need to bother with making individual patties. It’s perfect for feeding a crowd and easy to prep ahead of time!

I love a good cheeseburger, and I’ve found many ways to highlight its delicious flavors – Cheeseburger Soup, Cheeseburger Pizza, and Cheeseburger Pizza Rolls are family favorites. This Cheeseburger Sliders recipe makes fun, easy work out of creating cheeseburgers for a crowd. And they are unbelievably tasty!
Why We ❤️ This Cheeseburger Sliders Recipe
Cheesy comfort food is everything our family loves. We make these sliders for dinner time, game time, and everything in between! Here’s why we love cheeseburger sliders:
- Mini cheeseburgers are FUN! These sliders make people smile. They offer everything you love about cheeseburgers, but in a three to four-bite package. All of the familiar flavors of a cheeseburger are there, but just in smaller form.
- Quick & easy. This low-fuss recipe comes together quickly, without much effort.
- Great for parties. This is always a crowd-pleaser of a dish and it’s easily doubled to serve more people. Plus there’s no need to fire up the grill and flip burgers for a crowd!

What You’ll Need
Here’s everything you’ll need to make these sliders. Scroll down to the printable recipe card at the end of this post for the exact ingredient amounts.
- Ground beef – This burger recipe calls for a pound of lean ground beef.
- Onion – I like to use a yellow onion, but a red onion is also good.
- Salt & pepper – Simple, classic seasonings add flavor.
- Garlic powder – This adds delicious garlic flavor in a super simple way.
- Condiments – Use your favorite brands of ketchup, mayonnaise, and yellow mustard.
- Worcestershire sauce – For a bit of umami flavor.
- Smoked paprika – This adds a little smoky undertone. You could substitute it with regular paprika.
- Dinner rolls – You’ll need a 12-pack of your favorite rolls. We love Hawaiian roll cheeseburger sliders! (made with King’s Hawaiian Original Sweet Rolls)
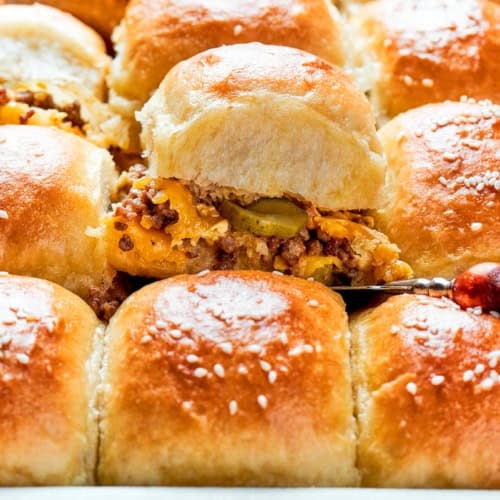
- Cheddar – We like to use medium cheddar but you can use your preferred cheddar, or try another cheese of choice.
- Dill pickles – Slices of Dill Pickles are the traditional cheeseburger pickle.
- Butter – I like to brush some butter over the tops of the buns so they bake up toasty and extra tasty.
- Sesame seeds – A little sprinkling of sesame seeds over the tops of the rolls give them that familiar hamburger bun look, texture, and flavor.

How To Make Cheeseburger Sliders
This is an easy slider recipe – here’s my method! Find the detailed instructions in the recipe card lower down.


- Prep. Preheat the oven to 350°F. Line a baking dish with parchment paper.
- Cook beef and onion. In a skillet over medium heat, cook the ground beef and onion, seasoned with black pepper, salt, and garlic powder. Cook until the beef is browned and cooked through.


- Stir in condiments & seasonings. Add the ketchup, mayonnaise, yellow mustard, Worcestershire sauce, and smoked paprika. Stir to incorporate.


- Add rolls to pan. Slice the rolls in half horizontally and place the bottom layer of rolls in the prepared baking dish.
- Layer cheese. Place cheddar slices over the bottom layer of rolls.


- Add beef. Spread the seasoned ground beef over the cheese.
- Add cheese and pickles. Place more cheese over the beef, then add the pickle slices.


- Top with rolls. Cover with the top layer of rolls.
- Brush with butter. To finish, brush butter over the tops and sprinkle with sesame seeds.
- Bake. Cover the pan with foil and bake for 15-20 minutes, then remove the foil and bake 1-3 minutes more.

Tips & Variations
Follow these simple tips to help your cheeseburger sliders turn out just right:
- Drain excess fat. When the beef and onion finish cooking, be sure to drain away any excess fat and liquid. Otherwise, the additional grease and liquid can make the buns soggy.
- Line buns with cheese. I like to line the bottom buns with cheese slices, to create a barrier between the bun and beef – so any remaining fat and liquid don’t soak into the bottom bun.
- Brush buns with butter. Not only does this add delicious flavor, but it also adheres the sesame seeds to the buns.
- Other toppings. Layer in thinly sliced red onions, crumbled bacon, or sauteed mushrooms.
- Heat things up. If you like a kick of heat, sprinkle some dried red pepper flakes into the beef or stir in some Sriracha.
- Different pickles. Go beyond dill pickles and serve these sliders with Bread & Butter Pickles, Pickled Jalapenos, or Pickled Red Onions.
- Double the recipe. This is an easy recipe to double – just use two 9″ x 13″ baking dishes or place both sets of sliders in one 10″ x 15″ pan.

Serving Suggestions
Serve your cheeseburger sliders as an appetizer, quick lunch, or turn them into dinner with a side of fries, potato salad, a green salad, and more. Here are a few more suggestions:
- Salad. My Creamy Cucumber Salad is an always-welcome side. I also like to make Dill Potato Salad or Creamy Coleslaw with sliders.
- Fries. Fries and burgers were meant to be together. I love a big plate of fresh Truffle Fries with cheeseburger sliders. For a little different take on fries, or why not make Fried Pickles?
- Veggies. Make Grilled Asparagus or Potatoes with roasted garlic vinaigrette for something a bit heartier. Or, serve a bowl of pickled vegetables like my Quick Pickled Carrots or Quick Pickled Beets.
To Make Ahead
You can pre-make these cheesy ground beef sliders earlier in the day or the evening before. Just cover and refrigerate them. Bake according to the recipe instructions, adding an extra 3-5 minutes of baking time, to get everything hot and the cheese melty.
How To Store Leftovers
Sliders are best eaten on the day that they’re made, but you can certainly keep leftovers and reheat them later if needed. Here’s how to do it:
- Fridge – Place the cooled sliders in an airtight container and store them in the fridge for up to 4 days.
- To Reheat – Add the sliders to a baking sheet or baking dish and reheat them at 350°F until they’re heated through and the cheese is melted.
More Ground beef Recipes To TRy
Cheeseburger Sliders
Ingredients
- 1 pound lean ground beef
- ½ cup finely diced yellow onion
- 1 teaspoon black pepper
- ½ teaspoon Morton kosher salt
- ½ teaspoon garlic powder
- ¼ cup ketchup
- 2 tablespoons mayonnaise
- 1 teaspoon prepared yellow mustard
- 1 teaspoon Worcestershire sauce
- ¼ teaspoon smoked paprika
- 1 package (12 ounces total) 12-count dinner rolls (such as King's Hawaiian Original Sweet Rolls)
- 8 slices medium cheddar
- 24 dill pickle slices
- 1 tablespoon salted butter, melted
- ½ teaspoon sesame seeds
Instructions
- Place oven rack in center of oven. Preheat oven to 350°F. Line a 9" x 13" baking dish with parchment paper and set aside.
- Place a medium-sized skillet over medium heat. Add ground beef and onion, and break up the beef with a spatula. Season with black pepper, salt, and garlic powder, and stir to combine. Cook until beef is browned and cooked through, then remove skillet from heat. Spoon away any excess fat and juices.
- To the beef, add ketchup, mayonnaise, yellow mustard, Worcestershire sauce, and smoked paprika, and stir until evenly combined.
- Slice the rolls in half horizontally, all the rolls still attached to each other. Place the bottom layer of rolls in the prepared baking dish.
- Place 4 slices of cheddar over the bottom layer of rolls, cutting the cheese as needed to fit.
- Spread the seasoned ground beef in an even layer over the cheese slices, using the spatula to create a squared-off edge around the entire perimeter.
- Place remaining 4 slices of cheddar over the top of the ground beef, cutting the cheese as needed to fit.
- Top individual sliders with 2 pickle slices each. Then place the top layer of rolls on top, and press down gently to snuggle everything together.
- Brush melted butter over the tops and immediately sprinkle with sesame seeds.
- Cover pan tightly with foil. Place pan on center rack and bake 15-20 minutes, until thoroughly warmed. Remove foil and bake 1-3 minutes more, until cheese is melty and tops are toasted to your liking.
- Remove from oven and let rest a few minutes. Offer extra ketchup on the side for dipping, if desired.
Notes
Nutrition Information:
This post was originally published in 2011, then updated in 2025.

These were great, so tasty and easy – I will make again!
Thank you so much!
Looks so yummy. Thinking during the 4th for sure!
Love. It.
Oh my goodness this looks delicious! I love sliders, they are literally the perfect size.
Those goodies are so delicious!! Great to hear from you, Brittany – thanks!
Holy moly – now THAT’S a burger! Wow!
These look Great! In fact, they look like supper tonight! Except I will be using ground pork, of course! It was fun meeting you last week and I love your blog!
SO NICE to hear from you, Dianne! I’ve been looking at my garden, which is in a pretty pathetic state right now – and thinking about your garden, wishing mine was even half as beautiful. It was great to get your comment on facebook – thanks for letting me know you loved this!!
My husband always grills the buns! He’d love to have a few of these sliding down to his stomach right now. Delicious!
This look DELICIOUS!!! and I love to grill our buns too!!