

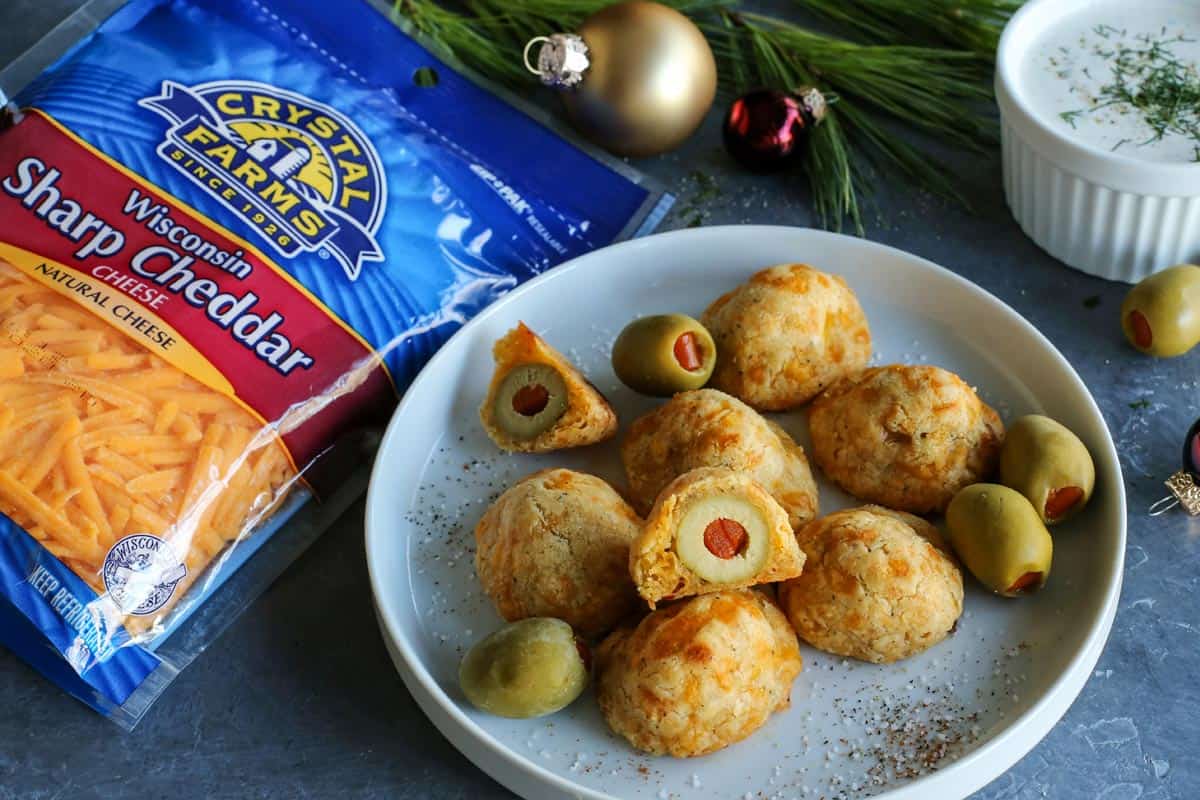
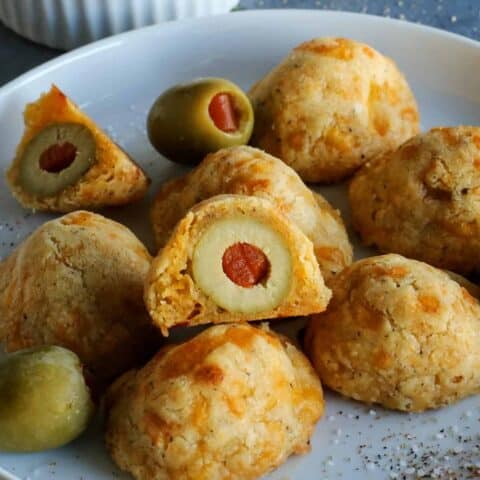
This baked Olive Cheese Balls recipe features flaky, tender, cheesy dough wrapped around a juicy, briny green olive. It’s a fun and easy appetizer recipe that’s perfect for entertaining, as you can make these ahead and even freeze them for later!

My mom’s worn, handwritten recipe card calls this easy Olive Cheese Balls recipe “Olive Surprises”. You just gotta love it! This retro recipe tucks pimento-stuffed green olives inside a buttery cheddar cheese dough, then it’s popped into the oven. The exterior bakes up flaky and tender, while the olive inside is warm and salty-juicy. Biting into one of these little baked olive cheese balls is definitely a “surprise”, with a big burst of flavor and texture!
Why We ❤️ this Easy Olive Cheese Balls Recipe
Our family loves to dip. Appetizers, that is! We just add a side of homemade ranch or honey mustard dipping sauce, and we’re all set. Here’s why we love this recipe:
- Easy to make ahead. This recipe is great for entertaining, or any time you simply want everything prepped ahead of time – and easy to make in bulk, for a crowd.
- A classic. I love the retro feel of this appetizer that dates back to the 1950’s – it’s the kind of nibbles you want to serve with a martini. This appetizer always makes people smile – it’s fun and irresistibly delicious!
- Delightful flavors & textures. Flaky, buttery, cheesy pastry + juicy, briny olives = one heckuva delightful appetizer!
Ingredients for Cheese Balls with Olives
Just grab these six ingredients to make little olive-stuffed balls. Here’s a look at what you’ll need. Find the exact ingredient amounts in the printable recipe card at the end of this post.
- Olives – I use Queen olives that are stuffed with pimento, the classic martini olive. These are large, plump Spanish olives that are semi-firm and meaty, with a burst of briny flavor.
- Butter – Use unsalted butter, as there’s enough sodium in the cheese and olives.
- Cheddar – I like to use sharp cheddar. You can shred your own or use a brand such as Crystal Farms® Shredded Sharp Cheddar.
- Flour – All-purpose flour creates the base of the cheesy dough.
- Paprika – This adds a little smoky warmth.
- Salt & pepper – To simply season the cheesy dough.


How To Make Olive Cheese Balls
This is how we make cheese balls with olives – just follow along with the photos! Find the detailed instructions in the recipe card at the end of this post.
- Drain the olives. First, drain the olives and let them dry on a paper towel.
- Make the dough. First combine the butter and sharp cheddar. Then add the flour, paprika, salt & pepper, and mix again.

- Form dough into a ball. Mix the dough until it holds together to form one large ball.
- Portion out dough. Divide the dough into 18 smaller pieces and roll into balls.
- Flatten balls. Place a dough ball in the palm of your hand, and press it flat using your thumb.
- Stuff with olives. Place an olive in the center of the flattened dough and mold the dough around the olive.
- Refrigerate. Place the olive cheese balls on a sheet pan and chill in the refrigerator for 1 to 2 hours.


- Bake. Preheat the oven to 400°F, then bake the cheese balls for about 15 minutes.
- Serve. Let the baked cheese balls cool on the pan for a few minutes before serving warm.

Tips & Variations
This a beautifully simple recipe that yields a super flavorful bite-sized appetizer. Make this recipe as-written or mix things up. Here are a few variations suggestions plus some helpful tips:
- Parmesan Jalapeno Ranch variation. For a spicier version of these olive cheese balls, I trade the sharp cheddar for Parmesan, swap out pimento-stuffed olives for those with jalapenos, and add dry ranch seasoning to the dough. See the Notes at the bottom of the recipe card for detailed instructions on how to make these!
- Use soft butter. Be sure to bring your butter to softened room temperature so that it easily blends with the shredded cheese and other dough ingredients.
- Dry the olives. I also highly recommend that you let the olives dry on a paper towel after you drain them – or simply pat them dry with paper towels if you’re short on time. This helps the cheesy dough stick to the olives better.
- Chill the cheese balls. Allow time for the cheese balls to chill in the fridge before you bake them. If the dough is too warm, it can spread and the cheese balls will lose their rounded shape.
- Try another variety of olive. You can use any type of olive you like in these cheese balls with olives – just make sure to use pitted olives. For smaller cheese balls, I like to use pimento-stuffed Spanish Manzanilla olives – note that this will also yield more cheese balls, and may take a little less time to bake.
- Other cheese. Try another cheese, like I do with my Parmesan Jalapeno Ranch variation. You could also try pepper jack or mild cheddar in place of the sharp cheddar.
To Make Ahead and Freeze
- Make ahead. You can make the cheese balls up to 24 hours in advance – this is where it’s really important that you dry the olives before making the cheese balls. Place the unbaked cheese balls in an airtight container in the fridge, with a layer of plastic wrap pressed over them. Then place them on a sheet pan and bake according to the instructions on the recipe card.
- Freeze for later. Place unbaked olive cheese balls on a sheet pan and freeze for 2-3 hours. When frozen, transfer the balls to a freezer-safe baggie and freeze for up to 1 month. Thaw on a paper towel for 5 minutes to absorb moisture, then place on a baking sheet and bake according to recipe card instructions. Frozen olive cheese balls may take a little longer to bake.

Serving Suggestions
This crowd-pleasing appetizer is fun to serve any time of year. I like to bake these during the holidays and football season as much as I enjoy them on a warm summer day on the backyard patio.
- Dip! Homemade buttermilk ranch is my family’s first choice when it comes to a dipping sauce. The creaminess goes so well with the tangy, briny flavor of the olive cheese balls. Honey mustard dipping sauce is also fun.
- Cocktails. A refreshing homemade cocktail perfectly cuts the rich and briny flavors in this bite-size appetizer. Make a classic gin & tonic or a classic mojito. Or think along the lines of aperitivo hour in Italy, and serve an Aperol spritz, a Campari spritz, or a limoncello spritz – a Negroni or Americano cocktail would also fit right in. A chilled glass of Spanish tinto de verano or sparkling white wine would be a delightful choice on a summer day. Browse my drinks section for the perfect sip!
Proper Storage
Here’s how to store any leftover olive cheese balls:
- Fridge – Placed cooled cheese balls with olives in an airtight container and store them in the fridge for up to 5 days.
- Reheat – Place the cheese balls on a baking sheet and heat them in a 300°F oven until warmed.
More Easy Appetizers
Olive Cheese Balls
Ingredients
- 18 Queen olives stuffed with pimento
- ¼ cup unsalted butter, at soft room temperature (but not melty)
- 4 ounces shredded sharp cheddar
- ½ cup + 1 tablespoon all-purpose flour, divided
- ¼ teaspoon paprika
- ¼ teaspoon Morton kosher salt
- ¼ teaspoon black pepper
Instructions
- Drain olives and place them on a paper towel to dry.
- In a small bowl, combine butter and shredded sharp cheddar with a wooden spoon. Add flour, paprika, salt, and pepper. Mix as well as you can with the wooden spoon, and then finish by combining with your hands. It will turn into a moist, dense dough that you can easily form into a ball.
- Divide the large ball of dough into 18 smaller portions. I like to use a small 2-teaspoon scoop, tightly packed. Roll each portion into a ball and place it in the palm of one hand. With the thumb of your other hand, press the dough ball to flatten it. Place an olive in the center of the flattened dough and mold the dough up around the olive. Give it a gentle roll between your palms to finish. Place olive cheese balls two inches apart on an ungreased baking sheet. Cover tightly and refrigerate for 1 to 2 hours.
- Preheat oven to 400°F. Place chilled baking sheet in oven and bake for about 15 minutes, or until lightly browned. Let cool on the baking sheet for 5 to 10 minutes before serving. These are best when eaten while still warm. Serve with homemade buttermilk ranch if you like to dip!
Notes
Nutrition Information:
This post was first published in 2019, then updated in 2024.

I made these fir the first time for a sunset boat cruise and everyone loved them. I received comments, “These taste like Red Lobster cheddar biscuits”. “These are good and I’m not much of an olive fan.” I bought Spanish Queen olives which are huge so the dough covered only 10 olives. It just meant more to enjoy with each bite! Delish!
SO HAPPY to hear this. I love sunset boat cruises – and this sounds like a wonderful way to enjoy a sunset! Thank you for coming back to let me know. :)
Love these but would like to know if I can make ahead of time? 1. Keep in fridge till I’m ready to bake 1-2 days?
Or bake and warm up before serving? Help?
I think these sound wonderful! How about using black olives and feta cheese or another Greek cheese with Mediterranean seasoning and Tzakziki sauce for the dip? I love black olives and anything
Mediterranean.
Have been making these for years & years! What I do now…less fuss! Roll dough into a log. I have a tiny tart pan, 1 3/4 inch diameter…. Cut dough into slices….press into tart pan…..place a olive inside each pastry. The pastry puffs up almost covering the olive as it bakes. Looks like a olive tart, but same taste as the balls & a whole lot easier!
Merry Christmas!
Well that’s awesome! Thanks for sharing!
I like to freeze and bake later.
We use old English cheese spread in little glass jars instead of grated cheese. Flour and butter and cayenne pepper. Make a dough and roll the green olives in and bake. Basically this recipe different cheese. So good.
Yum!
These were a huge HIT!!! I made them for New Years Eve and everyone enjoyed them so much!!! I didn’t have cheddar cheese in the house so I used pepper jack cheese which gave them a little kick and poof they were gone. Thank you for the great recipe that I will surely make over and over again. Happy New Year!!
I love to hear this, Karen! And I like the pepper jack substitution. ALOT. :)
what a fun recipe or appetizer for entertaining as you write and great flavors too, thank you!
Talk about Karma. I was JUST telling someone the other day that my mom used to make these and how much I hated them as a kid. I have been wanting to try them as an adult because they contain some of my favorite things and I can’t believe I didn’t like them. Wallah! I will definitely be making these.
PERFECT timing! Enjoy!!
Oh my! It has been a long time since I have made these. Looking at your photos makes my mouth water.
I love that Grandma remembered these, too!! Thanks for sharing the recipe, Mom. :)
I am so excited about this recipe! These look so delicious. I am going to make them this weekend!! Thanks for this recipe!
Yay! Enjoy!