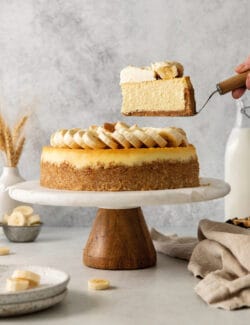
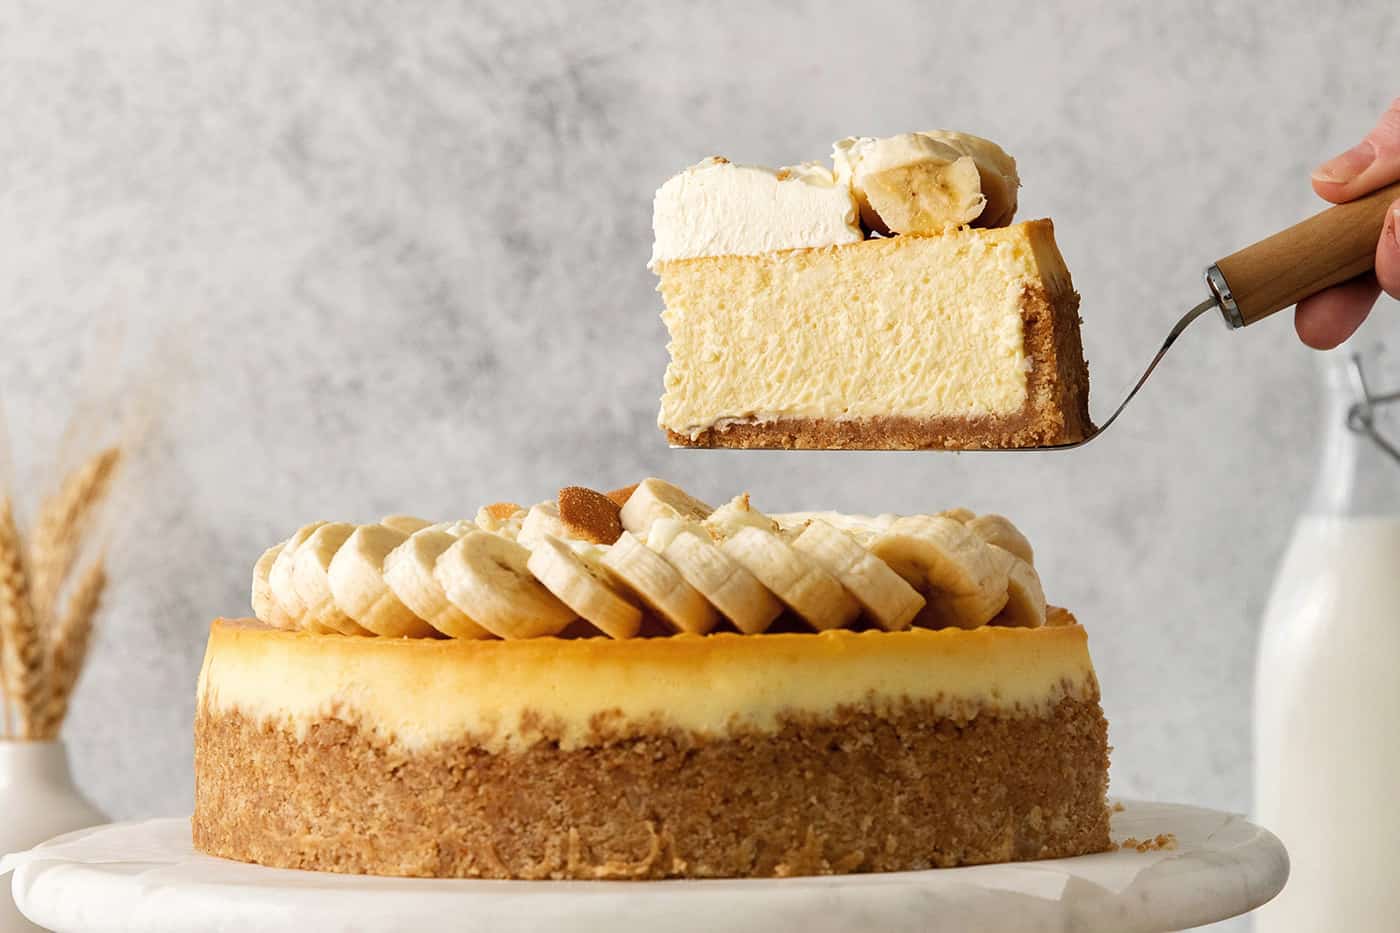
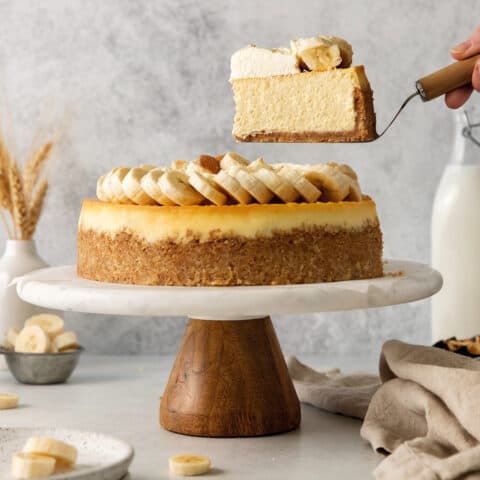
This Banana Pudding Cheesecake features a buttery Nilla wafer crust with a cool and creamy cheesecake filling that has sweet banana flavor – all topped off with a fluffy banana pudding whipped cream garnish!

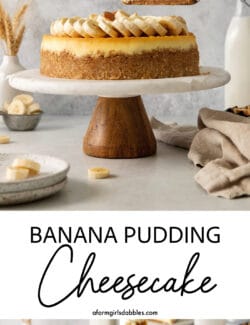
The Best Banana Cheesecake Recipe
This Banana Pudding Cheesecake features a Nilla Wafer crust and fresh slices of banana, plus a tangy, creamy cheesecake filling that’s infused with banana pudding flavor. And it’s topped with a fluffy banana pudding whipped cream garnish – I’m in love!!
Banana pudding is an irresistible childhood favorite. And that box of pudding mix makes an appearance in both the cheesecake filling and the whipped cream topping, ensuring each bite is infused with that classic flavor we know and love.
This banana cheesecake is a great make-ahead dessert, as it’s best after chilling for at least 6 hours. The homemade crust comes together in 10 minutes or so and the filling is easy to prepare.
Never made a cheesecake before? Be sure to check the tips section below for advice on how to bake a homemade cheesecake that doesn’t crack!
This was my first cheesecake I’ve ever made and I’m sooo impressed! My son who isn’t a fan of cheesecake but loves banana pudding absolutely loved this!
Chrystal

What You’ll Need
Each part of this cheesecake recipe is made with simple ingredients.
See the recipe card below for full measurements and instructions.
For the Crust
- Nilla wafers – Nilla Wafers are the star of any classic banana pudding. Although a classic graham cracker crust would always work!
- Honey – Honey gives delicious flavor to the crust, plus a bit of stickiness to hold it together.
- Cinnamon – Cinnamon adds a touch of warmth and spice that compliments the buttery cookies.
- Salt – Salt is a subtle delicious contrast to the sweetness in the cheesecake filling.
- Butter – Butter also holds the crust together, gives rich flavor, and helps the crust brown nicely.

In the Banana Pudding Filling
- Cream cheese – Cream cheese is the primary ingredient in the cheesecake layer. Make sure it’s fully softened – if it’s cold, you will end up with clumps of plain cream cheese in your cheesecake.
- Sugar – Granulated sugar sweetens the cheesecake.
- Sour cream – Sour cream adds another layer of tangy, rich flavor to the cheesecake. It also helps to lighten the texture a bit.
- Milk – Milk lightens the cheesecake so it isn’t overly dense. It also offers additional moisture to incorporate the dry banana pudding mix.
- Vanilla – Vanilla enhances the banana flavor, making it taste extra delicious!
- Banana pudding mix – Banana pudding mix helps add that classic “banana pudding” flavor to the cheesecake. Make sure to use an instant pudding mix, not a cook & serve variety. This is incorporated into both the cheesecake and the whipped cream topping to ensure this dessert really tastes like banana pudding!
- Flour – Flour absorbs extra moisture in the cheesecake to help prevent cracking.
- Eggs – Eggs add richness in flavor, plus a binding quality. They help turn the cheesecake layer into a creamy, custard-like consistency.

For the Topping
- Heavy whipping cream – Heavy cream is used to make whipped cream for garnishing the cheesecake.
- Powdered sugar – Powdered sugar sweetens the whipped cream and ensures a light, fluffy texture.
- Bananas – Last but not least, some fresh banana for the banana pudding cheesecake – this is always my favorite part to traditional banana pudding! Use raw sliced bananas to add fresh, fruity flavor. Just make sure to decorate the cheesecake right before serving as bananas will brown as they sit.


How to Make Banana Pudding Cheesecake
This dessert looks like it came straight from a bakery display, but don’t let that fool you into thinking it’s difficult to make – because it’s really very easy!
- Prepare the pan. Wrap the exterior of a 9” springform pan tightly with foil. Spray the interior lightly with nonstick baking spray.
- Make the crust. In a food processor, pulse the Nilla Wafers until they’re a fine crumb. Add the honey, cinnamon, and salt, then pulse to combine. On low speed, slowly add the melted butter. Then pulse until the mixture resembles wet sand.
- Bake the crust. Press the crust mixture into an even layer on the bottom of the pan and 1″ up the sides, so it’s 1/4″ thick. Bake for 10 minutes, then set aside to cool.


- Make the banana filling. Beat the cream cheese and granulated sugar until light and fluffy. Mix in the sour cream, milk, and vanilla, scraping down the sides as needed. Add the banana pudding mix and flour. Add the eggs one at a time, mixing on low speed.
- Prepare the water bath. Pour the cream cheese mixture into the baked crust. Transfer the springform pan to a baking pan with tall sides. Carefully add hot water to the baking pan until it’s 1/2″ deep.
- Bake the cheesecake. Bake for 60-90 minutes, until the center jiggles only slightly when shaken. I know this seems like a long time to bake, but this is a very thick cheesecake – there are 4 blocks of cream cheese in there!!
- Allow to cool. Turn the oven off and crack open the door. Cool in the oven for 1 hour, then remove from the oven. Remove springform pan from the water bath and chill in the fridge for at least 6 hours.


- Make the whipped topping. Beat the heavy cream, powdered sugar, and banana pudding mix until stiff peaks form.
- Decorate the cheesecake. Transfer the banana cheesecake to a serving platter. Spread the whipped topping over the center, leaving a border around the perimeter. Add a layer of sliced bananas around the bare perimeter. Top the whipped cream with a few whole Nilla Wafers, some crushed Nilla Wafers, and more banana slices.

What If I Don’t Have A Stand Mixer or Food Processor?
You can still make this easy banana pudding cheesecake if you don’t have these kitchen tools!
- To make the crust without a food processor: Place the Nilla Wafers into a large ziploc bag and crush them into a fine crumb using a rolling pin or kitchen mallet. Then transfer the crumbs to a large bowl and add the remaining crust ingredients. Stir to combine and follow the directions above.
- To make the filling and topping without a stand mixer: If you don’t have a stand mixer, use a hand mixer to make both the cheesecake filling and whipped cream.

Tips for the Best Homemade Cheesecake
If you’ve never made a cheesecake before, here are a few helpful tips:
- Wrap the springform pan tightly in foil. Wrapping the pan completely in foil, and making sure there are no holes, gaps, or cracks, ensures that water won’t seep through the 2-piece pan into the crust and cheesecake filling. If not wrapped adequately, water can enter the inside of the pan and cause the cheesecake crust and filling to become soft and mushy.
- Why do I need to do a water bath? A water bath is a key part of making cheesecake for several reasons. First, it ensures there’s moisture in the oven, which hinders the cheesecake from drying out. Second, it allows the cheesecake to cook slowly and evenly.
- Don’t overmix the filling. Stop mixing as soon as the last egg is incorporated. Overbeating the eggs is one of the top causes of a cracked cheesecake.
- Cool the cheesecake slowly. When the cheesecake is finished cooking, resist the urge to pull it straight from the oven. Instead, crack open the oven door just a bit and allow the cheesecake to slowly cool as the oven does. Then transfer the cheesecake to the fridge to finish cooling. This also helps to prevent cracks in the cheesecake.
- Chill overnight. I always recommend preparing this banana cheesecake (and any other cheesecake) a day in advance, so there’s plenty of time for it to set and chill. Six hours is the minimum, but overnight is really best.
- Wait to decorate. I recommend waiting until right before serving to decorate this particular cheesecake with its topping of fresh sliced bananas. This will ensure that the whipped topping and fresh bananas are in their utmost freshest best.
- How to prevent bananas from browning once cut. However, if you do want to fully decorate the cheesecake up to 2 hours prior to serving, here’s what I recommend. Place the banana slices in a bowl and sprinkle with freshly squeezed lemon juice, ensuring that all sides of the banana slices are covered with the juice. The lemon’s acidity will slow the oxidation process and inhibit browning. When adding the banana slices to the top of the cheesecake, shake off any excess lemon juice very well (so liquid doesn’t pool on top of the cheesecake).
- Another make-ahead decorating alternative. Here’s another suggestion. A couple hours prior to serving, add the whipped cream topping to the top of the cheesecake – then return the cheesecake to the fridge to chill. When ready to serve, cut individual slices of cheesecake and then add a few fresh slices of banana to the top of each piece. This is a great method when you know you’ll have leftover cheesecake!

Serving Suggestions
I always prefer to eat cheesecake COLD. I like the cold temperature and firmer texture. So I recommend keeping the banana cheesecake in the fridge until just before serving.
If you like to eat cheesecake a bit softer and not as cold, take it out of the fridge up to 30 minutes prior to serving.
I recommend adding the whipped topped and bananas just before serving as well.
For clean slices, be sure to use a large, sharp, smooth knife, and wipe it down after each slice.

Proper Storage
- Fridge. Store any leftover banana pudding cheesecake covered in the fridge for up to 4 days. Keep in mind that if you fully decorate it with banana slices, the bananas will brown more as they sit.
- Freezer. I only recommend freezing the cheesecake portion of this recipe. If you know you want to freeze it, omit all decoration. Once the cheesecake has thawed, add the decoration.
More Easy Cheesecake Recipes:
Banana Pudding Cheesecake
Ingredients
For the Crust:
- 1 box 11 ounces Nilla Wafers (set aside 4 cookies for garnish)
- 2 tablespoons honey
- ½ teaspoon ground cinnamon
- ½ teaspoon Morton kosher salt
- 6 tablespoons unsalted butter melted
For the Cheesecake:
- 32 ounces 4 blocks regular cream cheese, softened to room temperature
- 1 cup granulated sugar
- ¾ cup regular sour cream
- ½ cup whole milk
- 2 teaspoons pure vanilla extract
- ¾ cup instant banana pudding mix (you will need a full "family size" 5.1 ounce package for this)
- 2 tablespoons all-purpose flour
- 4 large eggs
For Garnish:
- 1 cup cold heavy whipping cream
- ½ cup powdered sugar
- 2 tablespoons instant banana pudding mix
- 2 medium bananas sliced
- 3 Nilla Wafers cookies and 1 crushed Nilla Wafers cookie from reserved Nilla Wafers in the crust
Instructions
- For the crust: Preheat the oven to 350° F. Wrap a 9” springform pan with foil as tightly as possible to prevent water from seeping into your crust. Lightly spray springform pan with nonstick baking spray and set aside.
- Add the Nilla Wafers to the bowl of a food processor. Pulse until cookies are a fine crumb, about 1 minute.
- Add the honey, cinnamon, and salt to the Nilla Wafer crumbs and pulse to combine.
- With the food processor on low speed, slowly add the melted butter. Pulse just until the mixture resembles wet sand.
- Transfer the crust mixture to prepared springform pan and press it into an even layer on the bottom and 1” up the sides. The crust should be about ¼” thick on all sides.
- Bake the crust for 10 minutes. Set it aside to cool while preparing the filling.
- For the Cheesecake: Add the cream cheese and granulated sugar to the bowl of a stand mixer fitted with the paddle attachment. Beat on medium-low speed until light and fluffy, about 1 minute.
- Add the sour cream, milk, and vanilla to the cream cheese mixture. Mix to combine, scraping down the sides of the bowl as needed.
- Add the banana pudding mix and flour. Mix to combine.
- With the mixer on low speed, add the eggs one at a time. As soon as the last egg is incorporated, stop mixing. Overbeating the eggs can lead to a cracked cheesecake.
- Pour the cheesecake mixture into the crust and then place the springform pan into a large baking pan with tall sides. Add very hot water to the baking pan until it's ½” deep. It's helpful to use a pitcher or a bowl with a spout for easy pouring.
- Bake at 350° F in the center of the oven for 75-90 minutes, or until the center jiggles only slightly when gently shaken. I usually bake for 90 minutes, to fully firm-up the center.
- Turn off the oven and crack open the oven door. Allow cheesecake to cool in the warm oven for 1 hour.
- Remove springform pan from the water bath and place the cheesecake in the fridge to chill – at least 6 hours, but overnight is preferred.
- For the Garnish: Add the heavy cream, powdered sugar, and banana pudding mix to the bowl of a stand mixer fitted with the whisk attachment. Beat on medium speed until stiff peaks form, about 2 minutes.
- Gently run a knife around the perimeter of the cheesecake, then release the sides of the springform pan. Transfer the cheesecake to a serving platter.
- Spread the whipped cream on top of the cheesecake, in the center, leaving a bare border at the outside edge. Add banana slices on top, at the bare outside edge. Sprinkle whipped cream with crushed Nilla Wafers, then poke the 3 whole Nilla wafers and a few banana slices into the whipped cream.
Nutrition Information:


My husband and son made this for son’s birthday. They aren’t experienced in cheesecakes and it came out picture perfect and delicious!
SO WONDERFUL to hear, Heather! Thank you so much for coming back here to let me know, and to rate this recipe!
I used Kinnikinnick gluten free vanilla wafers and Bob’s red mill gluten free 1:1 flour and not only did it look fabulous it tasted amazing! Oh, and my first attempt ever at making a cheesecake! This is a gluten free dessert like no other!
So wonderful to hear this, Carol! Thank you for sharing your gluten-free variations for more readers to enjoy!
This was my first cheesecake I’ve ever made and I’m sooo impressed! My son who isn’t a fan of cheesecake but loves banana pudding absolutely loved this! I had to share with a bunch of friends cause a 9″ cheesecake is huge I’ve ordered a 4″ pan to cut the recipe in half. So I have a question, if I cut the recipe in half, how long should I cook it?
I LOVE to hear this, Chrystal! Thank you so much for coming back here to let me know + rate the recipe. I have not made this cheesecake in a 4″ pan, so I cannot tell you for sure – I would recommend checking it at 40 minutes, and you’ll just have to keep an eye on it. You’ve already made this successfully in a 9″ pan, so you know how it should look/feel when it’s finished baking. If you do give this a try, please do come back and let me know how long you baked it, etc. Thank you! Enjoy!