This easy Thin Crust Pizza Dough Recipe is gonna knock your socks off! I call it my “faux brick oven pizza recipe”, as it yields a super thin crust that’s crisp and chewy and delicious – and it’s made in the kitchen oven!
Easy Thin Crust Pizza Dough Recipe
This Thin Crust Pizza Dough recipe has been a long time comin’, my friends.
With all the great brick oven pizza restaurants cranking out amazing pies, I’ve longed for a homemade thin crust pizza that would give me that same experience…but from my own very regular kitchen oven.
I’ve tried many different recipes and techniques. None of them left me wanting for more.
But then we ate some amazing brick oven pizzas in our friends’ backyard last fall. Shortly thereafter, I came upon a piece of mind-blowing homemade pizza-making equipment made for the kitchen oven. I experimented. And then experimented some more.
And, as they say, the rest is history.
I do hope you’ll find as much enjoyment in this homemade pizza as our family does. It’s quickly become a Family Pizza Night tradition!
“This recipe is amazing! I try it and followed the directions. The pizza was delicious. I will no longer have to spend so much money on a good tasting thin crust pizza. The dough had a nice texture, it was chewy and crunchy all at the same time. This is going to be a forever in my house”
Pamela
Easy Homemade Thin Crust Pizza
I remember making homemade pizzas as a kid. We’d pull out a box of Chef Boyardee Pizza Maker from the lazy susan and then happily proceed to create a pizza masterpiece.
Inside the box was the crust mix, a little can of pizza sauce, and a small packet of grated Parmesan. All we needed was some shredded mozzarella and toppings. Talk about an easy way to make your own pizza!
While I have awesome memories of this kind of homemade pizza making with my parents and sisters, I set my sights a bit higher with this recipe I’m sharing with you now. Although it does take more time than boxed Chef Boyardee, I promise that this is an easy way to achieve an epic thin crust pizza dough at home.
Why I Love This “Faux Brick Oven Pizza” Recipe
My “faux brick oven pizza” recipe makes me giddy. And that’s not an exaggeration. Just ask our kids. Every time I pull a hot pizza from the oven, Hatti and Tessa are laughing at me (or laughing “with me”?!). I simply canNOT contain my excitement!
Here is the criteria I used when creating this thin crust pizza dough recipe:
- The crust must be thin, and have both crisp and chewy textures. No wimpy, soggy pizza crust allowed!
- The crust must taste good, which means it must contain yeast. Crusts that don’t use yeast always have me longing for deeper flavor and greater texture.
- The dough must be easy to make AND easy to work with. Nothing frustrates me more in the kitchen than uncooperative dough!
- From start to finish, a hot homemade pizza must be on the table in less than 3 hours. Note that most of that time is not active time. When using yeast, you must allow time for the dough to rise. So it’s just a matter of planning for that hands-off rise time.
I promise you, once you make this easy thin crust pizza dough recipe, you’ll be making it every single week!!
Special Equipment (That’s Totally Worth It!)
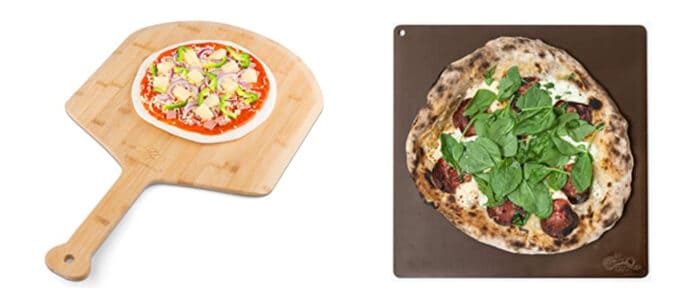
Two pieces of essential equipment make this fantastic recipe’s results possible. They are key in making pizza crust magic in a regular ol’ oven!
Pizza Peel
First, you’ll want to grab a pizza peel. This tool features a large flat surface with a handle – see the peel in the photo above, on the left.
A pizza peel is the perfect tool for transferring the pizza to and from the hot oven. I prefer a wood peel in the kitchen – but I also know that many restaurants and home cooks use metal peels, especially when cooking in a brick oven.
If you want to make larger pizzas, you’ll want to look for a larger pizza peel, so the pizza fits on it. My recipe specifies rolling the dough for each pizza into a 14″ diameter circle.
Here’s the extra-large wood pizza peel that we use (shown in the photo above, on the left). It works great.
Baking Steel
Second, get yourself a baking steel. Not a baking stone. A baking steel.
I was completely unaware that baking steels even existed until I ventured down this homemade pizza crust journey. After seeing one mentioned in a recipe, I took a chance and ordered one.
And, hey. I get it. If you feel resistant to buying yet one more piece of kitchen equipment, be assured that I felt the very same way!
But I was also desperate to conquer a thin and crispy/chewy crust in our kitchen oven. So I added this baking steel to my online cart, said a little prayer, and clicked “place order”.
I’m so happy it all worked out. I love my baking steel! The steel has more mass, so it retains more heat than a stone and gives a lighter airier crust. Plus, baking steels won’t crack like baking stones can!
Here’s the baking steel that we use (shown in the photo above, on the right). It’s 15″ x 15″ x 1/4″ of carbon steel. It is HEAVY at 16 pounds. And it’s AWESOME. Also – a bonus for me is that this steel is made in my home state of South Dakota. :)
Tips for the Best Thin Crust Pizza
I’m sharing my step-by-step technique for the best thin crust pizza I know! Please read through each step, as you’ll find all my best tips located within those individual steps. From specific ingredients, to equipment and techniques, I’ve got you covered!
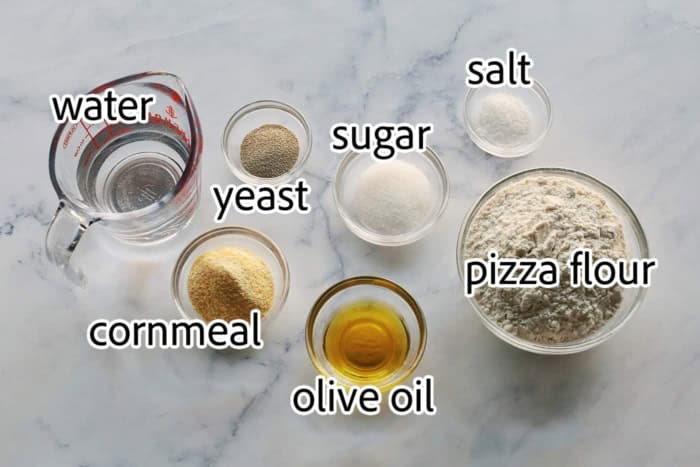
Pizza Crust Recipe Ingredients
The ingredients for this pizza crust are very basic, although I highly recommend a specific kind of flour.
- warm water
- dry yeast – Here’s the dry yeast that we use.
- sugar – Just a little bit adds great flavor!
- “00” pizza flour – I highly recommend this type of soft wheat flour for this recipe. It yields a silky smooth dough that’s super easy to work with + gives you a better textured crust that’s crisp and chewy. It’s available on Amazon. Also look for it in specialty grocery stores. I purchase this type of flour at our local Kowalski’s, in their Italian foods section – and it costs less than Amazon, just FYI. If you don’t want to buy this flour, then use all-purpose flour – just know that the results won’t be quite as spectacular. Here’s the “00” pizza flour that we use.
- kosher salt
- olive oil
- cornmeal – This isn’t actually in the pizza dough. It gets sprinkled on the pizza peel to easily slide the pizza dough onto the hot baking steel in the oven. It works fabulously! Here’s the cornmeal that we use.
How to Make the Pizza Dough
This pizza dough is easy to make. I’m a bit yeast dough impaired, and this recipe works for me every time!
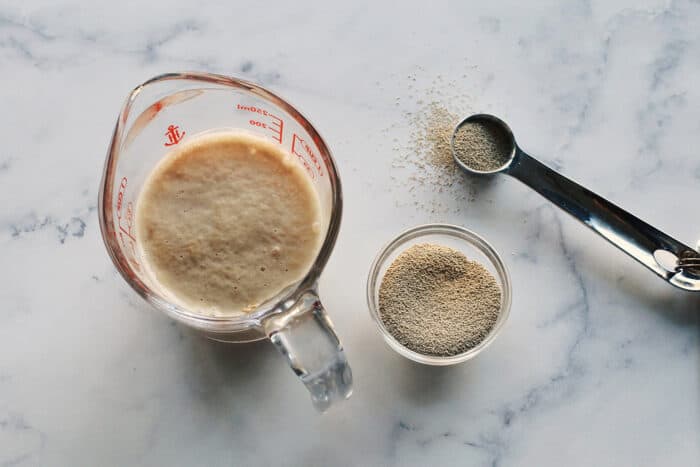
Activate the yeast: First, add warm water to a small liquid measure. We use this 1-cup measure.
Be careful to not get the water too hot. Experts say the ideal temperature should be 110° F. I once read that you should try to mimic the temperature of a warm bottle that you would feed a baby, and that’s the guide I use.
Add sugar to the warm water, then sprinkle the yeast evenly over the top of the water. Let stand for 15 minutes, or until the yeast is frothy (as shown in the photo above).
Now the yeast is activated, ready for a pizza party!
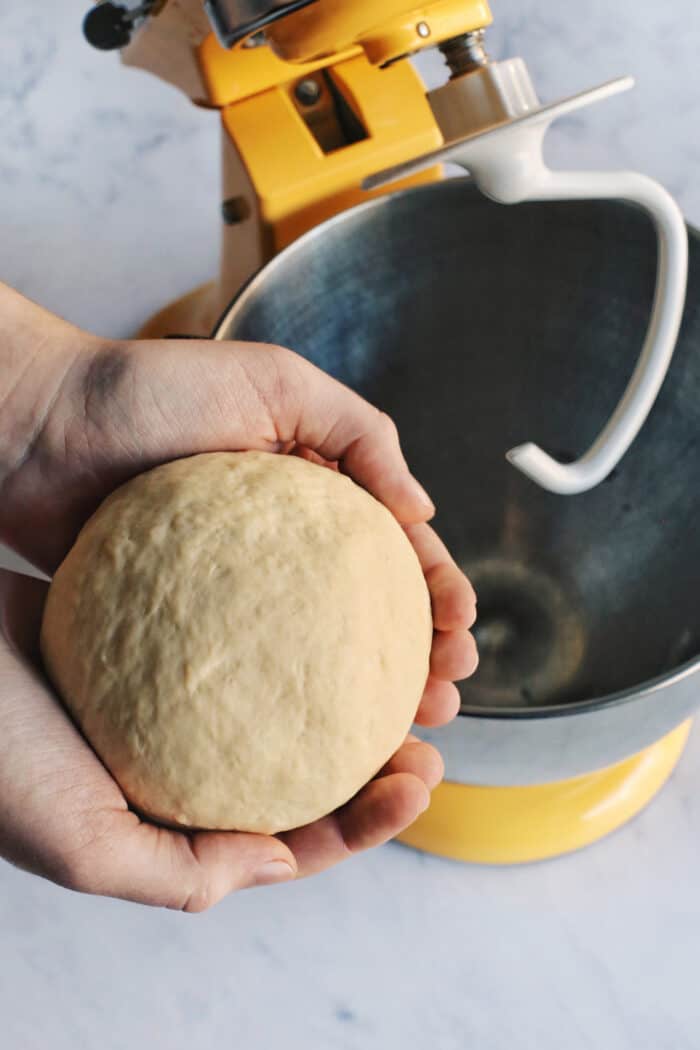
Create the dough: While yeast is activating, add flour and salt to the bowl of a stand mixer fitted with a dough hook. Stir on low speed for a few seconds, just to combine.
Then add activated yeast mixture and olive oil to the flour mixture. Combine on low speed for about 30 seconds, just to combine the wet and dry ingredients. Then increase speed to medium and let the dough hook knead the dough for 2 minutes, or until nothing is left in the bottom of the bowl.
Grab the dough out of the bowl and form it into a ball. Notice how soft and silky the dough feels. That’s because of the “00” pizza flour.
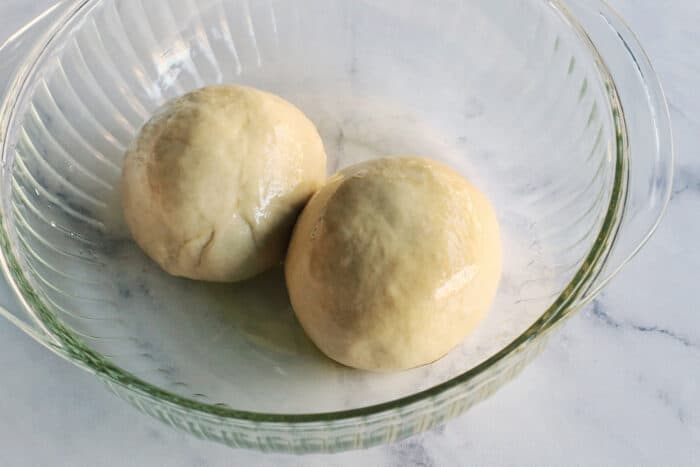
Create two balls of dough: Divide dough into two equal portions. Roll each one into a ball on a clean countertop using the palm and heel of your hand, adding a little flour to the countertop if needed.
Then drizzle a little olive oil into the bottom of a low wide bowl. Add dough balls and roll them around in the olive oil to coat completely.
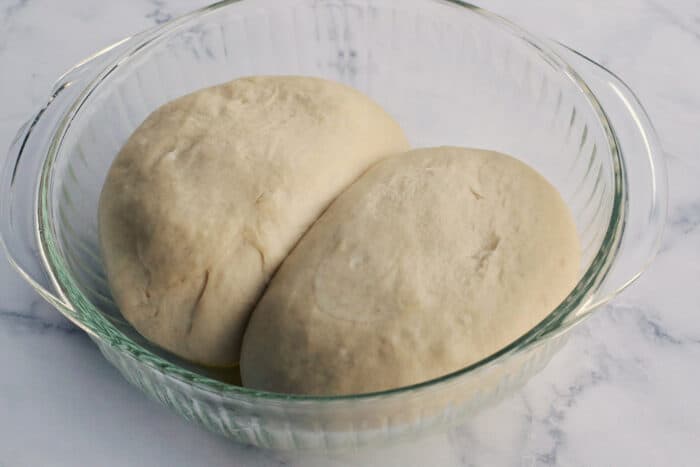
Let dough rise: Spray a piece of plastic wrap lightly with non-stick spray and cover bowl of dough balls, sprayed side down. And then let the dough rise at room temperature for at least 2 hours, or until doubled in size – like the photo above.
Prep the oven: Once the dough has doubled in size, place the baking steel in the upper portion of the oven. In our gas oven, I adjust a rack to the position second from the top. This measures about 4″ from the top of the rack to the broiler unit at the top of the oven.
Preheat the oven and baking steel to 500° F. Once that temperature has been reached, let the baking steel heat for an additional 30 minutes. You want it good and hot, thoroughly heated, for the best crust results.
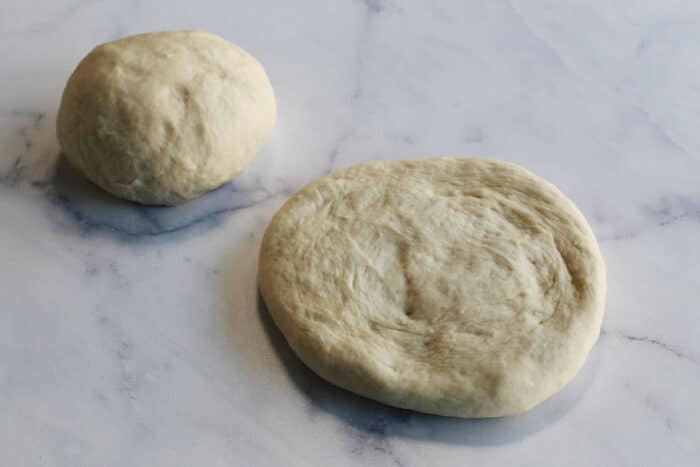
Flatten the dough: While the oven is heating up, start preparing the first pizza crust. Pat it down into a thick dough round, about 5″ in diameter.
Roll the dough: Lightly dust a clean countertop. And then, with a lightly dusted rolling pin, roll dough round into a 12″ diameter circle. Flip the dough over once or twice, in between rolling, adding a bit more flour to the countertop and rolling pin if the dough starts to stick.
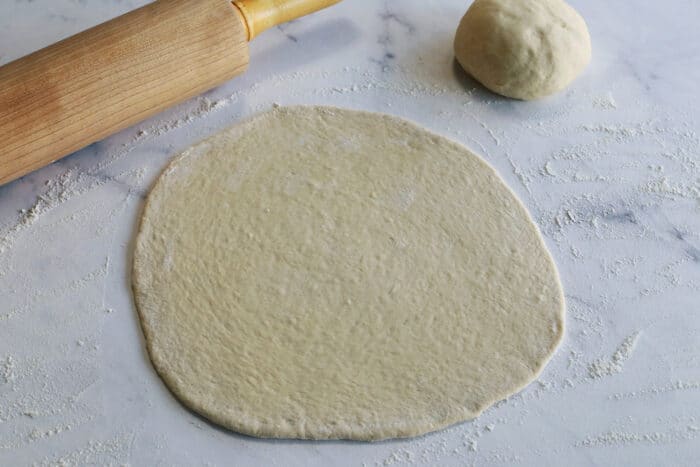
The dough may want to spring back a bit as you roll it larger. This is normal. Once the dough reaches 12″ in diameter, let the dough rest and relax for 5 minutes.
Roll the dough a bit more: After the dough has had a few minutes to rest, it will roll out easier into an even thinner circle of dough. Here comes that thin crust I promised you!
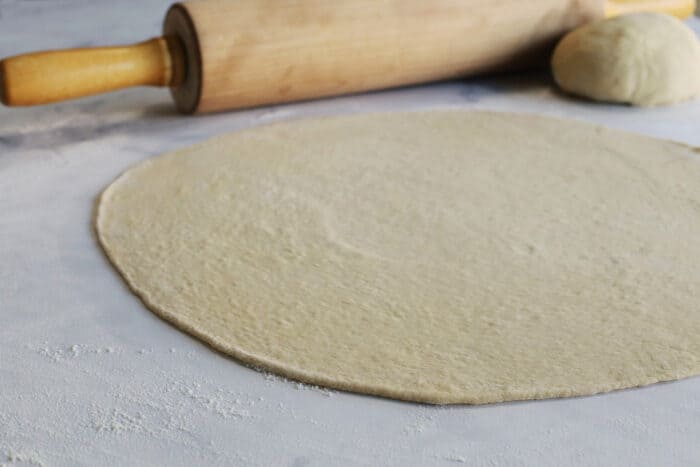
Continue to roll the dough until you have a 14″ diameter circle, adding flour to the countertop and rolling pin if needed. The dough should be very thin, as shown in the photo above.
Try to not use excessive additional flour when rolling out the dough. But also know that a certain amount of flour is desirable, in that it will enable you to easily lift the dough from the countertop to the pizza peel. Just remember that practice makes perfect. With every pizza crust that you make, you’ll get the feel for the dough, and it will be easier each time!
Fold dough in half: Gently lift the dough and fold it over itself, into a half-circle.
Tip for you! For easy cleanup of your countertop, use a bench scraper to easily remove the flour!
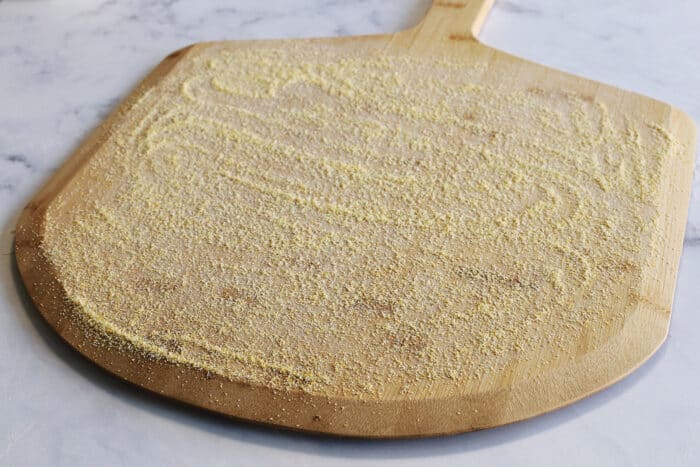
Prep pizza peel: Spread a thin layer of cornmeal evenly over the top of the pizza peel. Be sure to spread cornmeal all the way to the edge, as this will help the pizza slide off the peel more easily, onto the hot baking steel. I use nearly a tablespoon of cornmeal to cover a pizza peel this size.
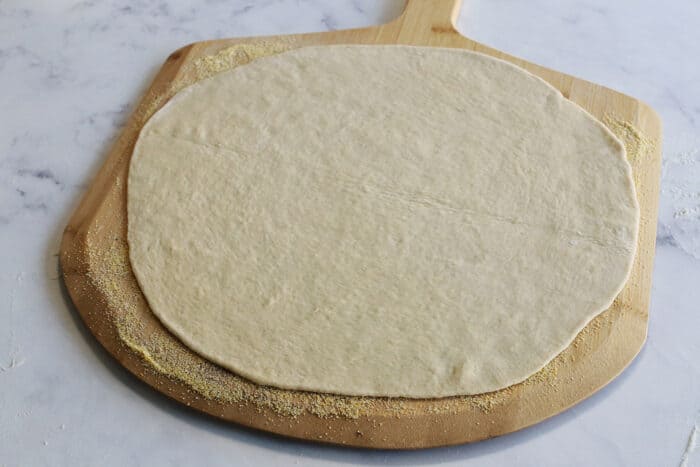
Transfer crust: Now transfer the half-moon pizza crust to cornmeal-covered pizza peel, unfolding it into its full circle shape.
How to Assemble & Cook Your Pizza
And now it’s time to assemble the pizza and get it in the oven!
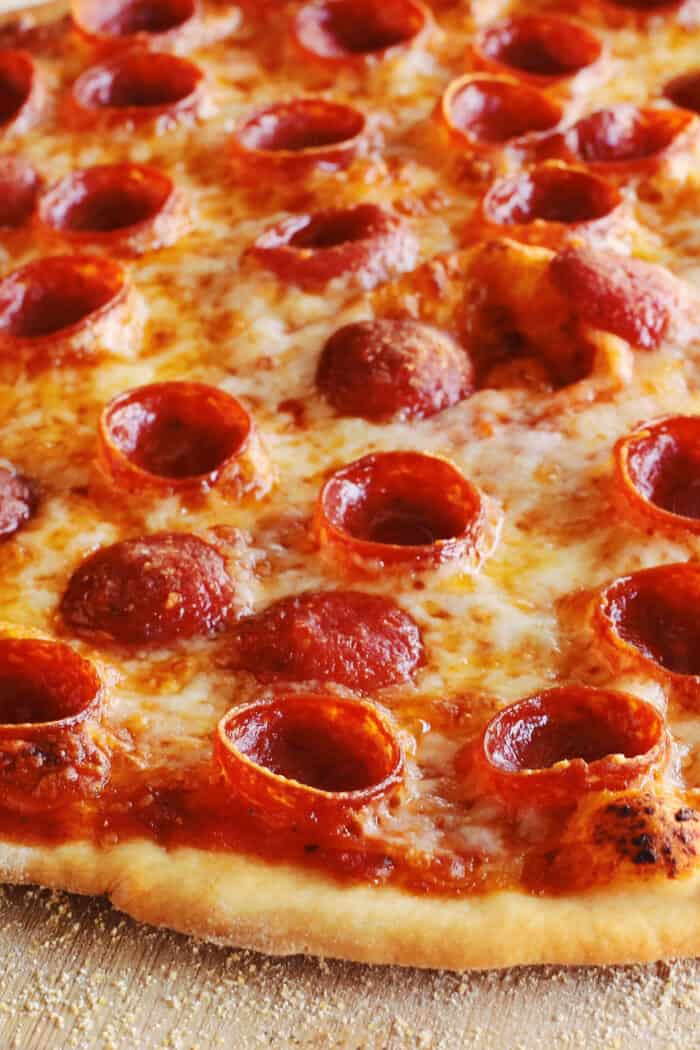
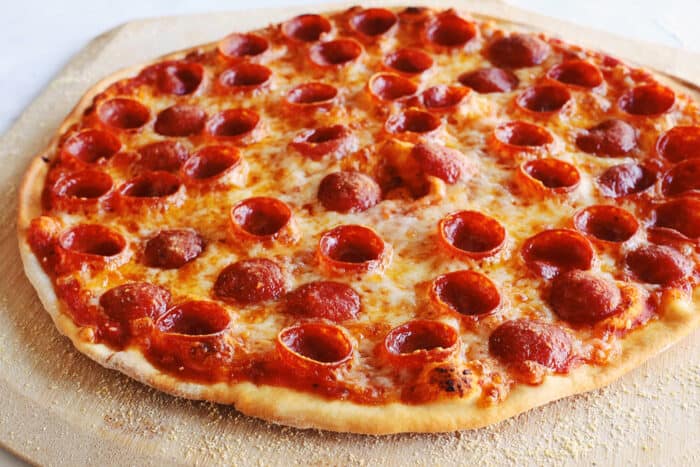
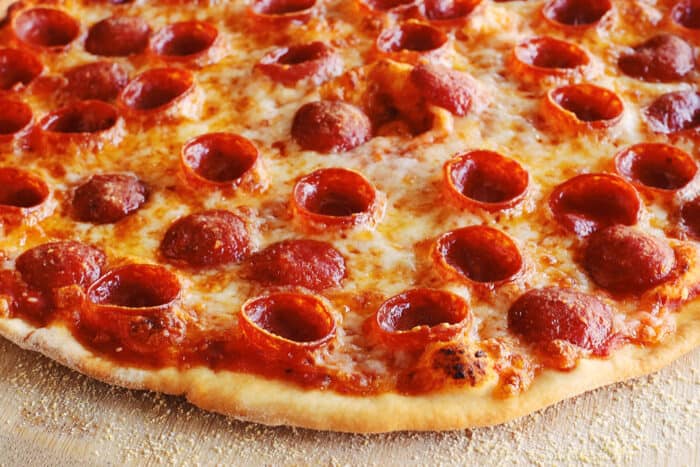
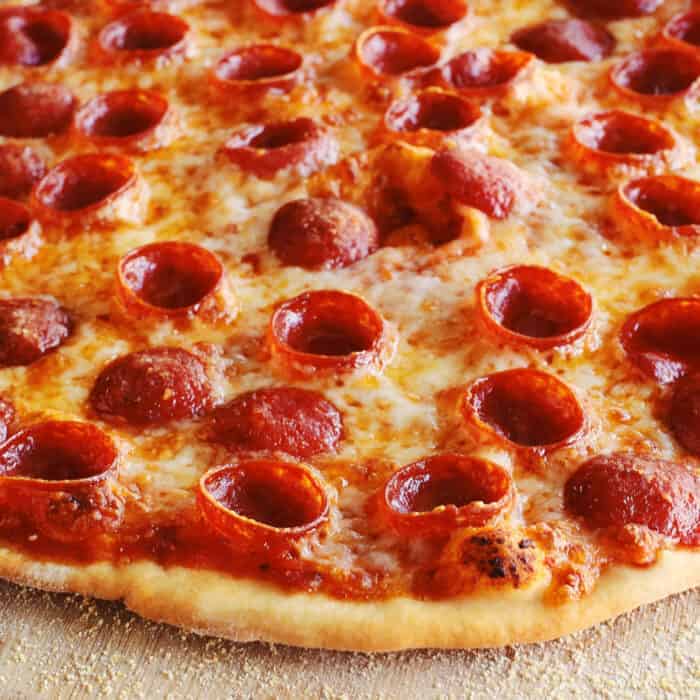
In the recipe card, I share the quantities of toppings we use for a basic pepperoni pizza, the pie we tend to make the most often around here.
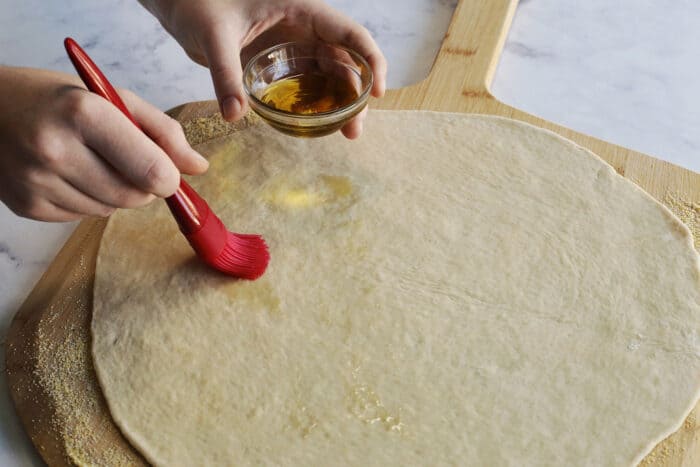
Brush with olive oil: Start by brushing a very thin coating of olive oil over the entire crust. This adds another layer of flavor, plus gives a little crispier crust and color to the finished pie.
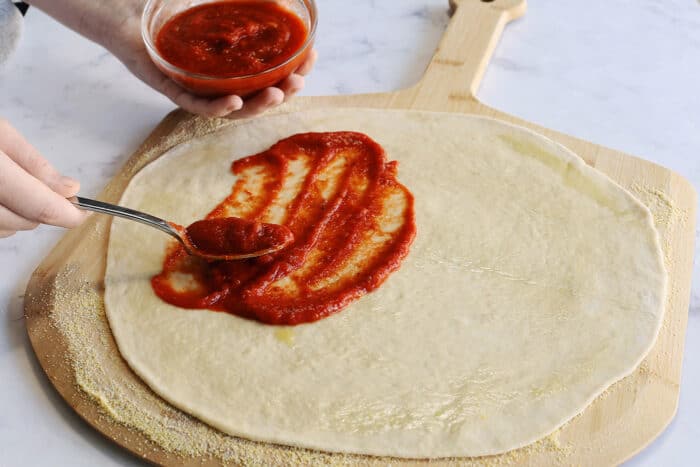
Spread on pizza sauce: I like to use a thicker style of pizza sauce that has lots of deep, rich tomato flavor, like my homemade pizza sauce recipe. Take care to not overdo the sauce, as that can make the baked crust soggy. I think that 1/3 cup of sauce is the perfect amount for this size pizza.
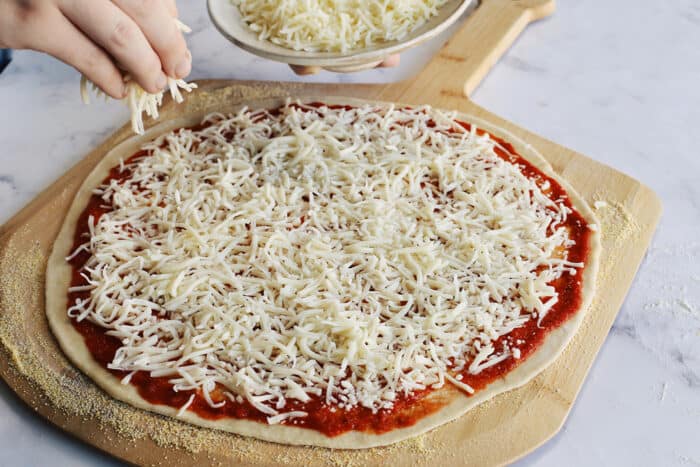
Sprinkle with cheese: We like cheese around here, and add about 6 ounces of shredded mozzarella over the pizza sauce. If you can find shredded whole milk mozzarella, that’s my #1 choice. It’s richer and creamier than the low-moisture, part-skim varieties.
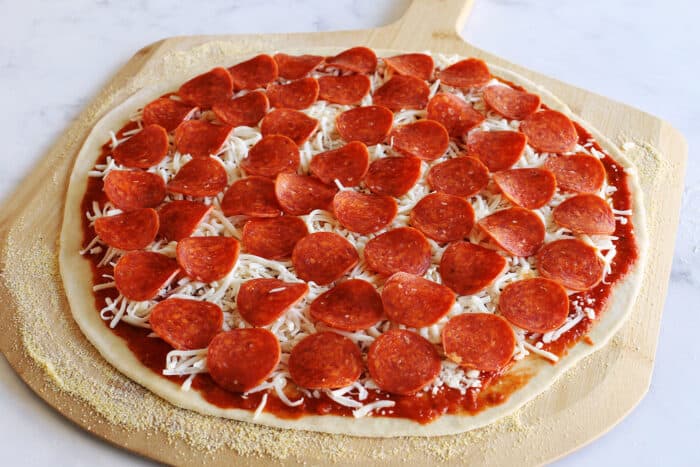
Top with pepperoni: And the final topping >>> pepperoni. We like to pile it on!
My favorite pepperoni is the kind that cups up and gets crispy edges from the heat of the oven. Current culture has dubbed them “roni cups”. I also refer to them as “cuppy pepperoni”. It’s really just pepperoni that still has its casing – the oven heat causes it to shrink up, thus curling the slice of pepperoni. Ann Kim, a highly acclaimed local Minnesota chef and restaurant owner (2019 James Beard Award winner for “Best Chef Midwest”), features this style of pepperoni on her pies…and this makes me SO HAPPY!
I love the texture of the roni cups, and how the cooked pepperoni’s fats pool in the cups that are formed. But for me, there’s also much nostalgia.
When I was very young, I remember my parents taking our family to a simple little cafe along the shore of Lake Traverse – it was called Kaufman’s, and is no longer open. With a dress code nothing fancier than jeans and flip-flops, it was a neighborhood spot to grab fishing bait, some hot bar food, and a cold beer. And my best memories from this place are pizza memories. They served frozen pizzas from their little countertop pizza oven…and the pizzas had little roni cups, perfectly cuppy and crisp, glistening with pools of fat. So AWESOME GOOD!
Where to find roni cups?! I like to use these roni cups, but I will say that I have been having trouble finding them lately. If you see them, buy them! Otherwise you can buy this link pepperoni and slice it very thinly yourself. The slice-your-own style is a bit smaller in diameter than the pre-sliced variety, but gives the same cuppy pepperoni experience.
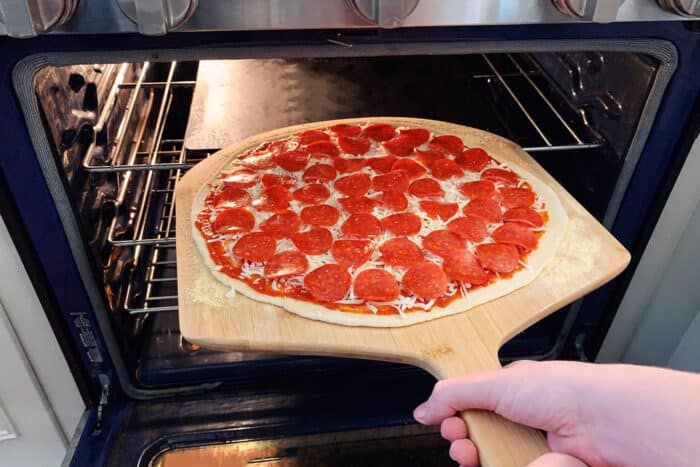
Bake the pizza: Now let the thin crust transformation begin. Slide that awesome pie into the oven and bake it. With the screaming hot oven and baking steel, the pizza bakes up in only 8 minutes!
First, jiggle the pizza peel a bit. Make certain that no part of the pizza is sticking to the surface of the peel, or it may be difficult to slide the pizza onto the baking steel properly.
To slide the pizza off, place the peel just above the back of the baking steel at an angle and jiggle slightly to get the pizza to make contact with the back of the hot baking steel. You may pull the oven rack out of the oven about half-way to make it easier, if you like. When the pizza crust hits the steel, the crust will stick to it. Slowly pull the peel out of the oven, letting the entire pizza fall down onto the hot steel.
This takes a little practice to get the proper angle and speed, but once you get the technique down, it’ll be nothing but PURE FUN!
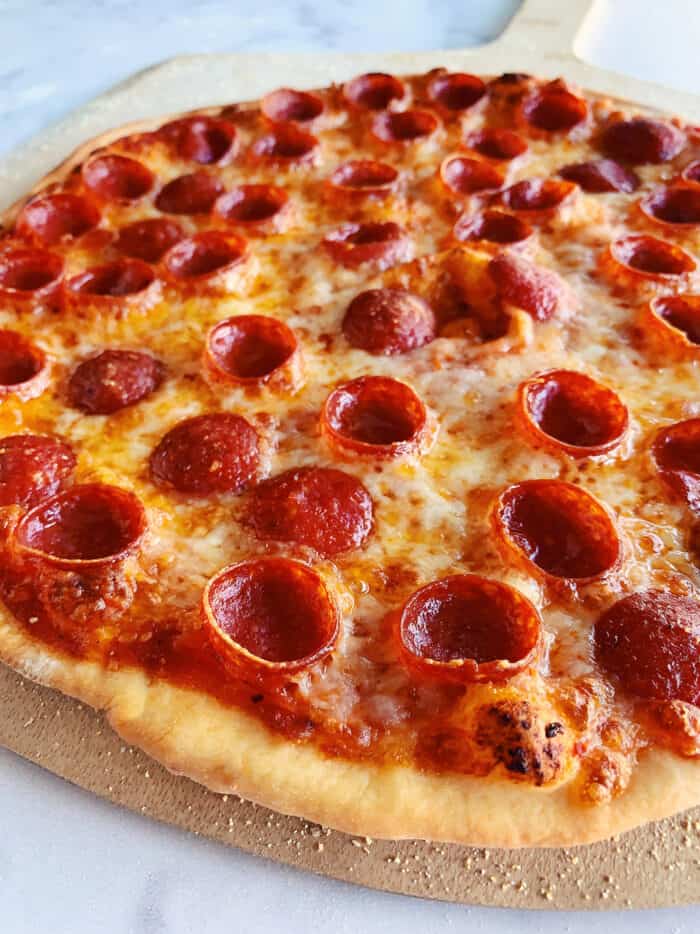
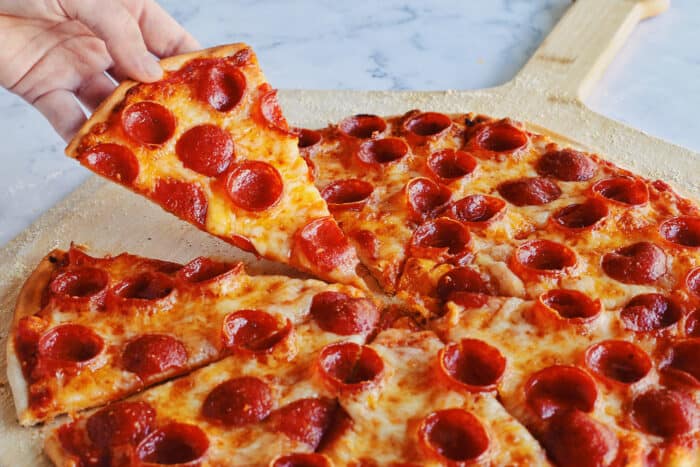
Remove pizza from oven: Once the crust has browned and the cheese is bubbling, it’s easy to remove the pizza from the oven – as the crust is now crisp.
I like to slide the oven rack out about half-way. Then I position the pizza peel level with the front of the rack, and slide the baked pie onto the peel with the help of a big spatula/turner.
All that’s left to do is slice it up and ENJOY!!!
Serving Suggestions
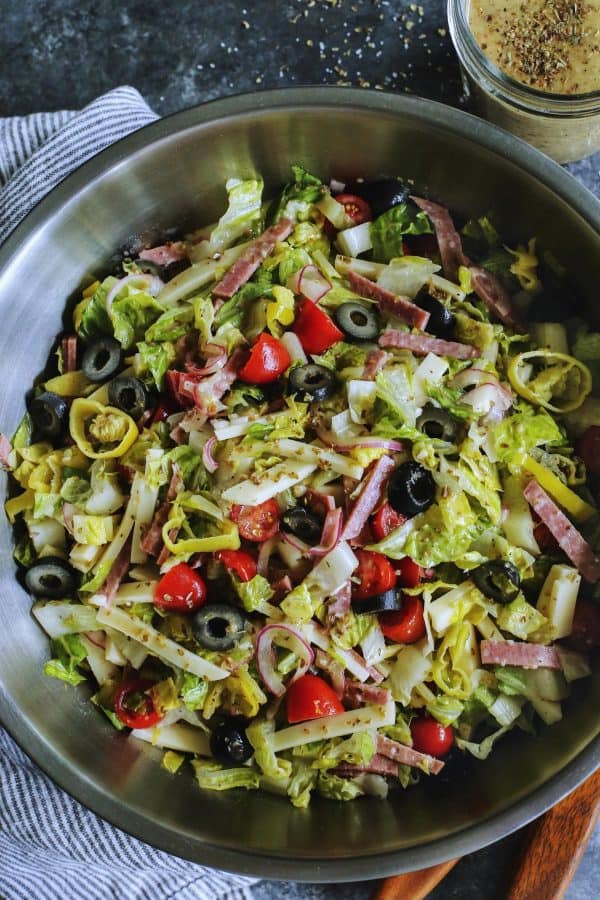
When it comes to a side with pizza, I’m all about a good fresh salad. Our family loves this Italian Chopped Salad. It’s chock-full of fun bites of deliciousness and dressed with a super zippy Italian vinaigrette. We love it!
Another salad suggestion would be to dress your favorite greens with this Homemade Buttermilk Ranch dressing. The creamy dressing is a great contrast to the pizza, one of our favorite salad dressings.
And for some garlic bread fun, check out my Cheesy Garlic Bread recipe. It’s perfection, with buttery, toasted bread that’s soft on the inside and crispy on the outside!
How to Store and Reheat Leftovers
It’s hard to imagine leftovers with pizza this good, but it does happen. :)
To store, place leftover slices of pizza in an airtight container and refrigerate for up to three days.
To reheat, place desired amount of pieces on a plate and gently microwave until hot. Or, if you’d like to crisp up the crust again, use the oven and baking steel. This time however, since the pizza has already been baked, preheat the oven and steel to just 350° F. Once preheated, let it heat for another 10 minutes. Then place pizza on the steel and heat until cheese is bubbling. You may want to place a piece of parchment paper under the pizza slices, so the cheese doesn’t melt onto the steel. Because who wants extra cleaning duty?!
Can I Make this Pizza Dough in Advance?
I prefer to make the pizza dough on the same day we bake the pizzas, as I simply like how soft and wonderful the dough is, straight from its rise. I also love the aroma in the house as the dough rises – it creates a fabulous mood that teases us about the delicious pizza we are soon to enjoy!
But this recipe also works well to make up to a few days in advance. Just follow all the same steps, through letting the dough rise. Then place the two pieces of risen dough in one or two airtight containers and refrigerate.
Deli containers work great for storing pizza dough and other random ingredients and meal leftovers. I have them in three different sizes: 32-ounce containers, 16-ounce containers (perfect for a single ball of pizza dough), and the smaller 8-ounce containers. We use these every single day!
On the day you want to make the pizza, remove the dough from the refrigerator. It will probably have risen even more. Take the dough out of the container and form it into a ball. Then place the dough ball in a bowl with a little bit of olive oil and roll it around to coat evenly. Lightly spray a piece of plastic wrap with nonstick spray and cover the bowl, sprayed side down. Let dough come fully to room temperature before proceeding with rolling it out – this can take up to a couple hours, depending on your room temperature.
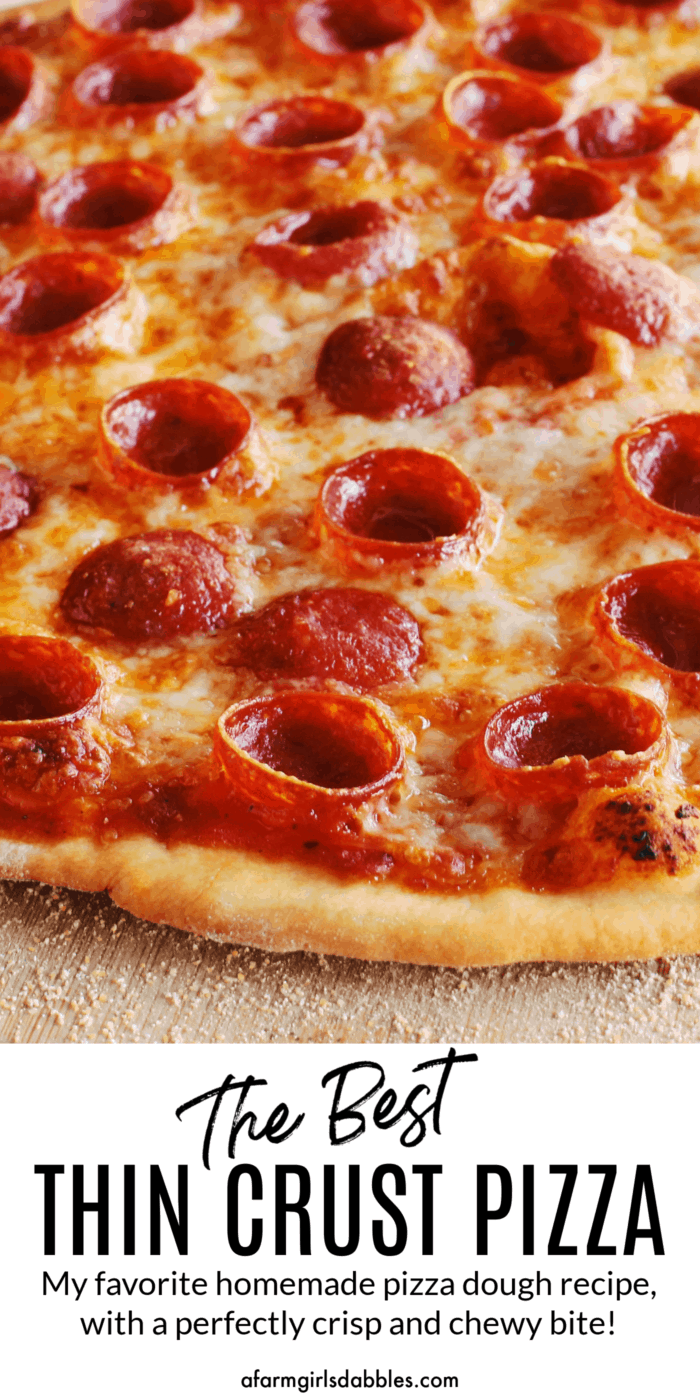
Like this pizza crust recipe? Save it to Pinterest!

Thin Crust Pizza Dough Recipe
Equipment
Ingredients
- 5 ounces warm water
- 1 teaspoon dry yeast
- 1 teaspoon sugar
- 2 cups “00” pizza flour – plus additional for flouring the bench or countertop
- ½ teaspoon Morton kosher salt
- 1 tablespoon olive oil plus additional to add to bowl when dough balls are rising
- 1 tablespoon cornmeal
Instructions
- Add warm water to a small liquid measure (I use a 1-cup measure). Be careful to not get the water too hot – I once read to try to mimic the temperature of a warm bottle that you would feed a baby.
- Add sugar to warm water, then sprinkle yeast evenly over the top of the water. Let stand for 15 minutes until frothy.
- Meanwhile, add flour and salt to the bowl of a stand mixer fitted with a dough hook. Stir to combine.
- Add yeast mixture and olive oil to flour mixture. Combine on low speed for about 30 seconds, just to combine the wet and dry ingredients. Then increase speed to medium and let the dough hook knead the dough for 2 minutes, or until nothing is left in the bottom of the bowl.
- Divide dough into two equal portions. Roll each one into a ball on a clean countertop using the palm and heel of your hand, adding a little flour to the countertop if needed. Drizzle a little olive oil into the bottom of a low wide bowl. Add dough balls and roll them around in the olive oil to coat completely. Spray a piece of plastic wrap lightly with non-stick spray and cover bowl of dough balls, sprayed side down. Let rise at room temperature at least 2 hours, or until doubled in size.
- Place baking steel in the upper portion of the oven – in our oven, I adjust a rack to the position second from the top. Preheat oven and baking steel to 500° F. Once that temperature has been reached, let the baking steel heat for an additional 20 minutes.
- While oven is preheating, prepare pizza peel by spreading cornmeal evenly over the top.
- Then start rolling out one of the dough balls on a clean countertop lightly dusted with flour. First pat it down into a thick dough round, about 5" in diameter. Then, using a lightly dusted rolling pin, roll dough round into a 12" diameter circle, flipping over on the lightly flour-dusted countertop once or twice. Let dough rest for 5 minutes. Then continue to roll the dough into a larger 14" diameter circle. Fold circle in half and transfer to cornmeal covered pizza peel. (For easy countertop clean-up, use a bench scraper to remove the flour!)
- Brush a thin coating of olive oil over entire crust.
- And then proceed with the toppings! For a basic pepperoni pizza, as shown in my photos: Spread on 1/3 c. thick-style pizza sauce, sprinkle with 6 oz. shredded mozzarella (use whole milk mozzarella, if you can find it), top with pepperoni, as much as you like. If using "roni cup" style pepperoni, know that it will shrink up tremendously, so feel free to crowd on the pepperoni!
- Jiggle the pizza peel a bit, to make certain that no part of the pizza is sticking to the surface of the peel. Then place the peel just above the back of the baking steel at an angle and jiggle slightly to get the pizza to make contact with the back of the hot baking steel. You may pull the oven rack out of the oven about half-way to make it easier, if you like. When the pizza crust hits the steel, the crust will stick to it. Slowly pull the peel out of the oven, letting the entire pizza fall down onto the hot steel.
- Bake for 8 minutes, or until crust is browned and cheese is bubbling. To remove pizza from oven, slide the oven rack out about half-way. Then position the pizza peel level with the front of the rack, and slide the baked pie onto the peel with the help of a big spatula/turner. Then slice it up and ENJOY!
Notes
Nutrition Information:

Excellent!!!The pizza was thin, crisp and yummy. I also made the sauce recipe. So good! I have enough sauce for a few more pizzas. This is a keeper
LOVE to hear this, Bonnie – thank you for coming back here to let me know + rate the recipe!
It’s not exaggerating to say we’ve probably made this dough at least 50 times now. It’s a fixture in our pizza night efforts.
I LOVE to hear this!!
This is by far the best thin crust pizza I’ve come across after trying several recipes by well known chefs. After making this thin crust pizza, I’ve deleted all my other recipes for this one is truly the only one you need.
I LOVE to hear this, MaryAnn! Thank you SO MUCH for coming back here to let me know + rate the recipe! :)
Great recipe, I used parchment paper on a pizza stone and it worked great.. Can the dough be frozen for use a date later than 4 days?
Love how thin this crust is! I used regular flour instead of pizza flour and it still turned out amazing!
So glad you liked this recipe, Kim – thanks for coming back here to let me know and to rate the recipe! :)
Finally!!!! I found a pizza crust that is thin & crunchy… I made two pizza’s and pre baked the crusts for 12 minutes, then added our toppings! I made the dough ahead of time and let it set for probably 4-5 hours. Easy to form the crust too.
Our new pizza crust!
I am a good cook and have always been looking for a great thin crust recipe. This is it!! It will not disappoint. Fantastic recipe, the crust is very easy to make incredibly thin. The entire family loved it. Do not buy store bought dough, this is by far the best pizza crust recipe ive ever made.
SO HAPPY you liked this recipe, Bryan! Thanks a bunch for coming back to leave a comment and rating. Enjoy!!
We loved this recipe! I did bake them on 2 very seasoned baking sheets. They came out great! Thank you!!
So happy to hear this, Pam! Thank you so much!
Best thin crust recipe I’ve come across. I’ve made it countless times, baked in a traditional oven, convection oven and Ooni Pizza oven…always spot on. Wonderfully crunchy but nice and chewy as well. I do prebake crust for 4-5 minutes in the traditional oven then add the toppings and bake for another 5 minutes at 450-500…in the pizza oven I roll out the crust then stick it in the freezer for 30 minutes til it’s just stiff not frozen..then add the toppings and bake at 625 for 3-4 minutes watching it constantly…Bellisimo!!!
Phenomenal! Delicious crispy thin crust. Only thing I did differently was to use pizza stones and no corn meal. (Would
Love cornmeal but didn’t want to dirty my oven).
I’m so happy you liked this, Deb! :)
This recipe is amazing! I tried it and followed the directions. The pizza was delicious. I will no longer have to spend so much money on a good tasting thin crust pizza. The dough had a nice texture, it was chewy and crunchy all at the same time. This is going to be a forever in my house
I’m so happy to hear you like this pizza dough recipe – thank you for coming back to let me know! :)
This recipe looks great and I appreciate your detailed instructions. We just got a new pizza oven – I assume this recipe would work with it just with a shorter cooking time. Any thoughts? Thanks!
Hi Dawn – lucky you, a new pizza oven! I would definitely give this recipe a try – but I cannot advise, as I have not tested this recipe using a pizza oven.
Have had my oven year now tried many recipes but this is by far the best results and tasting crust so far will be my go to no need to look anymore
Can the dough be frozen?
Great recipe, and instructions. I made this last night and this is now going to be my go-to pizza crust recipe! Turned out just perfect. Easy to handle and roll out, and held its own after baking (not floppy or soggy). Thanks so much!
Thank you for making this for us. The crust was amazing, and the pizza was yummy!
The best part was Dad repeating, “This is really good!” :) xoxo
Best pizza crust I have ever made. Nice and crispy. Thank you.
I LOVE to hear this, Sherri! :) Thank you so much for coming back to let me know!