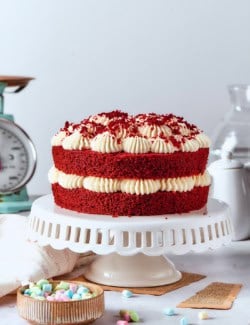
This classic Red Velvet Cake recipe features tender, ultra-moist cake with that signature subtle cocoa flavor, plus thick layers of irresistible cream cheese frosting. It’s a stunning, delicious, celebratory cake!

I adore a really great chocolate cake – from a super simple single layer Chocolate Wacky Cake in a 9″ x 13″ pan, to a gorgeous layered, richly chocolatey Chocolate Ganache Cake. But this good old fashioned Red Velvet Cake recipe, with its striking red and white color contrast, is definitely hard to beat!
WhY I ❤️ This Classic Red Velvet Cake
I was nearly 30 years old when I enjoyed my first chocolatey piece of red velvet cake, thanks to a co-worker who shared his birthday cake with me that was baked from scratch by his southern momma. I was instantly smitten – as you can see from my Red Velvet Brownies, Red Velvet Cookies, and Red Velvet Sheet Cake recipes! This classic red velvet cake has since graced many a birthday party around here, plus holiday gatherings and Valentine’s Day celebrations too. (Chocolate. Red. Cream cheese. Enough said.) Here’s why I love this recipe:
- Perfect balance of flavors. Red velvet cake is famous for its unique taste – subtly chocolatey, with tangy buttermilk and sweet vanilla flavor, plus that fabulous cream cheese frosting. This recipe nails it. It’s simply the best red velvet cake!
- Vibrant red color. You shouldn’t judge a book by its cover, but you can judge a red velvet cake by its color — and this one is a beauty! It’s one of the things that makes red velvet cake so special.
- Moist, tender crumb. The buttermilk in the batter ensures that the cake is super moist and perfectly dense.
What You’ll Need
This recipe relies heavily on common pantry ingredients. Scroll down to the printable recipe card to find the exact ingredient quantities and recipe instructions.

For the Red Velvet Cake:
- Butter – This recipe calls for unsalted butter. If you use salted butter, reduce the salt in the cake to just 1/4 teaspoon.
- Flour – All-purpose flour is perfect here.
- Baking soda & baking powder – For rise. The baking soda reacts with the acid in the vinegar and buttermilk to give the red velvet cake extra lift.
- Salt – I use kosher salt.
- Cocoa powder – Unsweetened cocoa powder adds that signature chocolate flavor.
- Sugar – Granulated sugar, AKA white sugar.
- Oil – I use vegetable oil, but another neutral oil you like to use for baking will work.
- Eggs – These provide structure to the cake, plus rich flavor and texture.
- Buttermilk – Full-fat buttermilk adds richness and helps make the cake moist. I do not recommend making your own buttermilk for this recipe.
- Vanilla extract – Use pure vanilla extract, for the best flavor (not imitation).
- Red food coloring – I recommend gel food coloring for the richest color – you also won’t need to use as much as you would with liquid coloring. You can adjust the amount depending on the hue you want to achieve. If you don’t want to use food coloring, just leave it out – the cake will still taste the same, but will have more of a chocolate cake appearance.
- Coffee – Plain hot coffee enhances the chocolate flavor of the cake — and no, it won’t make your red velvet cake taste like coffee!
- Vinegar – White distilled vinegar is the not-so-secret ingredient that makes red velvet cake shine. It’s key for the flavor and the texture.

For the Cream Cheese Frosting:
- Cream cheese – Full-fat cream cheese is essential for a thickest, richest, most delicious frosting. Let it soften to room temperature so it’s super creamy, without any lumps.
- Butter – Let this soften to room temperature too.
- Powdered sugar – Sift this before making the frosting to keep it smooth and velvety.
- Vanilla extract – Pure vanilla extract, or use vanilla bean paste if you want some fun little flecks of vanilla bean in your frosting.
- Salt – A small pinch of fine sea salt brings it all into balance.
How to Make Red Velvet Cake
If you want to get a head start on this recipe, you can bake the red velvet cake layers up to a day ahead of time. You can also make the frosting and refrigerate it, but let it soften to room temperature before using it. The full recipe instructions are at the bottom of the page.


- Prepare. Melt the butter and set aside to cool. Set oven rack in the center of your oven and preheat it to 350ºF. Coat two round cake pans with nonstick spray, add a parchment circle to each, then spray the parchment too.
- Combine wet ingredients. In a mixing bowl, combine the sugar, oil, and butter. Stir in the eggs, buttermilk, vanilla, and food coloring, followed by the hot coffee and vinegar.


- Combine dry ingredients, add to wet ingredients. Whisk the flour, baking soda, baking powder, cocoa powder, and salt in a bowl. Add one-third of the dry ingredients to the wet ingredients. Stir. Add another third, stir, and then the rest. Divide the batter into the pans.
- Bake. Place the pans in the oven and bake for 30 to 35 minutes, or until the cakes are set in the center and a toothpick comes out just clean.
- Cool. Let the cake layers cool until they’re just a bit warm. Run a knife along the edges, then turn out the cakes onto wire racks to finish cooling.
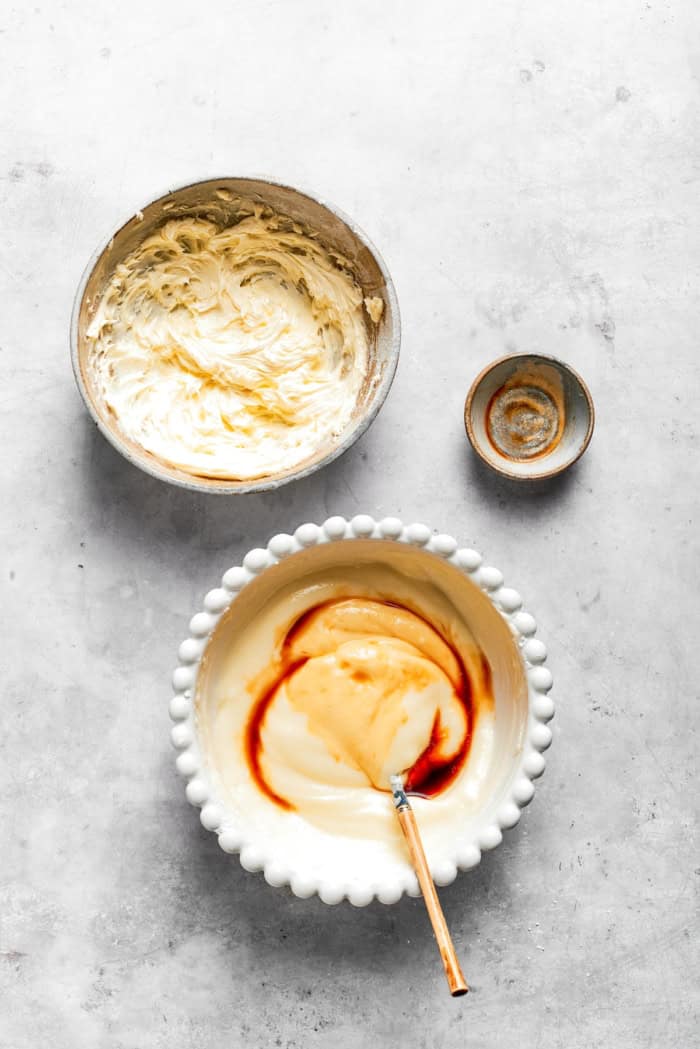
- Make the frosting. Beat the cream cheese and butter with an electric mixer and once smooth, beat in the powdered sugar, vanilla, and salt.
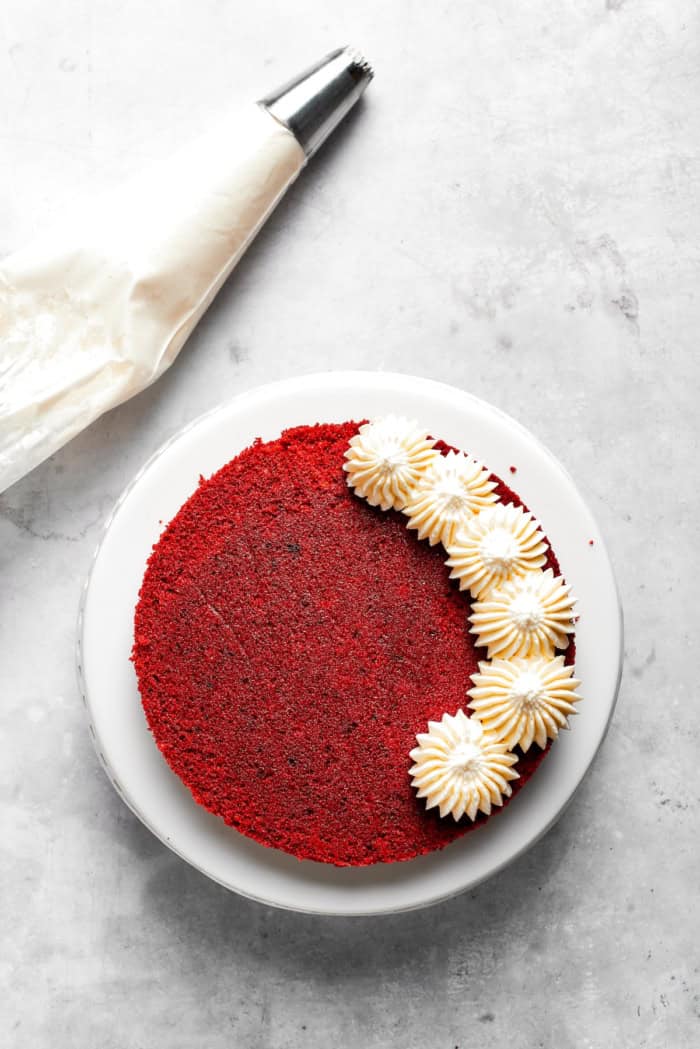
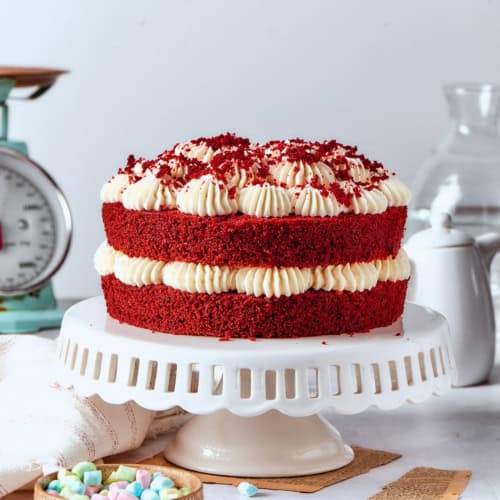
- Assemble. Set the first layer on a serving platter. Spread frosting over the top (or use a piping bag and tip), then add the second layer. Spread the remaining frosting over the top and sides (or leave the edges bare). Slice and serve.

- Finish and serve. Decorate however your little heart desires. Be sure to save cake crumbs if you like the look of the cake in my photos. Chill the cake if desired, or just slice and serve. Stunning!
Tips for Success
To make this old-fashioned, classic, just-like-your-Southern-grandma-made-it red velvet cake, I have a few tips for you:
- Use gel food coloring. Gel food coloring helps you achieve that vibrant shade of red without adding a whole bottle of liquid food coloring — which would water down the batter and affect its texture.
- Don’t overbake. As all oven temperatures are not the same, start checking for doneness a few minutes early. While you want to make sure the cake batter is fully baked, you also want to stay away from baking it too much, which will give a dry texture.
- Handle with care. Use gentle hands when handling the individual cake layers during cooling and assembly, as the cake is very tender.
- Bring the frosting ingredients to room temperature. Butter and cream cheese straight out of the fridge will have trouble blending smoothly; you’re likely to get little unblended clumps of butter and cream cheese in your frosting.

Decorating Ideas
As you can see in the photos, I piped the frosting onto this red velvet cake, but if you don’t have a piping bag, an offset spatula can make a professional-looking cake too. No offset spatula either? Use a butterknife and then use the back of a spoon to create swirls in the frosting.
For the topping, I scraped some crumbs from the bottoms of the cake — you won’t miss them and they make a pretty garnish sprinkled on top of the cream cheese frosting. White or dark chocolate curls or edible glitter are also pretty!

How to Store
- Refrigerator: Store the cake in an airtight container or place it under a cake dome. You can also lightly cover it with plastic wrap. The cake keeps well for up to 5 days. I like to eat it chilled, when it’s cold and super dense – but if you want to take the chill off, let it sit on the counter for about 20 minutes before serving.
- Freezer: To freeze individual pieces of cake for later, place cut slices on a sheet pan. Then place the pan in the freezer for 3 to 4 hours to firm up the cake and frosting. Wrap up the frozen slices snugly with plastic wrap, followed by heavy duty foil. Add wrapped slices to a freezer-safe, airtight baggie and freeze for up to 2 months. Thaw overnight in the refrigerator before serving.

More Crowd-Pleasing Cake Recipes
Red Velvet Cake
Ingredients
Red Velvet Cake
- ¼ cup (4 tablespoons) unsalted butter
- 2¼ cups all-purpose flour
- 1¼ teaspoons baking soda
- 1¼ teaspoons baking powder
- ¾ teaspoon kosher salt
- 2 tablespoons unsweetened cocoa powder
- 2 cups granulated sugar
- ½ cup vegetable oil
- 2 large eggs
- 1 cup full-fat buttermilk
- 2 teaspoons pure vanilla extract
- 2 teaspoons red gel food coloring (use more or less, according to your desired amount of red coloring)
- ½ cup prepared plain hot coffee
- 1 teaspoon white distilled vinegar
Cream Cheese Frosting
- 16 ounces full-fat cream cheese, softened to room temperature
- 1 cup unsalted butter, softened to room temperature
- 4 cups sifted powdered sugar
- 1 teaspoon pure vanilla extract
- small pinch fine sea salt
Instructions
Red Velvet Cake
- First, gently melt the butter. Set it aside to cool while you proceed with making the cake.
- Set oven rack in the center position of the oven. Preheat oven to 350°F. Spray the interiors of two 9" round cake pans. Line bottom of each cake pan with a parchment paper circle, and lightly spray the paper, too. Set the pans aside.
- In a medium bowl, whisk flour, baking soda, baking powder, cocoa powder, and salt. Set aside.
- In a large bowl, combine sugar, vegetable oil, and the melted/cooled butter.
- Add eggs, buttermilk, vanilla, and red food coloring, and stir to combine. Then stir in hot coffee and vinegar.
- In three additions, add dry ingredients to the wet ingredients, mixing after each addition, just until combined. Batter will be thin.
- Right before adding batter to pans, give the batter a couple stirs to combine well, to ensure the batter has the same consistency in each pan. Then quickly divide batter evenly into each pan.
- Bake 30-35 minutes, or until firmed up in the center, and a toothpick inserted in the center comes out just clean.
- Let pans cool on a cooling rack until the pans are just a bit warm to the touch. Then run a knife around the perimeter of the cake, between the cake and the pan, to loosen the cake from the pan. The warm cake will be delicate. Carefully turn out cakes from pans, and remove parchment papers. If you'd like to sprinkle some cake crumbs onto the frosting as a final decoration (like my photos show), scrape some crumbs from the bottoms of the cakes and reserve.
Cream Cheese Frosting
- In a medium bowl, with an electric mixer on medium-high speed, beat cream cheese and butter until completely smooth, about 1-2 minutes. Add powdered sugar, vanilla, and salt, and beat until smooth, another minute or so.
Assemble
- Place one cake circle on a serving platter. Use an offset spatula to spread a layer of cream cheese frosting over the top, 1/4"-3/8" thick. Place second cake on top and press down gently to set. Spread the remaining frosting around the sides and over the top of the cake, swirling the spatula as desired. You can also leave the outside of the cake bare, as shown in my photos. Use an offset spatula or a piping bag fit with a large piping tip. This will give you a thicker layer of frosting for the middle layer and the top of the cake. Optional: sprinkle reserved cake crumbs over the top.
- Due to the cream cheese frosting, store cake in the refrigerator. I personally like to eat the cake chilled. If you prefer more room temperature, let cake sit out for 20 minutes or so before serving.
Nutrition Information:

I have baked this cake for Mom’s birthday, which is at the end of November, during the holidays. Pretty in red & white, the cake is perfectly festive for celebrating!
This post was originally published in 2010, then updated in 2025.
…This cake was delicious!!!!!!!!!!!! Was incredibly excited delicious cake Morning morning morning time to bake a delicious cake!! Baking…And DONEE! Then we eat cake yum
I’ve been looking for the perfect Red Velvet recipe and this one looks great. Can’t wait to try it!
Hi LeeAnn! I’d love to know what you think, please come back to let me know!
I am not quite sure what to suggest, Fay. I’ve made this cake, from this exact recipe, a number of times with no issues. The frosting is a softer set, but I’ve never had problems with it. I suppose you could try reducing the butter a bit.