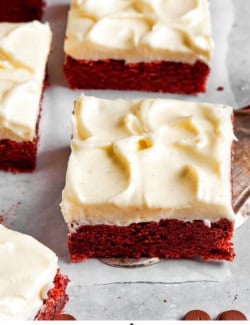
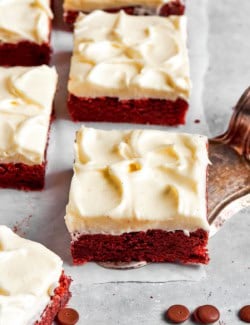
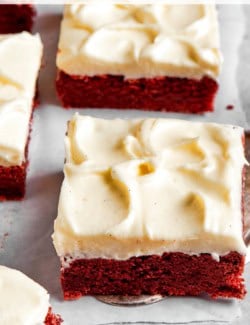
Move over red velvet cake! These Red Velvet Brownies are an even better way to enjoy that signature flavor — and that signature, irresistible cream cheese frosting. The brownies are thick and chewy-fudgy, just the way brownies were meant to be!

While I adore a beautiful Red Velvet Cake layered with cream cheese frosting, I can readily admit that not every day is a cake kind of day. This easy Red Velvet Brownies recipe, on the other hand, is the type of treat you can whip up on a weeknight, and serve without a plate and fork. I love how rich and fudgy these are, with the perfect cream cheese frosting!
Why We ❤️ This Red Velvet Brownies Recipe
Brownies are a favorite in our house. While we most often make my mom’s super simple Fudgy Brownies recipe, we also adore Heart Shaped Brownies with Fresh Raspberry Buttercream and Nutella Cheesecake Brownie Bites. Here’s why my family loves these red velvet brownies:
- Easy peasy, with a touch of “special”. If you can make a classic brownie recipe, you can nail these red velvet brownies too. They’re very easy to make, yet beautifully eye-catching. I don’t know anyone who doesn’t think that red velvet desserts are special!
- Perfect for holidays. Because of the red coloring, these brownies are especially fun to make for Christmas and Valentine’s Day. I often cut them into 2-bite portions, about 1½” square – which is perfect for holiday party platters. Also check out my Red Velvet Cookies and Red Velvet Sheet Cake recipes!
- Freezer-friendly. I also need to share that these brownies freeze really, really well. I appreciate this aspect a LOT – as I can bake them in advance if needed, and tuck them away in the freezer, for a later party time!
What You’ll Need
Time to gather your ingredients! Here’s what you’ll need. Scroll to the printable recipe card at the bottom of the post for exact ingredient amounts.

For the Red Velvet Brownies:
- Butter – Unsalted butter is always my go-to for baking. There’s no need to soften it since you’ll be melting it.
- Bittersweet chocolate – I use a good quality chocolate baking bar, which melts up perfectly smooth.
- Sugar – Granulated white sugar adds sweetness to the brownies.
- Eggs – This binds the batter together and gives the brownies structure, plus adds rich flavor and moist texture.
- Vanilla extract – Use pure vanilla extract, not imitation, for the very best flavor.
- Salt – I use kosher salt.
- Food coloring – You’ll want to use red gel food coloring – it’s thicker and more concentrated than liquid food coloring, to give you that beautiful deep red color.
- Flour – I use unbleached all-purpose flour.
- Baking powder – This helps the brownies rise.

For the Cream Cheese Frosting:
- Cream cheese – Use full-fat cream cheese and let it soften to room temperature.
- Butter – Let this soften to room temperature too.
- Vanilla extract – Again, you want pure vanilla for the best flavor.
- Powdered sugar – Sift this before you get started to keep your frosting free of lumps.
- Sea salt – A touch of fine sea salt adds balance and enhances the overall flavor.
How to Make Red Velvet Brownies
As promised, this recipe is incredibly easy. Scroll to the bottom of the post for the full recipe card.


- Melt the butter and chocolate. Place the butter and chocolate in a heavy saucepan and warm them over low heat until they melt and are smooth when stirred.
- Add the sugar and eggs. Whisk in the sugar, followed by the eggs.
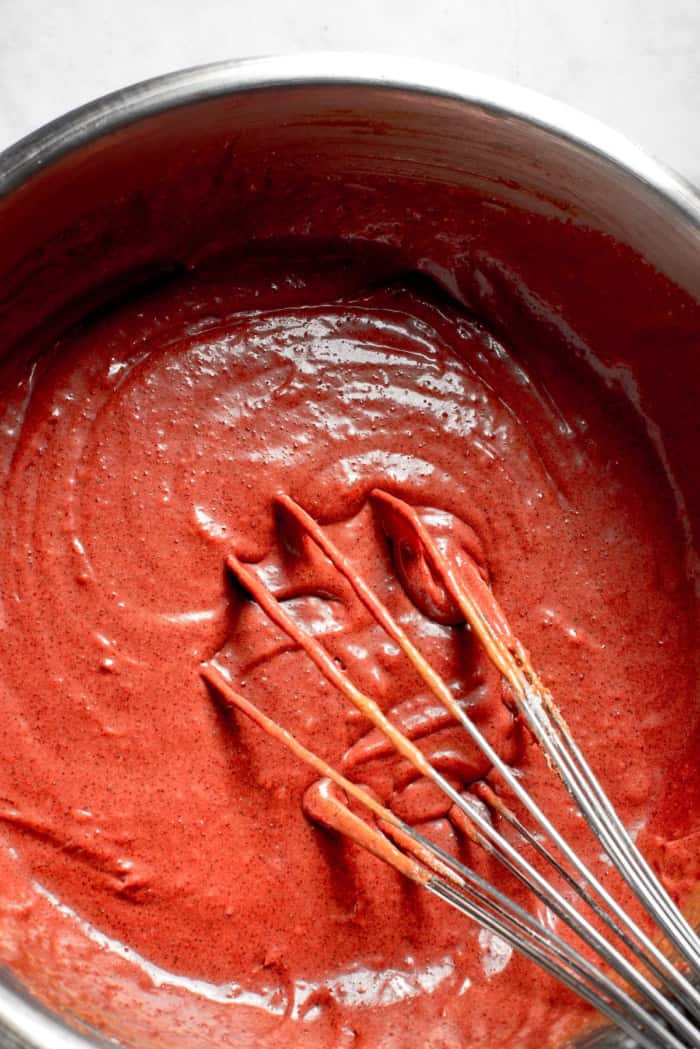
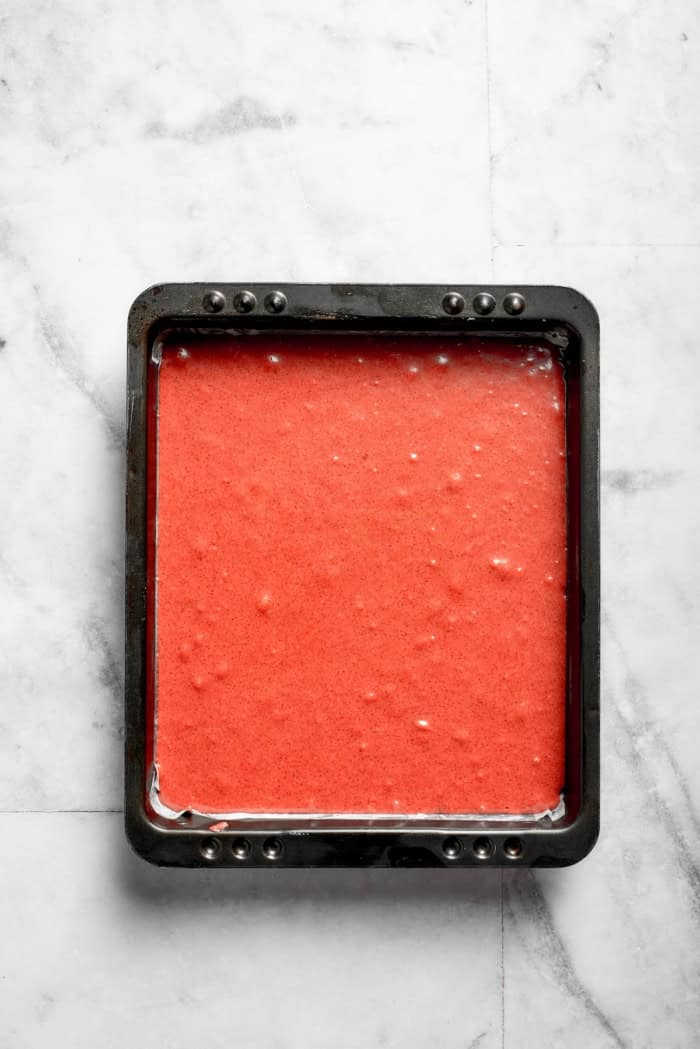
- Finish the batter. Stir in the vanilla, salt, and red food coloring. Sift in the flour and baking powder, and stir to combine. Then transfer batter to prepared pan.
- Bake. Place pan in a 325ºF oven and bake for 30 to 35 minutes. Let cool completely.


- Make the frosting. Beat the cream cheese and butter until lightened and fluffy. Add the remaining ingredients and beat until fluffy.

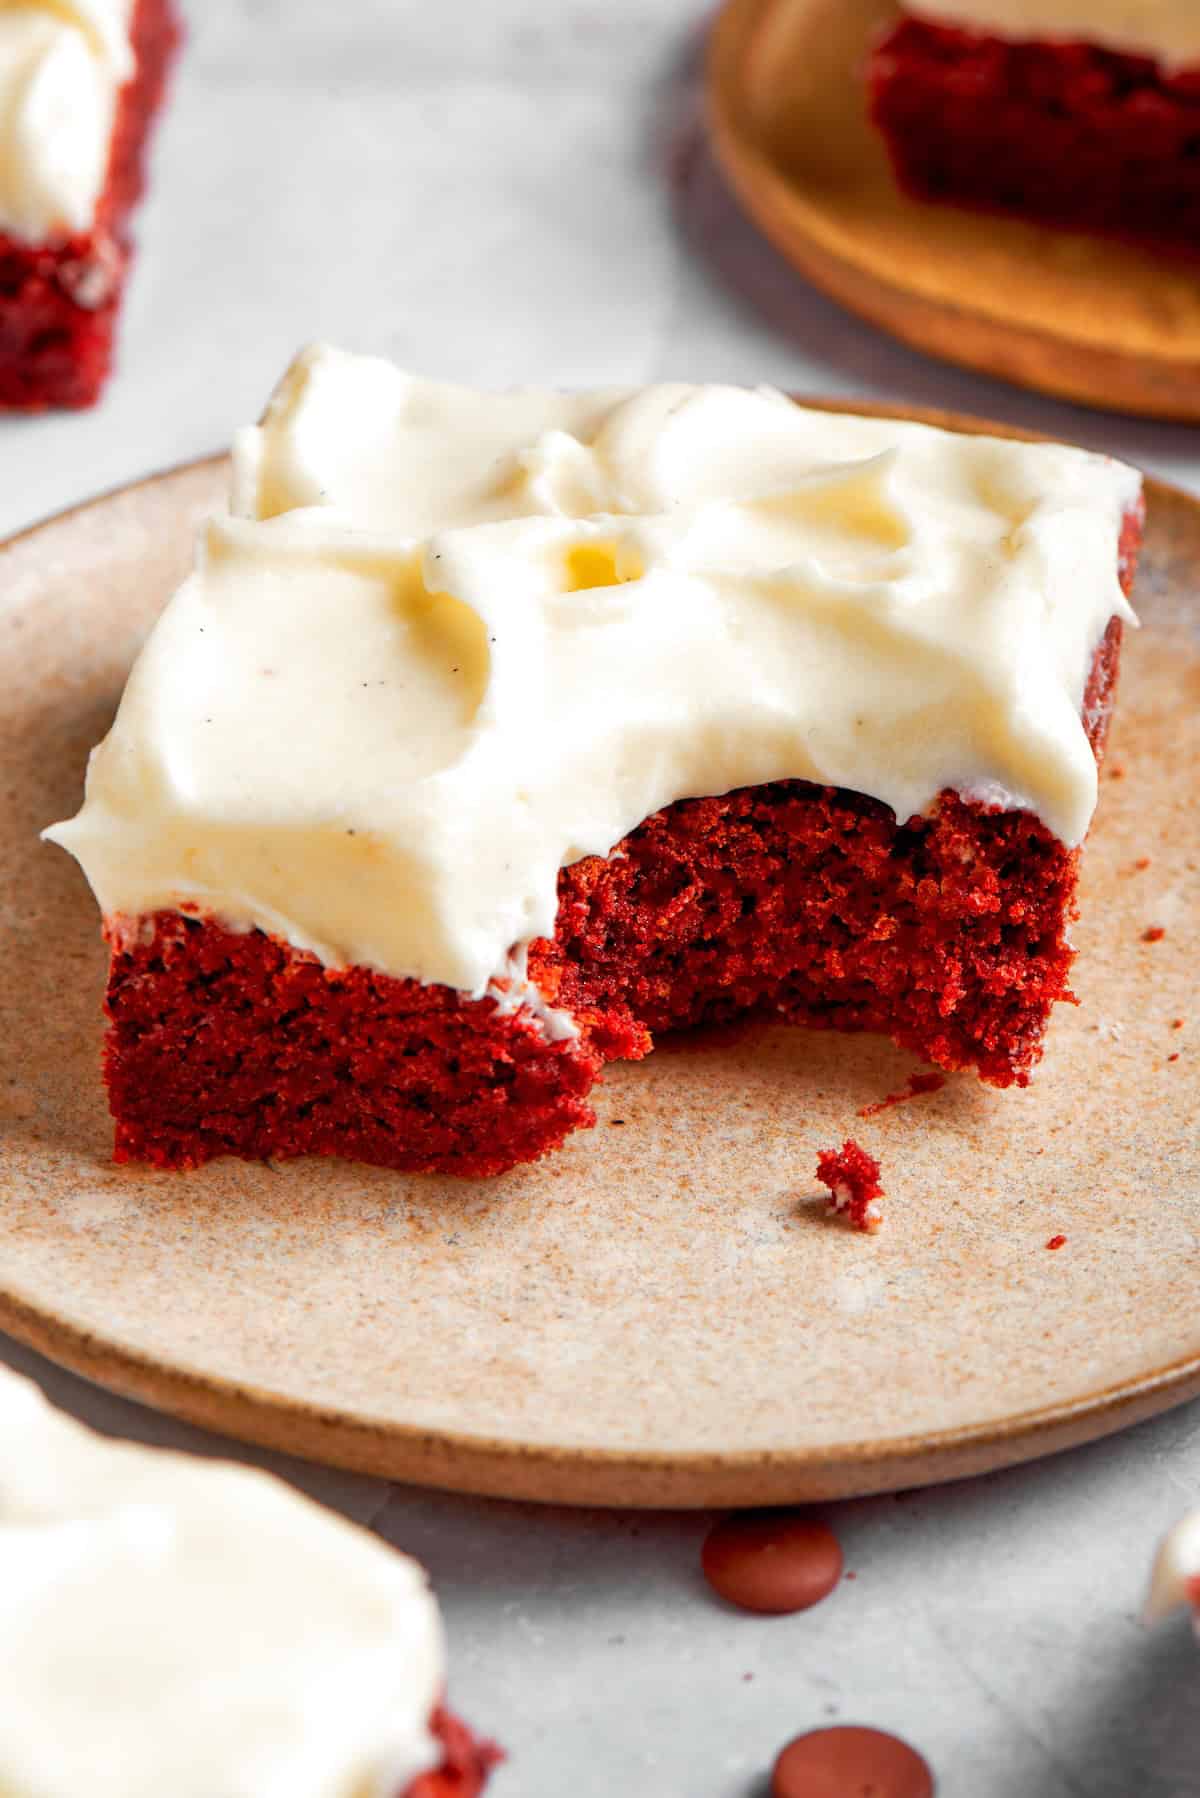
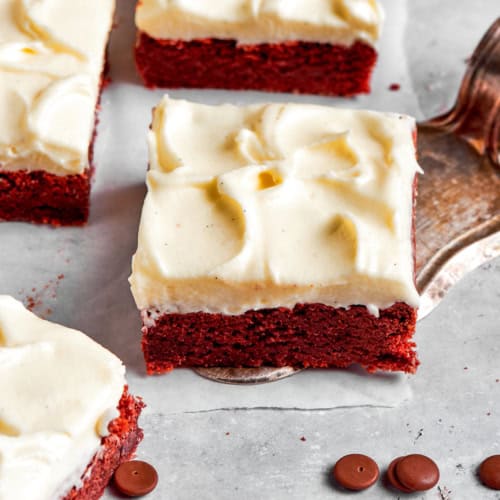
- Frost and slice. Lift the brownies out of the pan and transfer them to a cutting board. Spread the frosting over the top, then slice and serve.
Tips & Variations
These additional pointers will help you make sure your red velvet brownies turn out perfect!
- Don’t skip the parchment paper. Lining your pan with parchment paper not only prevents sticking but also makes it super easy to lift the brownies out for frosting and cutting. This makes a big difference if you’re wanting very neat cuts – I especially like to do this when making these for Christmas cookie platters.
- Let the brownies cool first. Wait for the brownies to cool completely before adding the cream cheese frosting. If the brownies are still warm, they can cause the frosting to get warm and weepy.
- Wipe the knife clean between each slice. If you’re making these to satisfy a midnight craving, it doesn’t matter much if you have clean cuts — but otherwise, you’ll want to wipe the knife after every single cut to keep the frosting pristine and free of red crumbs.
- Experiment with toppings. Sprinkle on white chocolate shavings, or crushed candy canes or peppermints for the holidays — just don’t skip that glorious cream cheese frosting!

How to Store
- Refrigerator: Because there’s cream cheese in the frosting, you’ll need to store these red velvet brownies in the refrigerator. In an airtight container, they will keep well for up to 5 days.
- Freezer: To freeze, I cut the brownies and place them in an airtight, freezer-safe container. They keep well for up to 3 months. Thaw in the refrigerator overnight, or on the counter at cool room temperature for 30 minutes prior to serving.
More Reader Favorite Brownie Recipes
Red Velvet Brownies
Ingredients
Red Velvet Brownies
- ½ cup unsalted butter, diced
- 3 ounces bittersweet chocolate baking bar, chopped
- 1½ cups granulated sugar
- 3 large eggs
- 2 teaspoons pure vanilla extract
- ¼ teaspoon Morton kosher salt
- 3 teaspoons red gel food coloring
- 1 cup all-purpose flour
- ½ teaspoon baking powder
Cream Cheese Frosting
- 4 ounces full-fat cream cheese, softened to room temperature
- 6 tablespoons unsalted butter, softened to room temperature
- 1 teaspoon pure vanilla extract
- 2 cups sifted powdered sugar
- 1 pinch fine sea salt
Instructions
Red Velvet Brownies
- Preheat oven to 325°. Line a 9” x 9” metal baking pan with parchment paper.
- In a large heavy-bottomed saucepan over very low heat, stir butter and chocolate until chocolate is melted. Remove saucepan from heat.
- To the chocolate mixture, immediately whisk in sugar, then eggs, 1 at a time. Stir in vanilla, salt, and food coloring. Sift flour and baking powder over mixture and stir gently to incorporate fully. Transfer batter to prepared pan – mixture will be thick.
- Bake brownies until puffed and a bit dry-looking, and toothpick inserted into center comes out with some moist batter attached, 30 to 35 minutes. Cool completely in pan on rack.
Cream Cheese Frosting
- Using an electric mixer on medium-high speed, beat cream cheese and butter in a medium bowl until light and fluffy, about 1 minute or so. Add vanilla, powdered sugar, and salt, and mix on low just to combine. Then turn speed up to medium-high and beat until fluffy, about 1-2 minutes.
Assemble
- For super clean slices, cut around the perimeter of the pan to release the brownies. Using the parchment paper, lift the brownies out of the pan and set on a cutting board. Spread cream cheese frosting evenly over the cooled brownies. With a long, non-serrated knife, cut into individual brownies, wiping the knife clean after each slice. (If you're not concerned about super clean slices, just frost the brownies right in the pan.)
Nutrition Information:
This post was originally published in 2011, then updated in 2025.

Want to make these for two weekend Christmas parties. Can I make one weekend, freeze half and have them still be good after thawing the following week?
Your recipe is amazing and the brownies are to die for! :)
Was wondering if you could also make mini cupcakes using this recipe, in a mini muffin pan? How long would the bake time be, and would you need to modify the ratio of the ingredients?
Included these in a Valentine’s Day roundup tonight! Beautiful photos!
Amanda
Thank you, Amanda.
i made these last night for friends, and they were such a big hit. thanks.
That’s wonderful to hear. Thank you SO MUCH for taking the time to come back and let me know. :)
Yay! Don’t know what it is about red velvet but the brownies are fabulous!
Those look even better than red velvet cupcakes! Way more original to serve in little squares. You can actually see the red part that is usually covered by a cupcake wrapper.
I made these for New Year’s! I heard that red velvet cake was good luck… Not sure where I heard it, but hey… It can’t hurt!
They were super easy to make and turned out beautifully!
Thanks for letting me know, Tammy. I’ve never heard that before, but it sounds great to me!! So glad you liked them.