
This Peppermint Marshmallows recipe is a load of sweet and puffy peppermint joy for wintertime and the holidays. Whether you add the homemade marshmallows to a mug of hot chocolate or sink your teeth into them as-is, they are absolutely delightful!

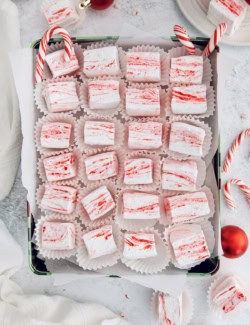
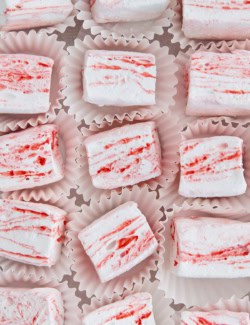
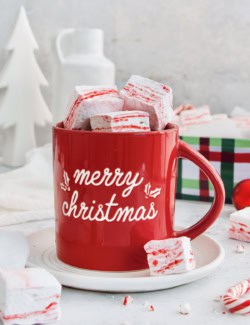
It seems to run in my family: the love of marshmallow. And ever since I tried my hand at Homemade Marshmallows many years ago, I was convinced that making your own marshmallow from scratch is one of the most wonderful joys in the world. These Peppermint Marshmallows, with their pretty red swirls, are perfect for winter and Christmastime. Plop them into mugs of Hot Chocolate, tuck them into tins for holiday gifting – they spread cheer wherever they go!
Why These Homemade Marshmallows Are a Must-Make

I thank our oldest daughter for making this recipe a reality in our kitchen. Whenever I’d make the traditional vanilla flavored marshmallows, it was Hatti who was persistent in requesting a peppermint version. So I surprised her one day. When she came home from elementary school, there were peppermint marshmallows waiting for her. She smiled big, grabbed a piece of that sweet and fluffy peppermint joy, and did a little happy dance across the kitchen. Here’s why this recipe is family favorite:
I know this time of year is busy, but I promise it’s worth your while to add these peppermint marshmallows to your agenda. Really, what could be more fun than a tower of sweet pillowy marshmallows, made from scratch? It’s the ultimate in kitchen play!
- A holiday treat that’s not cookies. I always aim for variety when it comes to holiday treats – it’s about so much more than cookies! Homemade marshmallows on the Christmas platters always get people excited – because so many people don’t know that you can make your own! Pair these with my grandma’s Chocolate Caramels and these crispy Peanut Butter Truffles for a delightful assortment.
- The ultimate in kitchen play! If you have a trusty stand mixer, there’s nothing keeping you from enjoying your very own puffy homemade marshmallows. This recipe offers so much satisfaction for those who like to create delicious, pretty things in the kitchen.
- Fantastically festive. I love how the red coloring is swirled so prettily throughout the marshmallow. And then there’s the cooling peppermint flavor — these taste like candy canes in marshmallow form!
- So much better than store-bought. Homemade marshmallows are just the best treat, and are absolutely superior to the ones found in the baking aisle at the grocery store.
Enjoy!


What You’ll Need
A handful of pantry staples come together to make something that feels gourmet and gift-worthy! Scroll down to the printable recipe card to find the exact ingredient quantities and full recipe instructions.
- Powdered sugar – This is used to coat the pan and toss the peppermint marshmallows after cutting, to keep them from sticking to each other (and your fingers).
- Water – This activates the gelatin powder to create a soft and puffy-chewy gel. It is also the base of the sugar syrup.
- Gelatin – Look for unflavored gelatin near the flavored Jell-O mixes at the grocery store. This forms the puffy structure of the marshmallows.
- Sugar – Granulated white sugar.
- Corn – Light corn syrup prevents crystallization and adds a subtle vanilla flavor.
- Kosher salt – I use Morton kosher salt. Just a pinch, for balance.
- Peppermint extract – Be sure to use peppermint extract – not mint extract, which has more of a wintergreen flavor.
- Red food coloring – For the festive swirl. You can leave it out if you’d like, but I love adding it because it’s fun to marble it in and it makes the finished marshmallows look like candy canes!
How to Make Homemade Peppermint Marshmallows
Your next mug of hot chocolate is about to be incredibly awesome. Here’s a brief overview of the process, with the full instructions in the recipe card below.


- Prepare the pan. Lightly coat an 8×8 pan with nonstick spray and dust it with powdered sugar. Tap out the excess.
- Soften the gelatin. Sprinkle the gelatin over ⅓ cup of water in a stand mixer bowl and let this sit for 10 minutes to soften the gelatin.
- Cook the syrup. Heat the remaining water, sugar, corn syrup, and salt in a pan over medium-high heat until the mixture reaches 240°F on a candy thermometer.


- Combine and whip. With the mixer on low, slowly pour the hot syrup into the gelatin mixture. Increase to high speed and beat until thick and stringy.
- Make it pepperminty. Add in the peppermint extract and beat for 2 minutes more.
- Create swirls. Add the food coloring and turn the mixer only 1–2 times on very low speed to create a marbled effect.


- Spread and cool. Transfer the mixture into the prepared pan and press with wet hands to spread it evenly. Let the mixture set for at least 1 hour.
- Cut and dust. Cut the marshmallows into squares with a pizza cutter and toss with powdered sugar in a shallow bowl, making sure they’re well-coated. Serve or store for later.

Tips & Variations
I have a few more pointers and some variation ideas that you can try with these peppermint marshmallows.
- Use a candy thermometer. Unless you’re an experienced candy maker, it’s essential to use a candy thermometer to get the right texture. You can find inexpensive clip-on thermometers online and at kitchen stores.
- A sturdy stand mixer is a must. The marshmallow mixture gets super thick and sticky while mixing in the bowl, and needs to be beaten for about 10 minutes to get the right consistency. Human arms are just not cut out for the job. At least my arms aren’t!
- Don’t overmix the color. Only turn the mixer’s beater once or twice after adding the coloring, or the swirl effect will disappear and you’ll have straight-pink marshmallows instead. (That’s not a terrible worst case scenario, though — pink peppermint marshmallows are still delicious. Check out my adorable pink Marshmallow Hearts!)
- Try different shapes. Use cookie cutters shape your marshmallow into stars, candy canes, or hearts. I recommend coating the cutters in powdered sugar before each cut to minimize sticking.
- Dip them in chocolate. Dipping the marshmallows into melted dark chocolate makes them extra amazing, and very fun for gifting. And to make them extra-extra amazing, sprinkle some crushed candy canes over the chocolate before it sets.

Serving Suggestions
Hot cocoa with a couple of these fluffy peppermint marshmallows plopped into the mug is always a hit. But can I tell you a secret? They’re also incredible in a Vanilla Steamer (add a little peppermint extract instead of vanilla and almond) or a mug of coffee with a splash of milk or cream = a fun peppermint latte!
Add homemade marshmallows to a Christmas Charcuterie Board or a holiday dessert board with cookies and chocolates, like my Ritz Cracker Toffee and chewy Ginger Molasses Cookies. Then before your guests leave, give them boxes or tins so they can pack up their own selection and take a little of the holiday magic home with them.
How to Store
- Room temperature: Store these peppermint marshmallows in an airtight container at room temperature for up to 2 weeks. Keep them in a single layer or separate the layers with wax paper.
- Freezer: Freeze up to 2 months. Thaw at room temperature before serving.

More Holiday Treats to Make & Share

Peppermint Marshmallows
Ingredients
- 1 cup powdered sugar, divided
- ⅔ cup water, divided
- 3 packages (¼ ounce each) unflavored gelatin (found by the Jell-O at the grocery store)
- 1 cup granulated sugar
- 1 cup light corn syrup
- pinch of kosher salt
- 2 teaspoons pure peppermint extract
- 10 drops red food coloring
Instructions
- Lightly spray the inside of an 8''x8'' pan with non-stick cooking spray. Sprinkle with ½ cup of the powdered sugar and tilt the pan until there is a thick coating of powdered sugar on the bottom and sides of the pan. Gently shake out any loose powdered sugar and discard. Set pan aside.
- Pour 1/3 cup of the water into the bowl of a stand mixer. Sprinkle the gelatin over the water and stir briefly to incorporate and soften. Let stand for about 10 minutes, or until the gelatin has softened.
- In a medium saucepan, off the heat, combine the remaining 1/3 cup of the water with the granulated sugar, corn syrup, and salt. Place the saucepan over medium-high heat. Clip a candy thermometer on the inside of the pan, making sure it doesn’t touch the bottom. Cook the mixture without stirring until reaches 240°F.
- With mixer on low speed, very slowly and carefully add the hot syrup to the softened gelatin. Increase mixer speed to high. The mixture will start out clear, then quickly turn very white. Beat for about 7 minutes, or until the marshmallow gets very thick and sticky, and starts to pull away from the sides of the bowl, in string-like pieces.
- Add peppermint extract and beat 2 more minutes.
- With mixer stopped, add red food coloring in random drops over the top of the marshmallow mixture. On very low speed, give the marshmallow just 1 to 2 turns with the mixer blade, until you see swirls of red and white. Do not over mix, or you will lose the red streaks and end up with all-pink marshmallow.
- Spread swirled marshmallow mixture into prepared pan using a lightly oiled spatula. With wet hands, press the batter evenly into the corners of the pan. Just keep rewetting your hands to help with the stickiness. Set aside for at least 1 hour, or until the mixture is firm and cool.
- Sift some powdered sugar into a shallow bowl. Run a wet knife around the edge of the cooled pan to loosen the marshmallow. Remove the marshmallow from the pan, onto a cutting board or parchment paper. Cut into squares, using a pizza cutter wheel. This is a sticky job, but just have patience. It’s worth it! I like to cut each pan into 36 squares, which gives you marshmallows that are about 1¼” square, but feel free to cut them into whatever size you like. Toss each marshmallow in the remaining powdered sugar until completely coated.
- Store marshmallows in a single layer, or in layers separated by wax paper. They will keep very well for quite a long time (a couple weeks!) when stored airtight at moderate temperature. They also keep well in the freezer. Eat plain, dipped in chocolate, or in hot chocolate!
Nutrition Information:
This post was originally published in 2013, then updated in 2025.

I was so excited for these, but I *really* wish I would have read through the comments and questioned the amount of peppermint. An initial taste makes me think toothpaste rather than treat…the peppermint is way too strong for my liking. These may still be good in hot cocoa, but they are not edible alone. I will try this again with half the peppermint or try vanilla next time. Thanks for sharing. It was an easy and fun recipe!
I’m sorry to hear that these were too peppermint-y for you with 2 teaspoons of extract. I did try using 1 teaspoon of extract, as you’ll also see in the comments, but that just didn’t have enough peppermint flavor for our family.
i live in england , and i love seeing your recipes but , what on earth is corn syrup ?? is there an english equivalent or substitute , please ?
Hi Michelle. Corn syrup might also be referred to as glucose syrup. If you are unable to find either, I did find some marshmallow recipes online that don’t use corn syrup, but have not tried any of them.
Lovely creation! This Christmas I made marshmellows the first time. My first batch was a nightmare as I had no idea that it was THAT sticky – 50% stayed in the bowl. Next two batches I did learn. The third batch I did same as the first – just as directed but I moved faster. I agree 100% it would not be doable with out the Stand mixer & mine was new to me this Oct. The Prof version took 7.5 – 8 min to mix and not 10 or 15min. I left mine vanilla, and for Christmas goodies after slicing I dipped an edge of the triangle piece into white chocolate and pretty sprinkles. Man are they yummy in hot cocoa or warmed eggnog drinks. Cheers… and I look forward to fun marshmellow Easter ideas! :)
Oh wow, this looks perfect! I can’t believe I have never made marshmallows before!
i love these in hot cocoa!
Wowzers! I just finished and folks, we’ve got a winner! It is a sticky process, but not that bad. I can’t imagine preparing this without a kitchen aid stand mixer, though. I have had my trusty one about 15 years, I guess his name must be Biscuit, that’s his color.
I predict many happy homemade marshmallows in my family and friends future. These would be great with a coating of melted chocolate.
Thanks so much for the recipe.
Merry Christmas.
These peppmermint marshmallows are so pretty, I bet they are amazing!
LOVING your new Yellow Kitchenaid mixer, mine is red and on the fritz, I’m counting the days till I need a new one and secretly praying it holds on a lot longer. It sure is the workhorse of the kitchen!
The yellow is such a pretty color!
Thank you, Diane – the marshmallows ARE amazing! ;)
As much as I like to bake and make treats, I have NEVER made homemade marshmallows before. My husband loves the ones you buy in the store and so I just never wanted to put the time and energy into making them, until now! These ones looks sooo good! Hopefully during my time off for the holidays I can take the time to make them.
As for your mixer, I love your new yellow one!!!! I had the old cobalt blue as my first one that used to my Mom’s mixer before it became my mixer. Last year I moved up to get the bigger professional KichenAid mixer in the color silver and I named him “Hi-Yo, Silver” from the old TV/Radio show Lone Ranger because he is my silver workhorse! :-)
Definitely carve out a bit of time to try homemade marshmallows. I’ve never met a marshmallow fan who likes store ones better! And YAY for your new mixer…I’d love that professional series one, but its larger size just doesn’t work well in my small kitchen.
Such a gorgeous color, and I love the swirls on those marshmallows!
Thanks bunches, Shaina – and Merry Christmas to you and yours!