
Make the best Grilled Pizza at home with my tested and perfected pizza dough recipe and easy-to-follow instructions. The crust is thin and lightly chewy, with crispy-charred edges. And the red sauce is simple and fresh-tasting. Add classic Margherita toppings, or go your own way with any ingredients that make you happy!

I first shared our Grilled Pizza recipe just a few months after launching A Farmgirl’s Dabbles, way back in 2010. Then our family enjoyed pizza every day in Italy a couple years ago…and our barometer for great pizza rose higher. MUCH higher! So last summer we made a LOT of pizza on our grill, to get our recipe as close as possible to the pizzas we loved in Italy. Our exploration led to some recipe improvements, including specific ingredients and techniques, and I’m so happy to share it all here with you. The dough is easy to make and work with, the sauce is on-point, and the toppings are no-frill, but absolutely perfect. Welcome to our grilled version of pizza in Italy!
You Should Totally Make Our Grilled Pizza Recipe

When grilled pizza is on the menu at our house, it’s a family event. Our daughters like to get their hands in the dough, kneading and punching it down. And we all find a job in preparing topping ingredients. Slicing, chopping, and sometimes frying, we are all brought together in happy anticipation of sharing a very fun and tasty meal!
WHAT YOU CAN EXPECT:
- Tested and perfected dough. This pizza was our “project” last summer. I started out with my tried-and-true Thin Crust Pizza Dough, which I call my “faux brick oven pizza recipe”. This dough won’t let you down. (I promise: it won’t fall through the grill grates!)
- Fresh, simple red sauce. The pizzas in Italy always had the best, freshest tasting tomato sauce. It was on the thin side and almost “juicy”, not thick and pasty. So that was my goal — follow my recommended ingredients, and you’ll see exactly what I mean!
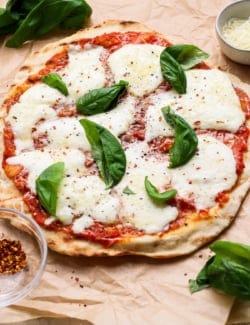
- Endless options. In the recipe card below, I share classic Margherita toppings, like we most often enjoyed in Italy. This includes the kind of mozzarella that closest resembles what we ate there. But you can add anything you like to your grilled pizzas.
- The BEST flavor. Grilling adds a beautiful, flavorful char to everything from Grilled Vegetables to Grilled Shrimp. If you love restaurant-style wood-fired pizza, this homemade pizza cooked on a grill mimics it very well!


What You’ll Need
You can customize this grilled pizza recipe with your own favorite toppings. But do use my dough recipe, perfected for the grill, below! Store-bought dough won’t be the same. Scroll down to the printable recipe card to find the exact ingredient quantities and recipe instructions.
Grilled Pizza Dough:
- Water – If you have an instant read thermometer, the temperature should be around 105ºF. If you don’t, just remember to err on the side of cooler, not hotter. Hot water will kill the yeast; cooler water will just slow its rise. I once heard that it should feel like a warm bottle that you’d feed a baby, and that’s always worked well for me.
- Sugar – This feeds the yeast so the dough rises.
- Yeast – I use “instant dry yeast”. If you don’t bake often, make sure your yeast hasn’t expired.
- “00” pizza flour – You can find this at most grocery stores these days, but specialty cooking stores often carry it too. Failing that, you can order it online (Amazon carries it).
- Kosher salt – I use Morton kosher salt.
- Olive oil – This keeps the dough moist on the inside and helps it get crispy on the outside.
Simple Red Sauce:
- Tomatoes – I tested a number of different brands of whole peeled tomatoes, as my goal was to have sauce with super fresh tomato flavor and a thinner texture, like the pizza we enjoyed in Italy. I landed on Muir Glen brand, for both flavor and texture. (Many brands have thicker sauces and do not taste as fresh.)
- Garlic – Fresh garlic is a must for a good tomato sauce.
- Kosher salt – Feel free to adjust the amount as needed.
- Red pepper flakes – You can omit the red pepper flakes if you prefer a mild sauce, but I think even just a little bit boosts the overall flavor.
- Sugar – Just a bit balances the acidity of the sauce.
Margherita Pizza Toppings:
- Olive oil – Brushing oil on the crust creates a barrier between the sauce and the dough, which keeps the crust from getting soggy.
- Parmesan – Freshly grated Parm is best; it melts better/smoother and just tastes fresher than pre-grated Parmesan.
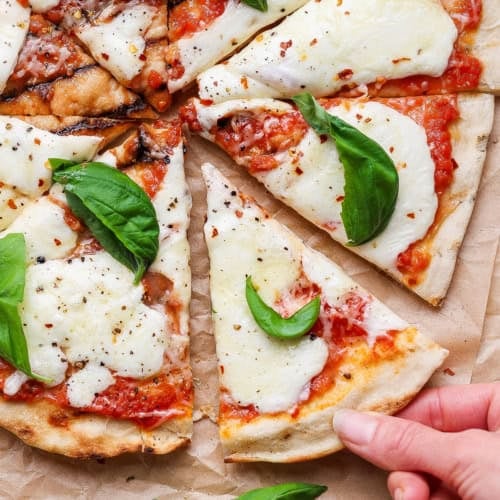
- Mozzarella – I use fresh hand-pulled mozzarella, which has a mild, milky flavor, is beautifully chewy, and provides epic cheese pulls. This is how we enjoyed pizza in Italy, too!
- Red pepper flakes – Again, you can leave these out if you don’t want any heat.
- Black pepper – Fresh, coarsely ground black pepper adds a little depth of flavor.
- Basil – Margherita pizza has the colors of the Italian flag: red tomato sauce, white mozzarella, and the fresh basil is our green!
How to Make Grilled Pizza
Here’s how to cook pizza on the grill, step-by-step.
Make the Dough:


- Activate the yeast. Combine the warm water and sugar in a bowl, then sprinkle the yeast over the top. Let this sit until the yeast gets frothy.
- Combine the dry ingredients. Mix the flour and salt in the bowl of a stand mixer fitted with a dough hook.
- Mix the dough. Pour the yeast mixture and 2 tablespoons of olive oil into the flour mixture. Mix on low speed until the wet and dry ingredients are combined, then mix on medium for 2 minutes.


- Form dough balls. Roll the dough up into a ball and place it on a lightly floured countertop or parchment paper. Flatten into a disc, then divide into 4 portions. Roll each portion into a ball.
- Let the dough rise. Drizzle the remaining oil in a baking dish. Transfer the balls to the baking dish, roll them to coat them in oil, and cover the baking dish with plastic wrap coated with nonstick spray. Let rise until the dough doubles in size, about 1 to 2 hours.
Make the Sauce:

- Drain the tomatoes. Place the tomatoes in a colander set over a bowl. Use a wooden spoon to press on the tomatoes to release the juices. Drain for 30 minutes.
- Blend. Use an immersion blender or regular blender to blend the tomatoes with the garlic, salt, red pepper flakes, and sugar.
Grill the Pizzas:


- Prepare. Heat your grill to 435℉, then clean and oil the grates. Punch down one of the dough balls and place it on parchment paper. Press or roll the dough into an 11-inch circle.
- Start grilling the crust. Brush olive oil on top of the dough. Flip the oiled side onto the grill grates and peel off the parchment paper. Grill for 1½ minutes, until the crust is just set.


- Top it. Transfer the crust to a baking sheet with the grilled side facing down. Brush with oil, then flip again. Add sauce, Parmesan, torn mozzarella, and a drizzle of olive oil.
- Finish grilling. Set the pizza back on the grill grates. Close the cover and cook until the cheese is melted. Transfer the grilled pizza to a baking sheet and finish with more Parmesan, red pepper flakes, black pepper, and fresh basil. Repeat with the remaining dough and toppings.
Brenda’s Tips for Grilled Pizza Success
I have a few more pointers to help your grilled pizza turn out perfect!
- Watch the dough, not the clock. The dough should be roughly doubled in size. If an hour elapses and it hasn’t doubled, let it rise longer. The amount of time it takes depends on the temperature in your kitchen and of the water you use. If you want to speed up the rising time, place the dough in a warmer location. Sometimes I turn the oven on low and let the dough sit on the stovetop, where it’s warmer.
- Let the dough rest if it’s not holding its shape. If you’re trying to stretch the dough into a circle to form the crust and it wants to shrink back, let it rest for a few minutes. Sometimes you just need to pause to let the gluten relax. Different temperature and humidity, etc. can cause the dough to react differently from one day to the next.
- Set up a topping station. This recipe moves fast, so you’ll want to have all your toppings at the ready. I set everything on a sheet pan that we can carry out to the grill: a bowl of sauce with a spoon, torn mozzarella, a small bowl with the Parmesan, a pepper grinder, red pepper flakes, and olive oil for drizzling.

More Topping Ideas
With a thin crust like this, you want to keep your pizza simple. Too many toppings will give you a soggy grilled pizza and no one wants that! Here are a few more ideas to try.
- Farmgirl’s favorite: Basil pesto, Kalamata olives, Roasted Tomatoes, and crumbled Italian sausage with torn fresh mozzarella.
- Grilled Hawaiian: Grilled Pineapple, Canadian bacon, and shredded mozzarella. Red pepper flakes are fun with this, too!
- Peach caprese: Sliced peaches, torn fresh mozzarella, pesto, and fresh basil leaves. Add a drizzle of balsamic glaze to finish.
How to Store & Reheat
- Refrigerator: Wrap leftovers in foil or transfer to an airtight container. Store in the fridge for up to 3 days.
- Freezer: To enjoy grilled pizza anytime, make the recipe as described but leave off the fresh basil. Let the pizzas cool, then wrap with plastic wrap and then a layer of foil. Freeze for up to 3 months. Add the fresh basil after baking.
- To reheat: Warm the pizza in a 450ºF oven until heated through. The microwave also works, but the crust won’t be as crispy.

More Recipes for Pizza Lovers
Grilled Pizza
Ingredients
Grilled Pizza Dough
- 1¼ cups warm (105℉) water
- 2 teaspoons granulated sugar
- 2 teaspoons instant dry yeast
- 4 cups "00" pizza flour, plus a bit more for flouring the countertop if needed
- 1 teaspoon Morton kosher salt
- 2 tablespoons + ½ teaspoon extra-virgin olive oil, divided
Simple Red Sauce
- 1 can (28 ounces) whole peeled tomatoes (I use Muir Glen brand)
- 1 large clove garlic, minced
- ¼ teaspoon Morton kosher salt
- ⅛ teaspoon red pepper flakes
- 1 big pinch granulated sugar
Margherita Pizza Toppings
- 8 teaspoons extra-virgin olive oil, divided
- 4 ounces freshly grated Parmesan, divided (use the small holes on a box grater)
- 8 ounces fresh hand-pulled mozzarella, and up to 16 ounces if you prefer more cheese, divided (a mozzarella ball wrapped tightly in plastic, not the mozzarella balls packaged in a tub with liquid)
- ½ teaspoon red pepper flakes, divided
- 8 big grinds freshly ground black pepper, divided
- fresh basil leaves
Instructions
Grilled Pizza Dough
- Add warmed water to a 2-cup liquid measure or similar sized bowl. Add sugar, then sprinkle yeast evenly over the top of the water. Let stand for 5-10 minutes, until yeast is frothy.
- Meanwhile, add flour and salt to bowl of a stand mixer fitted with a dough hook. Stir to combine.
- Add frothy yeast mixture and 2 tablespoons of the olive oil to flour mixture. Combine on low speed for about 30 seconds, just to combine the wet and dry ingredients. Then increase speed to medium and let the dough hook knead the dough for 2 minutes. There should be no loose flour left in the bottom of the bowl.
- Form dough into a ball and flatten it slightly into a disk shape on the countertop. Use a bench scraper to divide dough into four equal portions. Roll each portion into a ball on countertop, firmly using the palm and heel of your hand, adding a little flour to the countertop if needed.
- Drizzle remaining ½ teaspoon olive oil over the bottom of an 8"x8" baking dish. Add dough balls and roll them in the olive oil to evenly coat. Lightly spray a piece of plastic wrap with non-stick spray and cover pan of dough balls, sprayed side down. Let rise at room temperature 1-2 hours, until doubled in size.
Simple Red Sauce
- About 45 minutes before the dough is ready, make the red sauce. Add tomatoes to a colander set over a bowl. Use a wooden spoon to gently press on individual tomatoes, and split them open with the side of the spoon, to release juices inside. Let drain for about 30 minutes, shaking the colander and pressing on tomatoes occasionally. I always use Muir Glen whole peeled tomatoes and strain away at least 1⅔ cups of tomato juice. You really want as much juice strained away as possible.
- Place strained tomatoes in a small bowl with tall sides, along with the garlic, salt, red pepper flakes, and sugar. Use an immersion blender to blitz everything until smooth. (This could also be done in a blender.)
Margherita Pizza Toppings
- Also, while dough is rising, prep your toppings. Place prepared toppings on a rimmed pan or tray, something that's easy to carry out to the grill. You will be adding red sauce and toppings to individual pizzas out by the grill.
Put It All Together and Grill!
- Heat grill to 435℉. Make sure grates are very clean and oiled well. Prepare a space near the grill for pizza toppings and pizza assembly.
- Punch down one of the dough balls to release air bubbles, then transfer it to a piece of parchment (should be at 12"x12") on the countertop. Cover remaining dough balls in the pan with same piece of plastic.
- Form dough ball into a flattened disc, and with both hands, use your fingers to press into an 11" circle. Work from the center outward, creating an even thickness all the way across. Do not create a raised outer crust at the perimeter. The dough will be quite thin, and the parchment paper will help the dough retain its shape. However, if the dough wants to shrink back a bit, let it sit for a minute or two to relax before shaping further. Due to many variables (different ingredients, room temperature, humidity, etc), if you have any issues, try pressing out the dough right on the countertop (not on parchment), using a roller if you find that easier, and then transfer the 11" dough circle to a piece of parchment.
- Brush a thin layer of olive oil over the top of the dough, then slide parchment with dough circle onto a large non-rimmed cookie sheet and head to the grill. Quickly yet gently, lift the parchment with dough and flip it over onto the grates, placing the oiled dough directly onto the grates. Peel the parchment paper off the top.
- Close grill cover and cook about 1½ minutes, until crust is set, with crisp charred grill lines on the bottom side. While you wait, set out your pan of pizza toppings.
- Use a large spatula or tongs to transfer par-grilled crust to cookie sheet, grilled side still facing down. (Close grill cover.) Lightly brush olive oil over top of crust, then flip crust over so the grill marks are facing up. Add ⅓ cup red sauce and spread evenly over the crust. Sprinkle some grated Parmesan over the top. Then tear mozzarella into thin pieces that are about 1" to 2" in diameter and scatter over the top. Drizzle with a little bit of olive oil.
- Place pizza on the grates and close the grill cover. Cook for about 4½ minutes, or until cheese is melted and bottom of crust is cooked to your liking. If needed, lower grill temperature slightly to keep the cheese melting while not overcooking the crust.
- Transfer pizza to cookie sheet. Sprinkle with a bit more Parmesan, followed by a big pinch of red pepper flakes and a couple grinds of black pepper. Finish with a sprinkle of small whole basil leaves or thinly sliced basil leaves.
Notes
- Method 1 – This method is the one in the recipe card above, which has you completing one pizza on the grill before starting to form the next circle of pizza dough.
- Method 2 – This method has you forming all the dough balls into 11″ circles right away, and then par-grilling each crust. To start, form two or more dough balls into 11″ circles, with each dough circle on parchment paper. If making more than 2 pizzas, I recommend covering each dough circle with a kitchen towel or sprayed piece of plastic wrap, so the dough doesn’t dry out and form a dry outer skin. Grill one (or more, if your grill is large enough) dough circle for 1½ minutes to cook and char the bottom side. Remove par-grilled crust to a large rimmed pan. Repeat this step with the remaining dough circles, until all dough circles are par-grilled. Then proceed with Step 6 under “Put It All Together And Grill” in the recipe card above, brushing the uncooked side of each crust with oil, flipping it over, and adding sauce and ingredients to the cooked/charred side of each crust. Then grill one or more pizzas at a time, until finished.
Nutrition Information:
This post was originally published in 2010, then updated in 2026.

Will be trying these for the first time this weekend!!
And?!
Thank you for sharing this – I’ve been on a huge homemade pizza kick, but thought that you needed a pizza stone in order to do it on the grill. This is something I think I could conquer now :)
Hi! It was great to meet you! I wouldn’t recommend using a pizza stone on the grill. When we first started experimenting with this, a stone cracked on us. After looking into it further, I found out that happens regularly on the grill, unless you know how to set up your heat perfectly. Just try this recipe directly on the grates – it works! (You can, however, use a pizza stone in the oven with this pizza recipe.)
I am so excited to try this out with my family. We too have family Pizza night, but as I mentioned before , I Normally purchase the dough. However, now that you were kind enough to share your recipe, I am going to make my own now!!! Thank you again.
Mrs. Mix It (got it right this time!) – please let me know what you think. Have fun!
I’ve never heard of grilling pizza. Yours looks wonderful and the pizza dough looks awesome. Thanks for posting the recipe.
Paula, this is really a fun meal. So many aromas and textures. It just makes everyone happy. :-)