Grilled Pizza
Yield: 4 pizzas (serves 4 to 6 people)
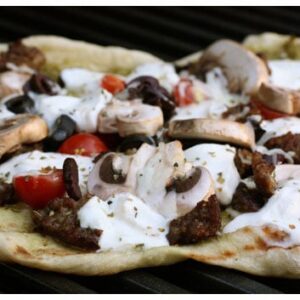
The pizzas are beautiful and taste crazy good straight from the grill.
Ingredients
for the dough:
- 1 c. warm water like warmed milk for a baby’s bottle, NOT hot
- 3 T. extra-virgin olive oil plus additional as needed
- 2 tsp. sugar
- 1.5 tsp. kosher salt
- 3 cups all-purpose flour plus additional for kneading
- 2.5 tsp. active dry yeast 1 package
tomato-based pizza sauce or basil pesto for the base
- pepperoni
- fried ground sausage or hamburger
- Canadian bacon
- pineapple
- black or kalamata olives
- fresh sundried, or roasted tomatoes
- sliced mushrooms
- diced or thinly sliced onions
- roasted garlic
- chunks of fresh mozzarella or shredded mozzarella straight from the bag
- crumbled goat or feta cheese
- dried Italian or pizza seasoning
- fresh basil and/or oregano
- freshly ground black pepper
- the possibilities are endless
- tomato-based pizza sauce or basil pesto for the base
- pepperoni
- fried ground sausage or hamburger
- Canadian bacon
- pineapple
- black or kalamata olives
- fresh sundried, or roasted tomatoes
- sliced mushrooms
- diced or thinly sliced onions
- roasted garlic
- chunks of fresh mozzarella or shredded mozzarella straight from the bag
- crumbled goat or feta cheese
- dried Italian or pizza seasoning
- fresh basil and/or oregano
Instructions
- To make the dough, stir warm water, oil, sugar, and salt in a liquid measuring cup until the sugar dissolves. Whisk flour and yeast in a large bowl and make a well in the center. Add liquid mixture. With a wooden spoon or your hand, gradually stir flour into the liquid to make a rough dough. Pull the dough together into a ball.
- Turn onto a work surface dusted lightly with flour. Knead until dough is smooth and elastic, about 10 minutes, adding a little flour here and there if necessary to keep it from sticking. Just try to use as little as possible to make it work.
- Shape dough into a ball. Put in a large, lightly oiled bowl and turn it to coat with oil. Cover the bowl with plastic wrap and let rise until double in size, about 1 hour.
- Punch dough down. This is Hatti’s favorite part. She always calls first dibs. Knead briefly, shape into a ball, cover, and let rise until soft and puffy, about 45 minutes. Isn’t that beautiful? And it has a wonderful feel to it. Soft and full of elasticity, it’s simply fun to handle Kinda like playing with Play-Doh. Only better. Much better.
- While the dough is rising, get your pizza toppings ready. Organization is your best friend here. We like to fill bowls with toppings and place them on a tray, for easy transportation to the grilling area. Preheat gas grill to medium-low. Most grilled pizza recipes will tell you to grill at medium-high, which will cook much faster and make for a crispier crust. Not that we don’t like crispy crusts, but we have found we like the “low & slow” method better, as it affords us a bit more time to add the toppings to the dough on the grill, and the girls like a little softer crust. If you like crispy, turn the heat up!
- Dust your work surface lightly with flour. Divide dough evenly into 4 balls and press into flour, flipping to dust both sides. Hold one piece of dough up like a steering wheel and rotate and stretch it to make an 8″ disk. Don’t be tempted to make it larger in diameter, as thin dough will cause trouble on the grill! Place your dough disk on a piece of plastic wrap (Absolutely don’t use wax paper, we learned that the hard way!) and cover with a kitchen towel to retain moisture. Repeat with the remaining dough, keeping disks separated with plastic wrap.
- Brush the top side of a dough disk with oil. Place oil side down on grill grate. Now brush the new top side with oil. As soon as the bottom has turned golden and the dough is easily moved on the grates, go ahead and flip. This should only take a minute or two. Here is where you have a couple of options of how you want to top your pizza dough. We have a system down where all the ingredients are handy at the side of the grill, and quickly “decorate” the dough as it sits on the grill. If you’re not comfortable with adding toppings over the hot grill, you can remove the dough to a plate once the second side has turned golden and is easily movable. Then add your toppings and return them to the grill to finish up.
- If you find that your cheese isn’t melting as fast as the crust is cooking, you might want to experiment with turning the heat down to low (or completely off) and shutting the lid for a minute or two. Experiment with the lid open and shut – it’s a great way to control your temperature when grilling pizza. Another way to make sure your cheese gets all melty is to put it on before the rest of the ingredients, letting it sit right on the warm grilled dough. Experiment. Have fun with it. And enjoy!
Notes
Adapted from Get Grilling by Food Network Kitchens
Nutrition information is automatically calculated by Spoonacular. I am not a nutritionist and cannot guarantee accuracy. If your health depends on nutrition information, please calculate again with your own favorite calculator.