Marshmallows

I get giddy preparing to make these homemade marshmallows. Something about this recipe, and the fun it produces, just makes me happy, happy, happy.
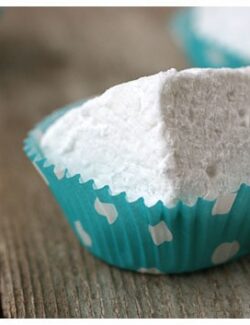
Have you ever even thought about the possibility of making your own marshmallows?! Did you know they can be whipped up (easily!) right in your very own kitchen, and that they taste far, far better than any bag of little identical cylindrical white puffs purchased from the store?
Well, my friends, it is possible. And it’s not hard. All you need is a little patience with cutting the sticky pan of marshmallow. The rest is chump change.
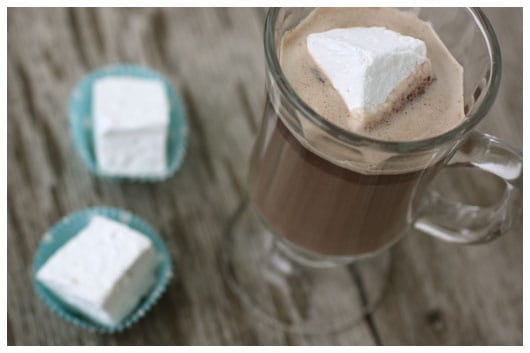
We eat plenty of these flavorful marshmallows just as they are, plain and beautifully simple. But they are ahhhhhmazing in homemade hot chocolate…
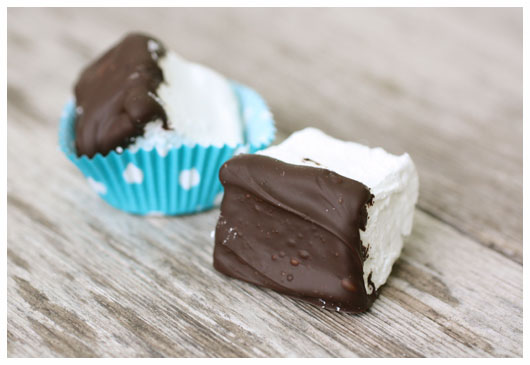
and, when dipped in melted chocolate, they are better than the very best piece of candy.
When we made these last winter, we even roasted them over the coals on the Weber, after Blake grilled. And they were absolutely positively the best roasted marshmallows we’ve ever had the pleasure of tucking between two graham crackers.
They also make a great gift, as they keep really well in an airtight container at room temperature. They are still good a few weeks after making them. So…just put some in a baggie, tie on a playful ribbon, and you have a very fun gift. It will make anyone happy, happy, happy.
Have you ever made your own marshmallows? If so, how do you like to eat them?
Marshmallows
Ingredients
- ⅔ c. water divided
- 3 1/4 oz. envelopes unflavored gelatin (found by the Jell-O at the grocery store)
- 1 c. granulated sugar
- 1 c. light corn syrup
- pinch of kosher salt
- 2 tsp. vanilla
- 1 c. powdered sugar for dusting
Instructions
- Lightly spray the inside of an 8”x8” pan with vegetable cooking spray. Generously coat with powdered sugar and set aside.
- Pour 1/3 cup of the water into the bowl of a stand mixer. Sprinkle the gelatin over the water and stir briefly to incorporate. Let stand for about 10 minutes, or until the gelatin has softened.
- In a saucepan, off the heat, combine the remaining 1/3 cup of water and the granulated sugar, corn syrup, and salt. Place the pan over medium-high heat. Clip a candy thermometer on the inside of the pan, making sure it doesn’t touch the bottom. Cook the mixture without stirring until reaches 240°. Brush down the sides of the pan with a pastry brush, dipped in water, to gently wipe away any sugar crystals.
- With your mixer on low speed, very carefully add the hot syrup to the softened gelatin. Add the vanilla and increase the speed to medium-high. The mixture will start out clear, but quickly turns very white. Beat for about 8 minutes, or until the marshmallow gets very thick and sticky, and starts to pull away from the sides of the bowl, in string-like pieces.
- Spread the mixture into the prepared pan using a lightly oiled spatula. With wet hands, press the batter evenly into the corners of the pan. Just keep rewetting your hands to help with the stickiness. Set aside for at least 1 hour, or until the mixture is firm and cool.
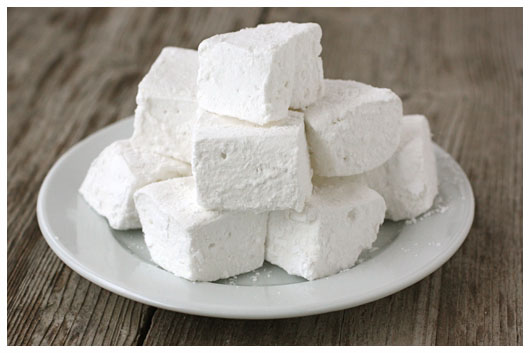
- Sift the powdered sugar into a shallow bowl. Run a wet knife around the edge of the cooled pan to loosen the marshmallow. Remove the marshmallow from the pan, onto a cutting board. Cut into squares, using a pizza cutter. This is a sticky job, but just have patience. It’s worth it! I like to cut each pan into 36 squares, which gives you marshmallows that are about 1-1/4” square, but feel free to cut them into whatever size you like. Toss each marshmallow in the powdered sugar until completely coated.
- Store marshmallows in a single layer, or in layers separated by wax paper. They will keep very well for quite a long time (a couple weeks!) when stored airtight at moderate temperature. For a variation, I like to dip the marshmallows in melted chocolate. It’s the best homemade candy EVER!! These are also spectacular roasted on a stick over the fire. Better than spectacular, actually.
Notes
Nutrition Information:


I just made these, and they are amazing! I made homemade graham crackers as well, got some semi-fancy chocolate, and had the most delicious, open-faced s’mores ever! Fabulous recipe!
Is there any substitute for the gelatin? We don’t eat anything made from beef or pork Thanks!!
I love making my own marshmallows… i add flavor to mine. Ive made chai tea, earl grey tea, coffee, peppermint and many others.. they are so yummy
These look perfect! I will be following your recipe, planning on making homemade marshmallows for my daughters sweet 16 winter wonderland themed party!
~Donika
Love your birthday party idea. FUN!!!
I’ll be different than most of your posters. I actally made your receipe for marshmallows last night for my wife. I lit the outside fire pit with some apple wood, let it turn to hot glowing embers, and on when the stick with your marshmallows. The piece was larger than store bought. It became golden, then darker, then we ate it. Some of course burst into a flame, which we blew out, some sooner some later.
The taste, best mellows ever! Sweet, dense, gooey. And I control the ingrediates.
Found your site after doing a brief search. Thanks !
have you tried making rice krispie treats with these? i tried a different recipe the other day and they were too heavy and dense and made the cereal soggy and i had to toss the whole 13×9 pan out. think homemade fluff would be better to use since it doesnt have to sit and dry like these do?
No, I haven’t Chrissy. I always intend to try something like that, but they never last that long!
I absolutely LOVE homemade marshmallows….You would never know it though. Haven’t made them since meeting my fiance a yr ago! He has no idea what he’s missing :D…
I surely don’t make them as often as I’d like, either. But then they’re always more of a treat that way. Yum!!
I totally agree :D
Just found you and I had to smile when I saw that you also are married to a 6 foot 7 inch man! :)
I love homemade marshmallows! I actually had plans to make them tonight and dip them in chocolate, and then I saw that’s what you do on your blog!
I love it! If only for letting me know about about being married to another 6′-7″ man – smiling here, too! Thanks for stopping by, Melissa.