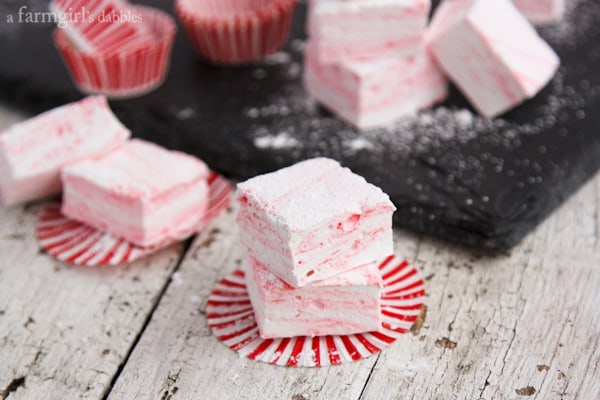
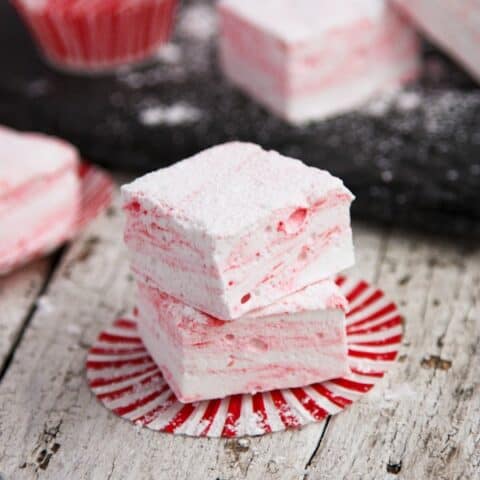
Peppermint Swirl Marshmallows
These Peppermint Swirl Marshmallows are sweet and puffy peppermint joy!
Our oldest daughter has been asking for peppermint marshmallows ever since I first starting whipping up my own homemade batches a number of years ago. Every time I say that I’m making marshmallows, Hatti asks, “Peppermint??” And, like a broken record, I tell her, “Not this time.”
So, needless to say, when Hatti came home from school to find these Peppermint Swirl Marshmallows waiting for her…she was nothing but pure happy. With a great big smile, a little happy dance, and a mouthful of sweet and fluffy peppermint joy…she was one delighted girl.
Previously, I had never added any flavoring but vanilla to my marshmallows. And they’ve been nothing but pure white. So this was a fun experiment for me in both flavor and color. I’m glad Hatti never gave up on me!
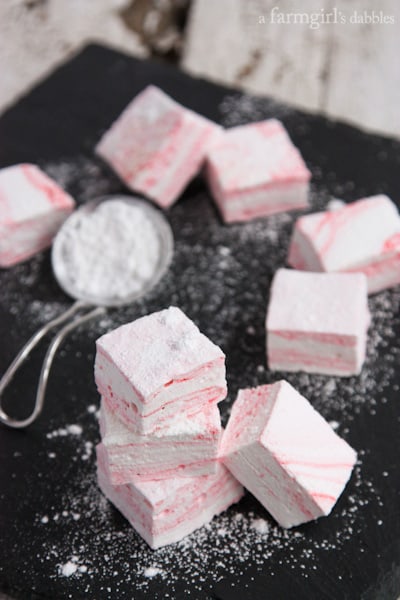
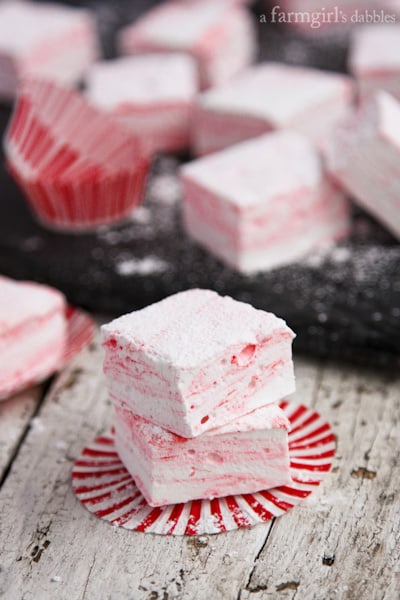
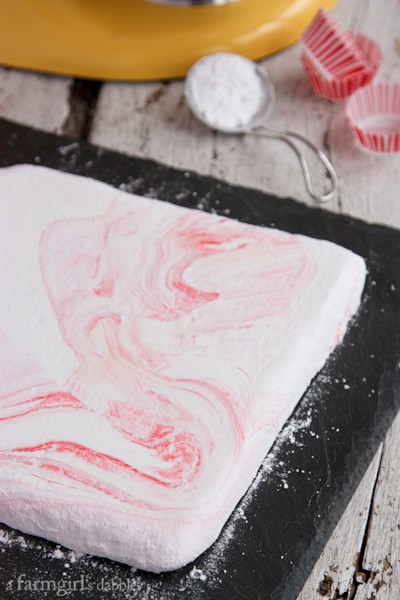
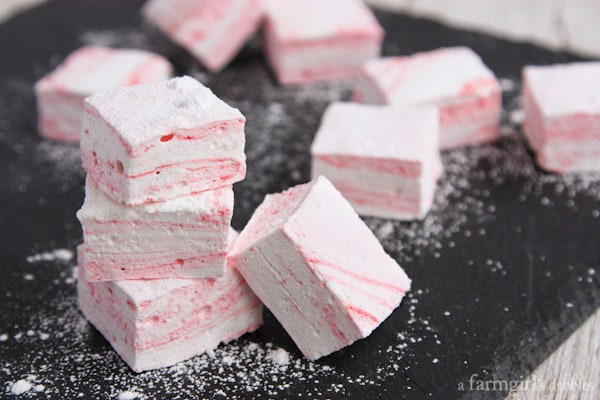
I love how the red coloring is swirled so delicately throughout the marshmallow. It’s so very pretty.
Really, what could be more fun than a tower of sweet pillowy marshmallows, made from scratch? It’s the ultimate in kitchen play!
But I’d be nowhere in my marshmallow experimenting without the help of my KitchenAid stand mixer. Just ask my aunt Patsy, who made marshmallows from my very first marshmallow post. She had her old mixer smoking. For real!
Making homemade marshmallows requires a strong dependable stand mixer. The marshmallow gets super thick and sticky in the bowl, and needs to be beaten for about 10 minutes to get the right consistency. Human arms are just not cut out for the job. At least my arms aren’t.
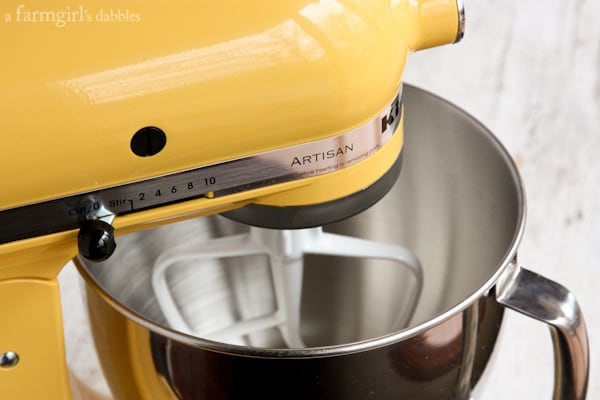
Blake and I bought our first KitchenAid stand mixer shortly after we were married. In red, it was the pride of our newlywed countertop.
Now, more than 14 years later, I can say that the KitchenAid stand mixer is an appliance I wouldn’t want to live without. It gets used several times each and every week, sometimes several times in the very same day. It’s a workhorse and a time saver, and a piece of equipment that allows me to accomplish so much more in the kitchen.
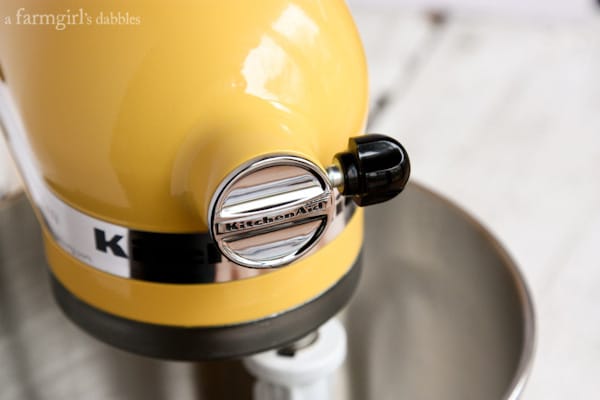
I’m thankful to KitchenAid for providing me with this new yellow stand mixer. Please say hello to Buttercup!
While I’ve always loved our red stand mixer, I was feeling the need for a change. I looked to a piece of Curly Girl artwork hanging in our kitchen for inspiration. The yellow mixer spoke to me. Or was it my love for butter and its beautiful hue? Or that yellow is our youngest daughter Tessa’s favorite color?
Whatever the reason…Buttercup was meant to be part of our family.
Do you make homemade marshmallows? If you haven’t tried it yet, I really want to encourage you to do so. Homemade marshmallows are just the best treat, and are definitely superior to the ones found in the baking aisle at the grocery store. They make the most awesome s’mores. And just imagine what one of these peppermint swirl marshmallows would do to a mug of hot chocolate!
Peppermint Swirl Marshmallows
Ingredients
- ⅔ c. water divided
- 3 1/4 oz. envelopes unflavored gelatin (found by the Jell-O at the grocery store)
- 1 c. granulated sugar
- 1 c. light corn syrup
- pinch of kosher salt
- 1 c. powdered sugar
- 2 tsp. pure peppermint extract for a good amount of peppermint flavor
- 10 drops red food coloring
Instructions
- Lightly spray the inside of an 8”x8” pan with vegetable cooking spray. Sprinkle with 1/2 cup of the powdered sugar and tilt the pan until there is a thick coating of powdered sugar on the bottom and sides of the pan. Gently shake out any loose powdered sugar and discard. Set pan aside.
- Pour 1/3 cup of the water into the bowl of a stand mixer. Sprinkle the gelatin over the water and stir briefly to incorporate and soften. Let stand for about 10 minutes, or until the gelatin has softened.
- In a medium saucepan, off the heat, combine the remaining 1/3 cup of water and the granulated sugar, corn syrup, and salt. Place the pan over medium-high heat. Clip a candy thermometer on the inside of the pan, making sure it doesn’t touch the bottom. Cook the mixture without stirring until reaches 240° F.
- With your mixer on low speed, very slowly and carefully add the hot syrup to the softened gelatin. Increase the speed to high. The mixture will start out clear, but quickly turns very white. Beat for about 7 minutes, or until the marshmallow gets very thick and sticky, and starts to pull away from the sides of the bowl, in string-like pieces. Add peppermint extract and beat 2 more minutes. In random drops, add red food coloring over the top of the marshmallow. On low speed, give the marshmallow just a couple of turns with the mixer blade, until you see swirls of red and white.
- Spread the mixture into the prepared pan using a lightly oiled spatula. With wet hands, press the batter evenly into the corners of the pan. Just keep rewetting your hands to help with the stickiness. Set aside for at least 1 hour, or until the mixture is firm and cool. Sprinkle a little more of the remaining powdered sugar evenly over the top.
- Run a wet knife around the edge of the cooled pan to loosen the marshmallow. Remove the marshmallow from the pan, onto a cutting board covered with parchment paper. Cut into squares, using a pizza cutter wheel. This is a sticky job, but just have patience. It’s worth it! I like to cut each pan into 36 squares, which gives you marshmallows that are about 1-1/4” square, but feel free to cut them into whatever size you like. Toss each marshmallow in the remaining powdered sugar until completely coated.
- Store marshmallows in a single layer, or in layers separated by wax paper. They will keep very well for quite a long time (a couple weeks!) when stored airtight at moderate temperature. They also keep well in the freezer. Eat plain, dipped in chocolate, or in hot chocolate!
Notes
Nutrition Information:
A great big thank you to KitchenAid for providing me with Buttercup, an Artisan Series 5-quart stand mixer.

I was so excited for these, but I *really* wish I would have read through the comments and questioned the amount of peppermint. An initial taste makes me think toothpaste rather than treat…the peppermint is way too strong for my liking. These may still be good in hot cocoa, but they are not edible alone. I will try this again with half the peppermint or try vanilla next time. Thanks for sharing. It was an easy and fun recipe!
I’m sorry to hear that these were too peppermint-y for you with 2 teaspoons of extract. I did try using 1 teaspoon of extract, as you’ll also see in the comments, but that just didn’t have enough peppermint flavor for our family.
should say corn syrup = /
i live in england , and i love seeing your recipes but , what on earth is corh syrup ?? is there an english equivalent or substitute , please ?
Hi Michelle. Corn syrup might also be referred to as glucose syrup. If you are unable to find either, I did find some marshmallow recipes online that don’t use corn syrup, but have not tried any of them.
Lovely creation! This Christmas I made marshmellows the first time. My first batch was a nightmare as I had no idea that it was THAT sticky – 50% stayed in the bowl. Next two batches I did learn. The third batch I did same as the first – just as directed but I moved faster. I agree 100% it would not be doable with out the Stand mixer & mine was new to me this Oct. The Prof version took 7.5 – 8 min to mix and not 10 or 15min. I left mine vanilla, and for Christmas goodies after slicing I dipped an edge of the triangle piece into white chocolate and pretty sprinkles. Man are they yummy in hot cocoa or warmed eggnog drinks. Cheers… and I look forward to fun marshmellow Easter ideas! :)
I am so glad you stuck with this! Yes, they are sticky. :) Check out my sweet little marshmallow Easter chicks from last year: https://www.afarmgirlsdabbles.com/2012/03/13/homemade-marshmallow-chicks-easter/
Oh wow, this looks perfect! I can’t believe I have never made marshmallows before!
i love these in hot cocoa!
Wowzers! I just finished patting into my 8×8 Pyrex and folks, I think we’ve got a winner! It is a sticky process, but not that bad. I can’t imagine preparing this without a kitchen aid stand mixer, though. I have had my trusty one about 15 years, I guess his name must be Biscuit, that’s his color.
I predict many happy homemade marshmallows in my family and friends future. These would be great with a coating of melted chocolate.
Thanks so much for the recipe.
Merry Christmas.
These peppmermint marshmallows are so pretty, I bet they are amazing!
LOVING your new Yellow Kitchenaid mixer, mine is red and on the fritz, I’m counting the days till I need a new one and secretly praying it holds on a lot longer. It sure is the workhorse of the kitchen!
The yellow is such a pretty color!
Thank you, Diane – the marshmallows ARE amazing! ;)
As much as I like to bake and make treats, I have NEVER made homemade marshmallows before. My husband loves the ones you buy in the store and so I just never wanted to put the time and energy into making them, until now! These ones looks sooo good! Hopefully during my time off for the holidays I can take the time to make them.
As for your mixer, I love your new yellow one!!!! I had the old cobalt blue as my first one that used to my Mom’s mixer before it became my mixer. Last year I moved up to get the bigger professional KichenAid mixer in the color silver and I named him “Hi-Yo, Silver” from the old TV/Radio show Lone Ranger because he is my silver workhorse! :-)
Definitely carve out a bit of time to try homemade marshmallows. I’ve never met a marshmallow fan who likes store ones better! And YAY for your new mixer…I’d love that professional series one, but its larger size just doesn’t work well in my small kitchen.
Such a gorgeous color, and I love the swirls on those marshmallows!
Thanks bunches, Shaina – and Merry Christmas to you and yours!