Limoncello
Learn how to make Limoncello with this easy recipe and just 3 ingredients. This sunny, sweet-tart Italian lemon liqueur is delicious sipped ice-cold on its own or mixed into cocktails like a Limoncello Spritz. It also makes a lovely homemade gift!

Homemade Limoncello Recipe
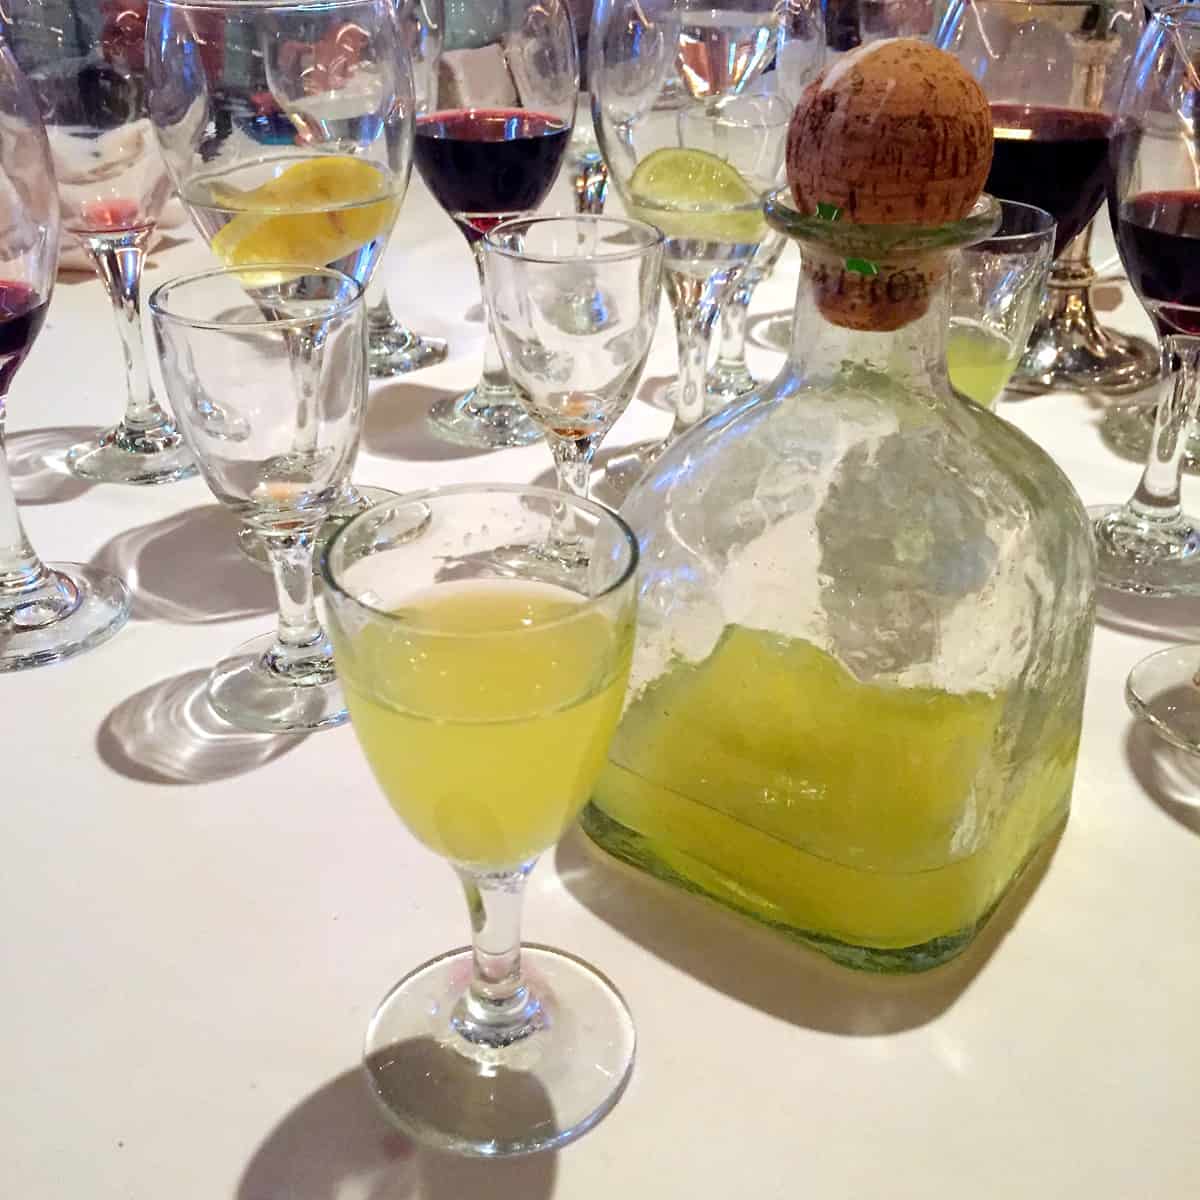
End your meal in true Italian style, with an ice-cold glass of bright and sunny Limoncello!
Italians drink this delightful lemon liqueur as a digestif after meals. Crisp and sweet-tart, it also fills in as a refreshing sippable dessert.
This homemade limoncello recipe is incredibly easy to make, with just 3 ingredients – lemons, vodka, and simple syrup. It’s an experience that leaves you with a bottle of gorgeous, homemade liqueur!
Sip this lemony drink ice-cold, all on its own. Or mix it into cocktails, like a refreshing limoncello spritz, bootleg cocktail, or whiskey sour. It also makes a lovely homemade gift!

My first-ever glass of limoncello was on my first-ever cruise, when Blake and I cruised Alaska. Peres, the head waiter from Portugal, shared a bottle of limoncello with our table and then also shared his recipe – the recipe you’ll find here. To learn more about our Alaska cruise experience, scroll down to the bottom of this post!
Why You’ll Love This Lemon Liqueur
A small glass of homemade limoncello, served straight from the freezer, is the loveliest end to a meal. Here’s why we love this limoncello recipe, and why we think you’ll want to drink it, too!
- Simple ingredients. You don’t need any complicated ingredients to make this drink. Just fresh lemons plus vodka and simple syrup (a simple mixture of water and sugar).
- This is the best limoncello recipe. Limoncello is so easy to make and I’ll walk you through each simple step – from the best way to zest the lemons to adding just the right amount of simple syrup.
- It’s homemade. I enjoy making and giving homemade gifts – and a bottle of homemade limoncello is definitely a special treat!
- Versatile. If you have a bottle of limoncello on hand, it’s easy to make a variety of beautiful drinks. A limoncello spritz is the obvious choice, absolutely delightful. But also think about making a lemon martini, or mixing it into a bootleg cocktail or whiskey sour. You can even stir it into a comforting hot toddy, in place of the usual lemon juice!
- It’s stunningly refreshing and so very delicious! This limoncello is smooth and sweet-tart with intense lemon flavor. When served ice-cold, straight from the freezer, it’s incredibly refreshing – the perfect end to a meal!
What is Limoncello?
Limoncello is an Italian lemon liqueur that’s traditionally served very cold (straight from the freezer!) as an after-dinner “digestivo”, meant to settle your stomach and help you digest food. It originated in Italy’s southern region, including the area around the Gulf of Naples, the Amalfi Coast, and Sicily.

What You’ll Need
Here’s an overview of everything you need to make this limoncello recipe.
Scroll down to the recipe card at the end of this post for the exact ingredients amounts.
- Vodka – Be sure your vodka is at least 80-proof, preferably 100-proof. See more about choosing a vodka below.
- Lemons – You can use regular lemons, organic or non-organic. Or Meyer lemons, if you want a sweeter, less acidic flavor.
- Simple syrup – You can easily make your own simple syrup with sugar and water (see my method below).
What Kind of Vodka Should I Use for Limoncello?
The vodka doesn’t need to be a top shelf vodka, just a good quality one that you already like to use when making cocktails. Make sure it’s at least 80-proof – but preferably 100-proof, for the smoothest, most flavorful limoncello.
Why use a higher proof vodka? Because it will extract more flavors, and faster, from the ingredients you are using. Plus it will uphold the strength of the limoncello, as you’ll later be cutting it with simple syrup that will reduce the overall proof of the drink.
Some people use a higher proof Everclear instead of vodka, to extract even more lemon flavor and end up with a stronger liqueur. But my preference is still 100-proof vodka.

How to Make Limoncello
Follow along with the steps and photos below to make this stunning lemon drink:

For the Limoncello
- Combine vodka and lemon zest. Pour the entire bottle (750 mL) of vodka into a glass jar. Add the lemon zest from 10 lemons. It’s important to use zest only, and not include any pith (the white layer under the outer yellow layer of skin) – I talk more about that in the Tips & Variations section below.
TIP: Don’t throw away all those lemons you just zested – juice them and make a batch of fresh blueberry lemonade or strawberry lemonade!

- Seal the jar and let the mixture steep. Seal the jar tightly with a lid and set it in a cool, dark place for at least 1 week, and up to 1 month.
- Swirl and wait. The length of steeping time will depend on the oil content of your lemons and the proof of your liquor. The first week will extract the most flavor from the lemon zest, so give the mixture a gentle swirl every couple days during that time. After 1 week, swirl and taste-test every couple days. When it has a bright and sunshiny, tangy lemon flavor, it’s ready for the next step.

- Strain out the zest. Line a colander with a double layer of cheesecloth and place it over a bowl. Pour the vodka mixture through the cheesecloth. Gather up the cheesecloth and use the back of a wooden spoon to press on the cheesecloth to extract every last bit of that lemon flavor into the limoncello. Discard cheesecloth full of lemon zest.

For the Simple Syrup
Once you’ve strained the vodka-lemon mixture, it’s time to sweeten it with simple syrup – then you’ll have lemon liqueur!
You need only water and granulated sugar to make simple syrup. Simple syrup really is SIMPLE!

- Make the simple syrup. Stir together water and sugar in a medium saucepan over medium-high heat, and bring it to a boil. Whisk rapidly until the sugar dissolves completely.
- Cool the simple syrup. Remove from heat and allow to cool completely.

- Add simple syrup to the vodka-lemon mixture. Stir the cooled simple syrup into the lemony vodka mixture. I recommend starting with 1 cup of simple syrup, then give it a taste test. Keep adding until it’s flavored to your liking. You can make it as sweet as you like. You now have limoncello!
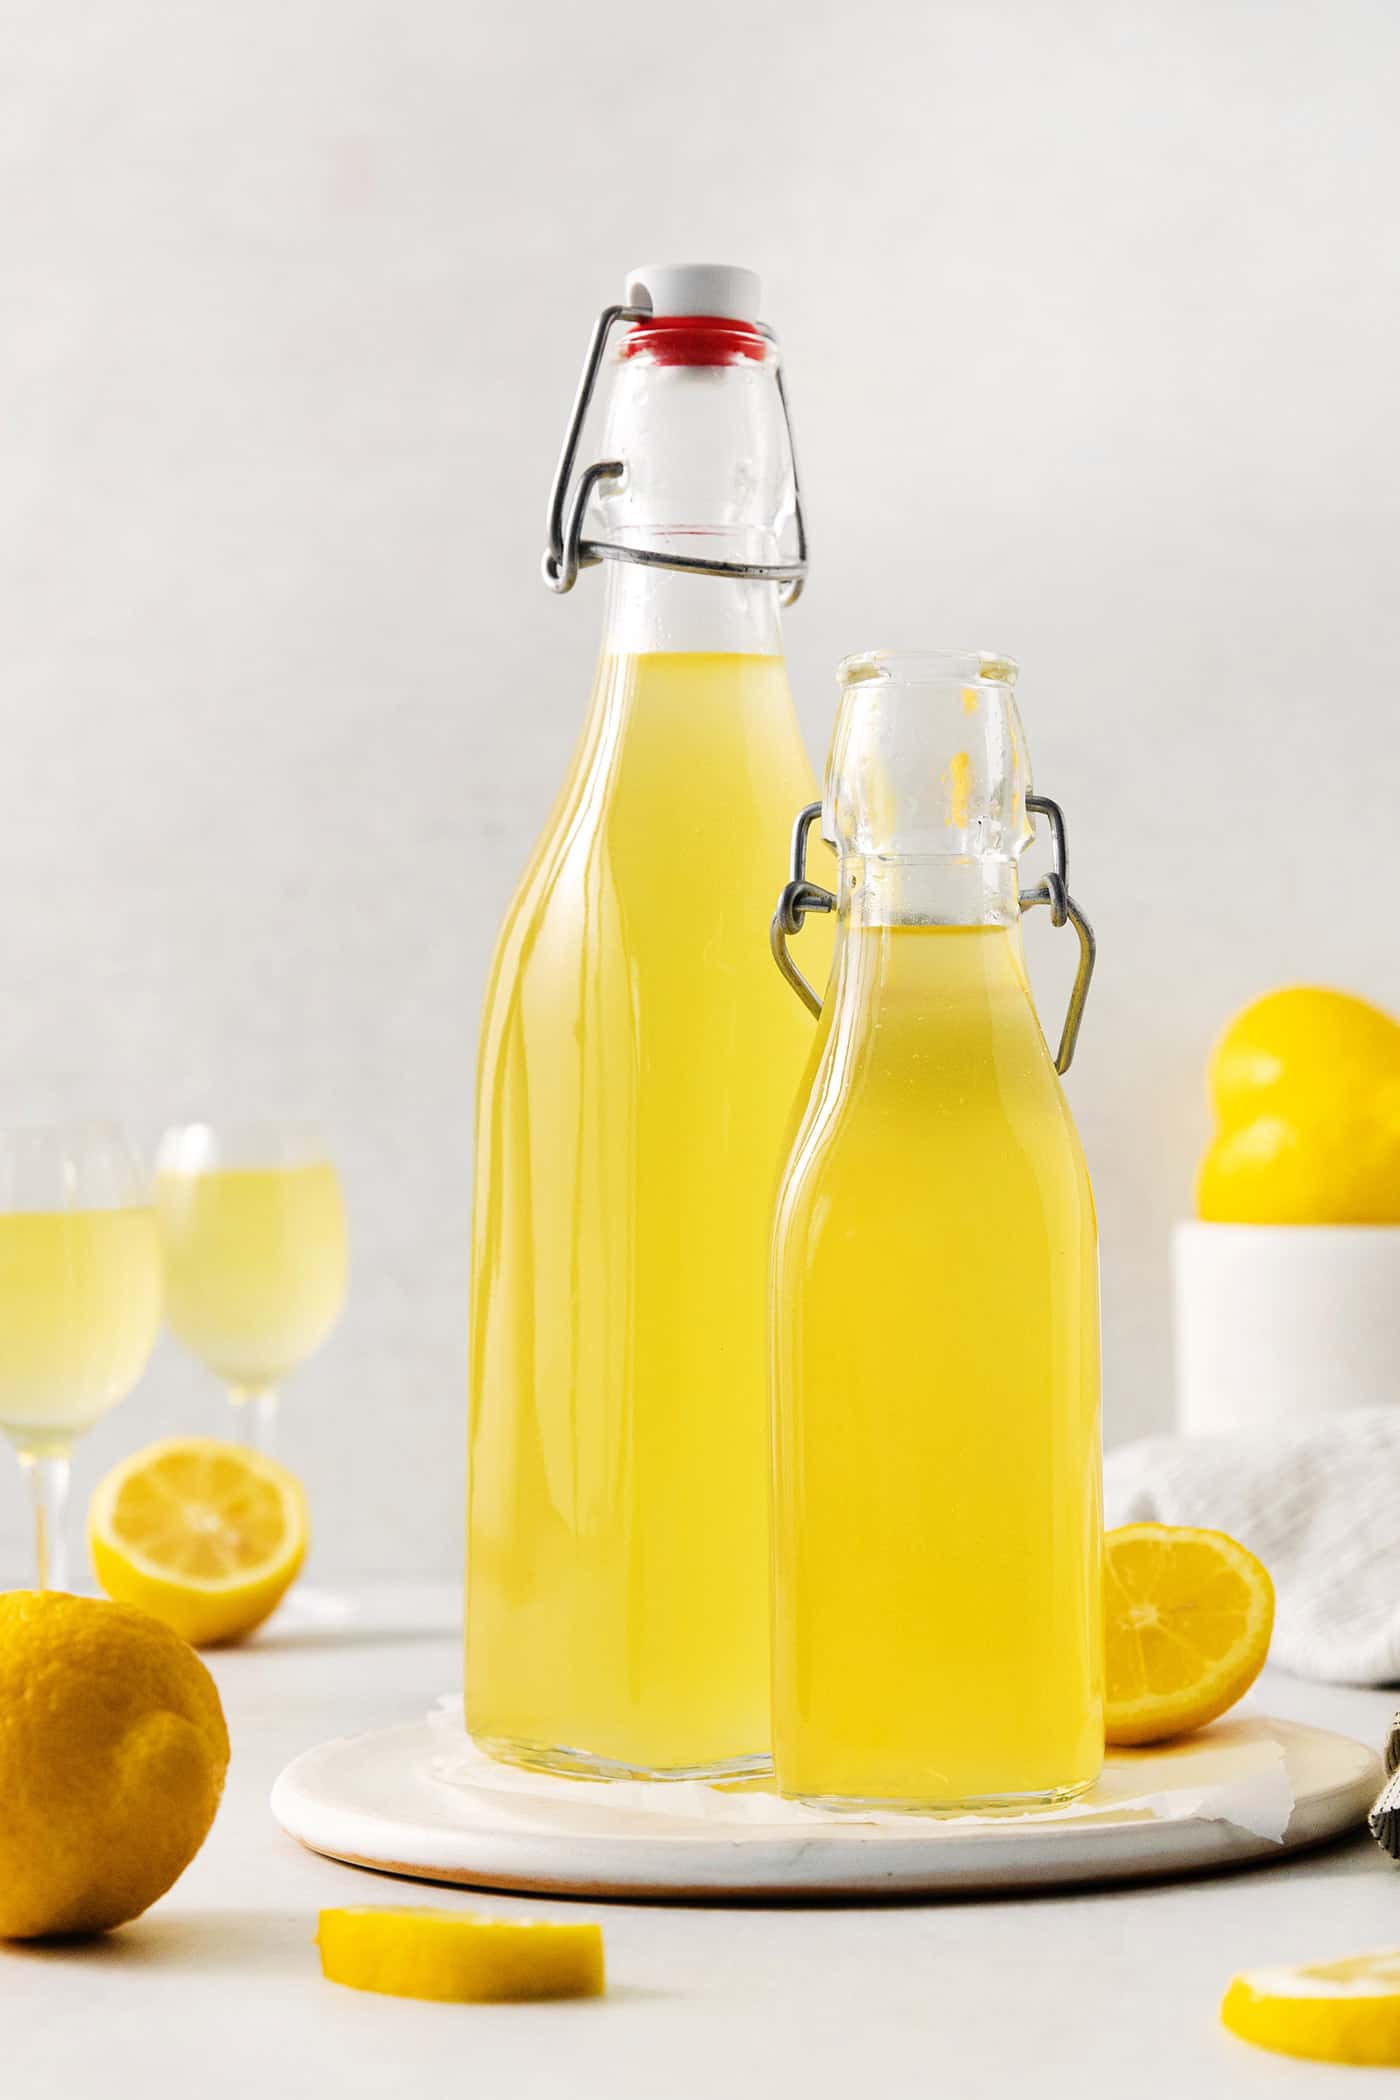
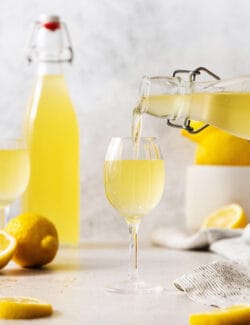
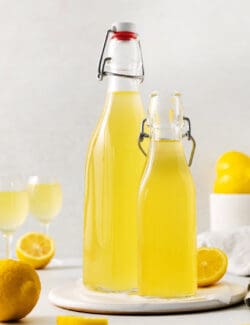
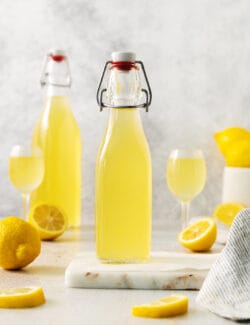
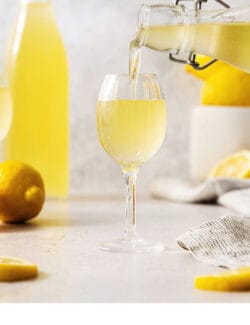
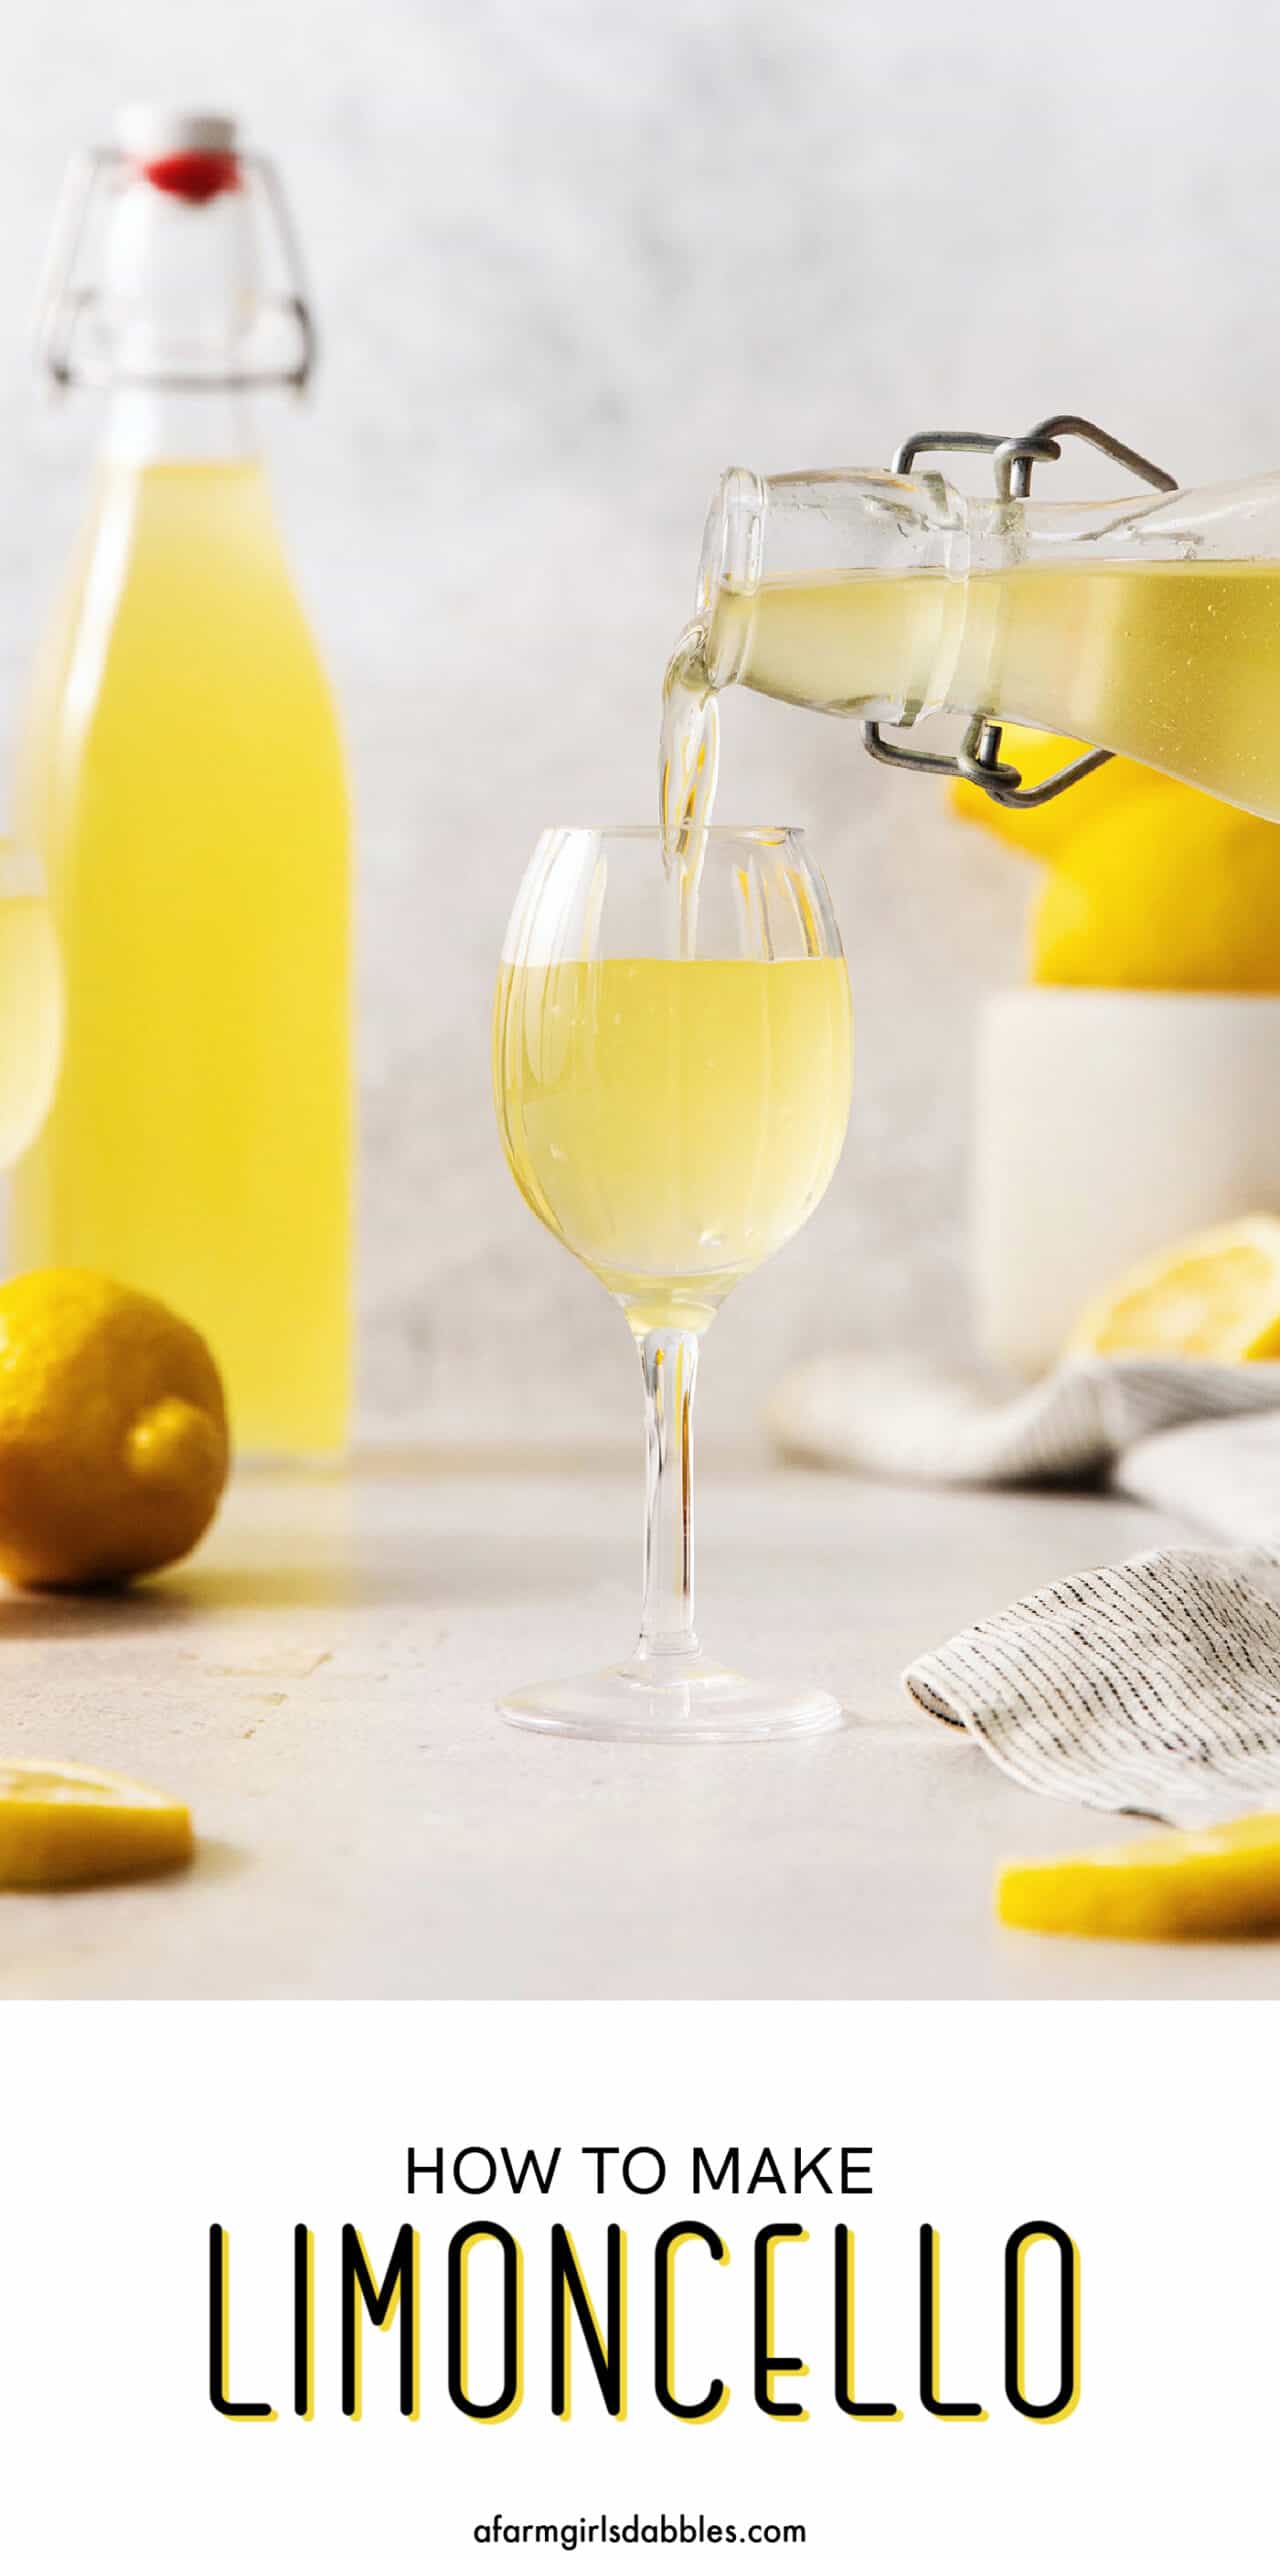
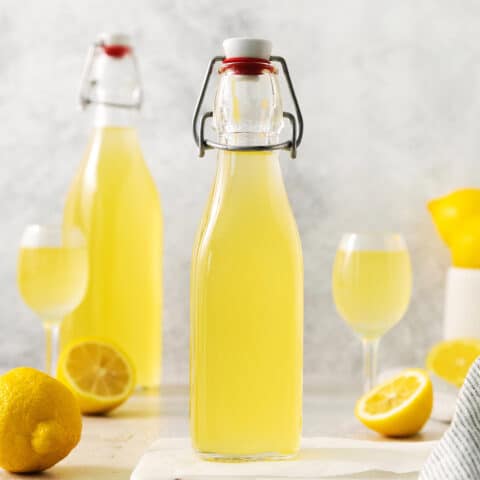
- Chill the limoncello. Pour the finished lemon liqueur into a freezer-safe bottle that has a tight-fitting cap. Place in the refrigerator or freezer. I like to keep mine in the freezer, for an ultra chilled cordial at a moment’s notice – plus it’ll keep longer. The high alcohol content will keep it from freezing (another plus to using 100-proof alcohol or higher). If you store yours in the fridge, move it to the freezer an hour before serving to bump up the chill.
- Make it sweeter? Store the remaining simple syrup in the refrigerator, in a container with a tight lid. After trying your chilled limoncello for the first time, feel free to add more simple syrup if you’d like it sweeter. Once you’re happy with the results, use any remaining simple syrup for lemonades, cocktails, teas, or coffee drinks.
Tips & Variations
Ready to make your own homemade limoncello?! I have a few tips for you, plus some variation ideas:
- Use good quality vodka. If you use a good quality vodka, the finished limoncello will taste better than if you use a super cheap one. But like I said before, there’s no need to use a top shelf vodka.
- A higher alcohol content results in a smoother limoncello. 100-proof vodka or an even higher-proof grain alcohol (such as Everclear) will give you a smoother limoncello. It will also keep the finished limoncello from freezing if you store it in the freezer.
- A few choices for lemons. Standard lemons are just fine for making limoncello, although they are usually coated with a food-grade wax. So be sure to scrub the lemons under warm water to remove it. If you prefer to use organic lemons, you can rest assured that no pesticides or insecticides will be extracted into the finished product. And lastly, Meyer lemons make an incredible limoncello – just know that they have a very thin skin and can be a bit more cumbersome to zest/peel.
- Wash the lemons. No matter the lemon you choose, be sure to scrub them well to remove any dirt or dust before you zest them.
- No pith! Citrus pith is the white stuff underneath the colorful yellow peel. Any pith – any pith at all! – in your limoncello can turn it bitter. You can still drink it (it’s not bad for you), but your limoncello won’t be as smooth and sweet as it’s meant to be. That’s why I like to use a microplane zester rather than a vegetable peeler, as a zester doesn’t dig as deep.
- Save the lemon juice. You only use the zest of the lemons in this recipe. So save the lemon juice for baking goodies like lemon pound cake, lemon bars, or soft and chewy lemon heaven bars. Or mix it into cocktails, homemade lemonade, or sparkling water!
- Store in a freezer-safe bottle. Keep your homemade limoncello in a freezer-safe sealed bottle (a screw top works well). Use 100-proof alcohol or higher, for the best freezing.
- Taste as you go. Different vodkas and lemon types will give different limoncello results. But remember that you can always adjust the sweetness to your liking. Add some simple syrup, then give it a taste test. If you want it sweeter, add more until you’re happy with it.
- Use different citrus. You can use this method to make other flavors of citrus liqueur. Branch out into other citrus fruits like grapefruits, oranges, limes, and tangerines. You can even use a mix of citrus, like I do in this bootleg cocktail that combines lemon, lime, and orange.

Common Questions
If your homemade limoncello tastes bitter, it more than likely contains some pith, which is the white layer just below the colorful yellow skin. Pith (even a small amount) can make limoncello bitter.
Limoncello is a liqueur made with a neutral alcohol, most often vodka, as its base.
Homemade limoncello is typically cloudy, and this is OK!
You can add extra lemon zest in with the vodka, but don’t pack in too much. The zest from 1-2 extra lemons should be plenty.

Serving Suggestions
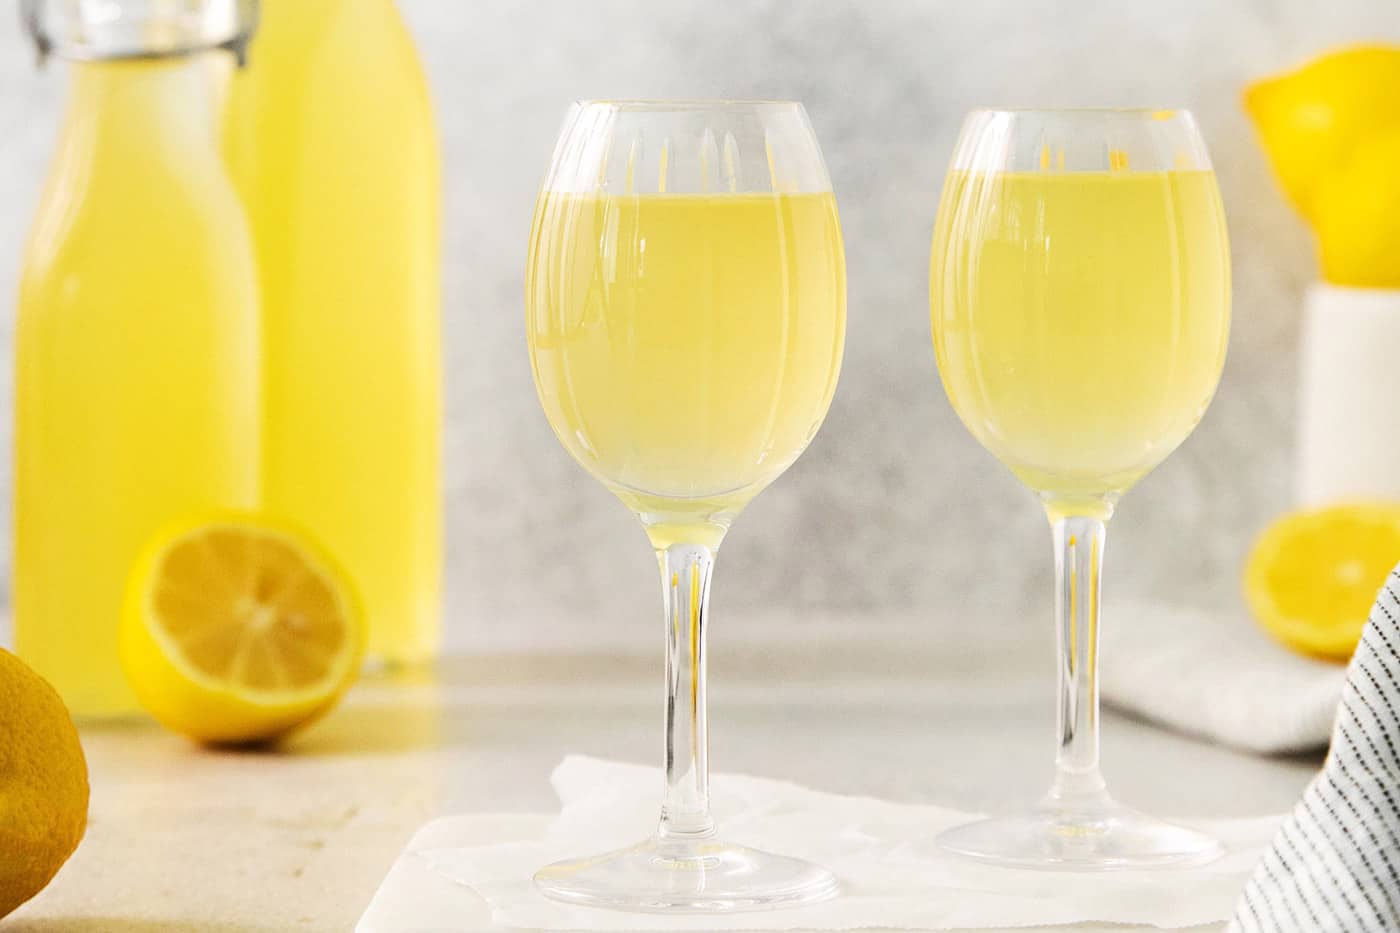
The best way to enjoy limoncello is ice-cold, straight from the freezer, in a small chilled glass, preferably a digestif/cordial glass or shot glass. Do not add ice to the glass, as this will water down the liqueur. A typical serving size is small, just 1.5 to 2 ounces, because of its high alcohol content. And it’s meant to be consumed after a meal, to aid in digestion.
But you can also use limoncello in cocktails or even desserts. Here are some suggestions of what to do with your homemade limoncello:
- In a cocktail. My pink lemonade margarita would be lovely with a bit of limoncello. Or make the classic lemon drop cocktail, which calls for limoncello. Or mix it into cocktails, like a limoncello spritz, bootleg cocktail, or hot toddy. You could also add some to a glass of sparkling wine for a simple festive drink. Or just mix it with an ice-filled glass of sparkling water on a hot summer day!
- Make spiked lemonade. Pour some homemade limoncello into blueberry lemonade, herby blueberry basil lemonade, or a tall glass of pretty strawberry lemonade.
- As part of a dessert. You could use limoncello in desserts, such as my lemon heaven bars.
- With dessert. For a delicious flavor pairing, serve cold glasses of limoncello with lemony blueberry dump cake!
How Long Does Homemade Limoncello Last?
Homemade limoncello will keep well for more than a year when stored in the freezer.
If stored in the fridge, it’ll be best when consumed within 3-6 months.
Like this Recipe? Save to Pinterest
Limoncello
Ingredients
- 1 bottle 750 mL vodka – use at least 80 proof, ideally 100 proof or more
- Lemon zest from 10 large lemons
- 1¼ cups prepared simple syrup – use more for sweeter limoncello
Instructions
- For the limoncello: Pour the entire bottle of vodka into a glass jar. Add lemon zest from all 10 lemons. I prefer to use a microplane zester, to ensure I don't get any of the white pith. If you have a peeler that works well and it allows you to only peel off the thin outer yellow skin without any pith, go ahead and use that. If the white pith is added to the vodka, your limoncello will likely have a bitter flavor.
- Seal the jar tightly with a lid and set it in a cool, dark place for 1 week and up to 1 month. The length of steeping time will depend on the oil content of your lemons and the proof of your liquor. The first week will extract the most flavor from the lemon zest, so give the mixture a gentle swirl every couple days during that time. After 1 week, swirl and taste-test every couple days. When it has a bright and sunshiny, tangy lemon flavor, it’s ready for the next step.
- Line a colander with a double layer of cheesecloth and place it over a bowl. Pour vodka mixture through the cheesecloth. Gather up the cheesecloth and use a spatula or the back of a wooden spoon to press on the cheesecloth and extract every last bit of lemon flavor into your limoncello. Discard cheesecloth full of lemon zest.
- For the simple syrup: Stir together water and sugar in a medium saucepan over medium-high heat, and bring it to a boil. Whisk rapidly until the sugar dissolves completely. Remove from heat and allow to cool completely.
- To create the limoncello: Add 1 cup of the cooled simple syrup to the lemony vodka mixture. Then give it a taste test. Add more simple syrup if you'd like it sweeter, until it’s flavored to your liking. You can make it as sweet as you like. You now have limoncello!
- Pour the finished lemon liqueur into a freezer-safe bottle that has a tight-fitting cap. Place in the refrigerator or freezer. I like to keep mine in the freezer, for an ultra chilled cordial at a moment’s notice – plus it’ll keep longer. The high alcohol content will keep it from freezing (another plus to using 100-proof alcohol or higher). If you store yours in the fridge, move it to the freezer an hour before serving to bump up the chill.
- Store remaining simple syrup in the refrigerator, in a container with a tight lid. When trying your chilled limoncello for the first time, feel free to add more simple syrup if you'd like it sweeter. I added what I thought should be the minimum amount of simple syrup, with additional simple syrup available if needed. Once you've added the desired amount of simple syrup, use any remaining simple syrup for lemonades, cocktails, teas, and coffee drinks.
Notes
Nutrition Information:
More Drink Recipes

My First Glass of Limoncello
My first-ever glass of limoncello was on my first-ever cruise, to Alaska, with Princess Cruises.
At dinner one evening, limoncello wasn’t even on the menu. And then Peres, the friendly, smiley head waiter from Portugal, brought out a frosty bottle of their house-made limoncello at the end of our meal.
Peres poured the ice-cold lemon liqueur into cordial glasses, which were clinked with happy smiles all the way around our big round table.
After just a couple sips, I started drilling Peres about how they make their limoncello on the Ruby Princess. He was more than happy to share the process. And that’s how the recipe got here!
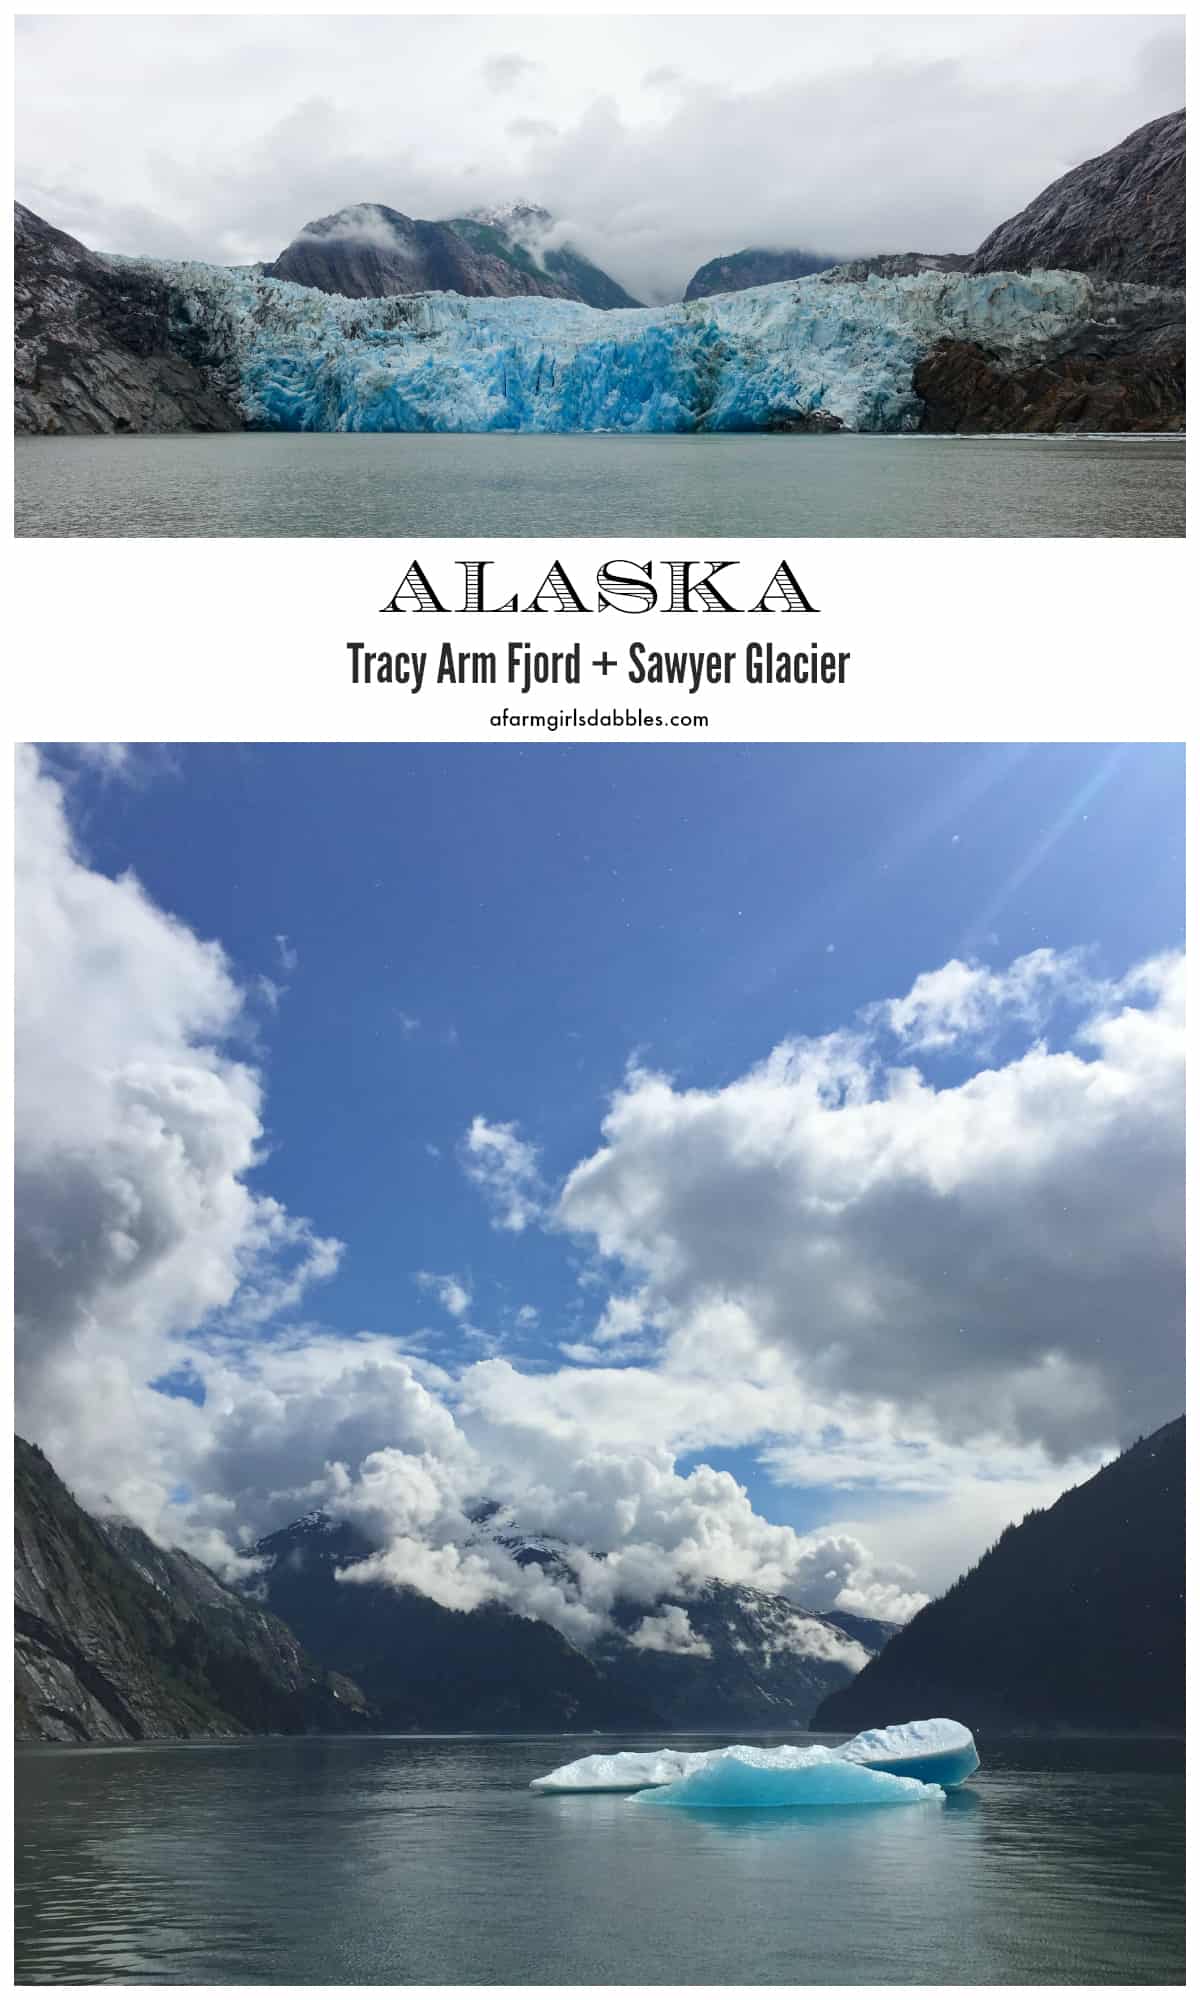
Tracy Arm Fjord + Sawyer Glacier Excursion
After our beyond-incredible excursion out of Ketchikan, on a float plane over Misty Fjords National Monument, I thought that if I never saw another beautiful site in Alaska I’d still be a very happy girl. That experience was just that amazing.
But then the very next day, after the Ruby Princess navigated as far as it could go into the Tracy Arm Fjord, we boarded a small catamaran for the second excursion of our 7-day cruise with Princess.
This smaller vessel allowed us to veer off and explore the tiny fingers of the fjord while the ship meandered back through the main arm, headed to our next port in Juneau, where we’d all meet up once again.
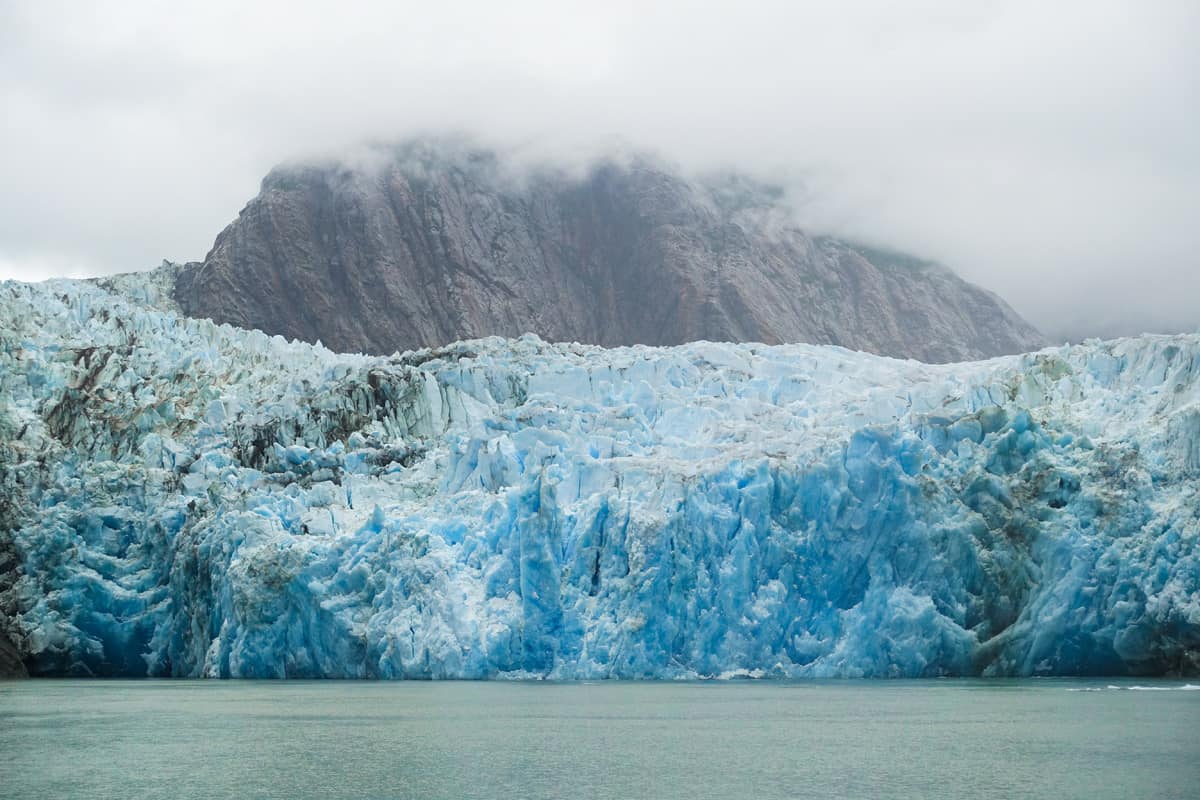
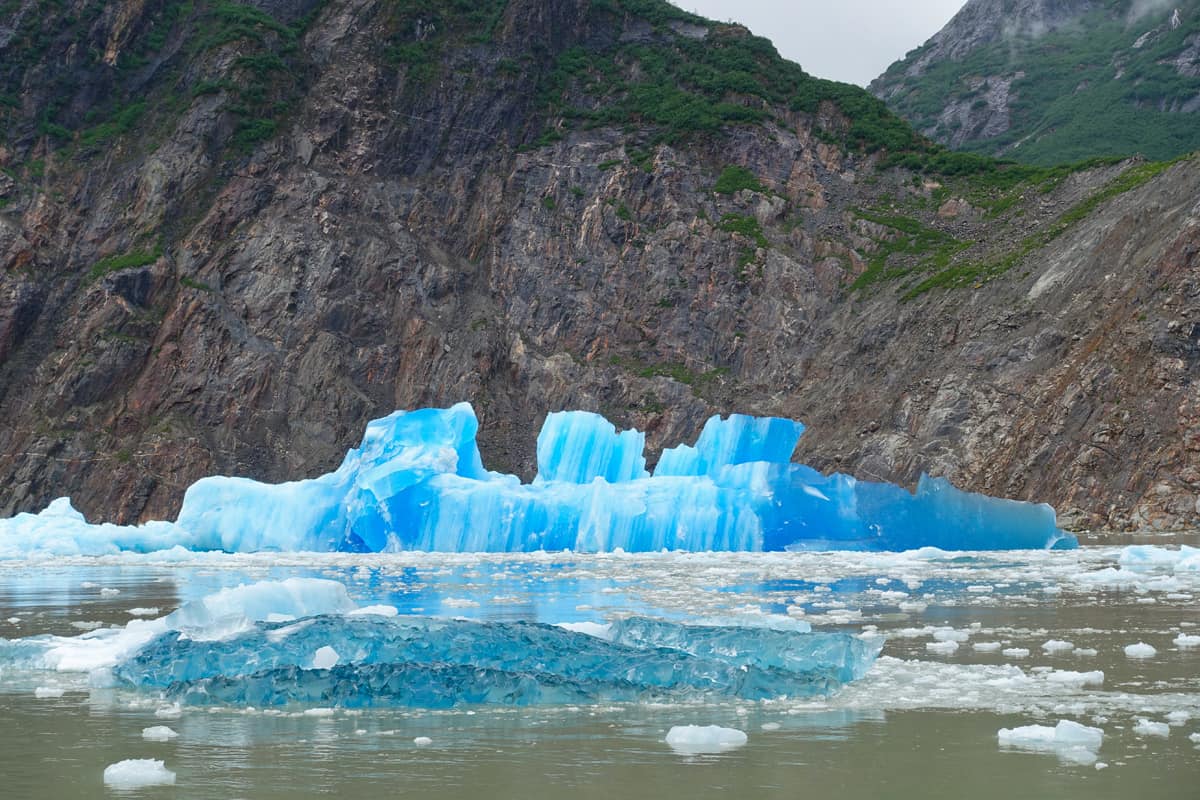
When my eyes caught sight of the Sawyer Glacier, the first glacier I had ever seen in my life, all I could do was stare in wonder. Those ancient layers of ice. That gorgeous blue color. The sheer magnitude of size. It was so much to take in. I was speechless.
Sawyer Glacier actually consists of two glaciers, North and South Sawyer glaciers, that were once united in one large frozen mass. The catamaran took us within 1/4 mile of the glacier. I was so excited that we were able to experience a couple of calvings, where big chunks of the glacier crash into the water with a magnificent splash and “BOOM!” sound.
Our guide explained that the reason this ice was so incredibly blue was that it was older and denser in nature.
In glaciers, the enormous pressure of the many different layers causes the air bubbles to be squeezed out, thus increasing the density of the created ice.
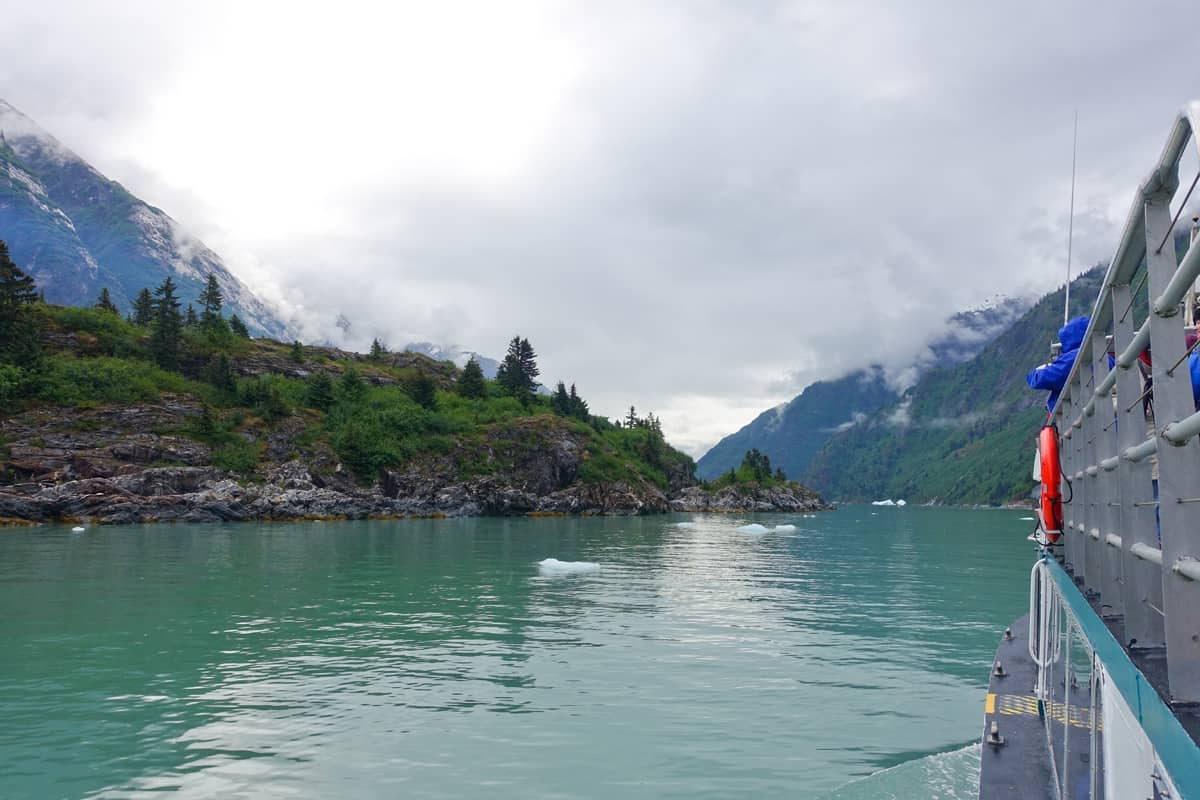
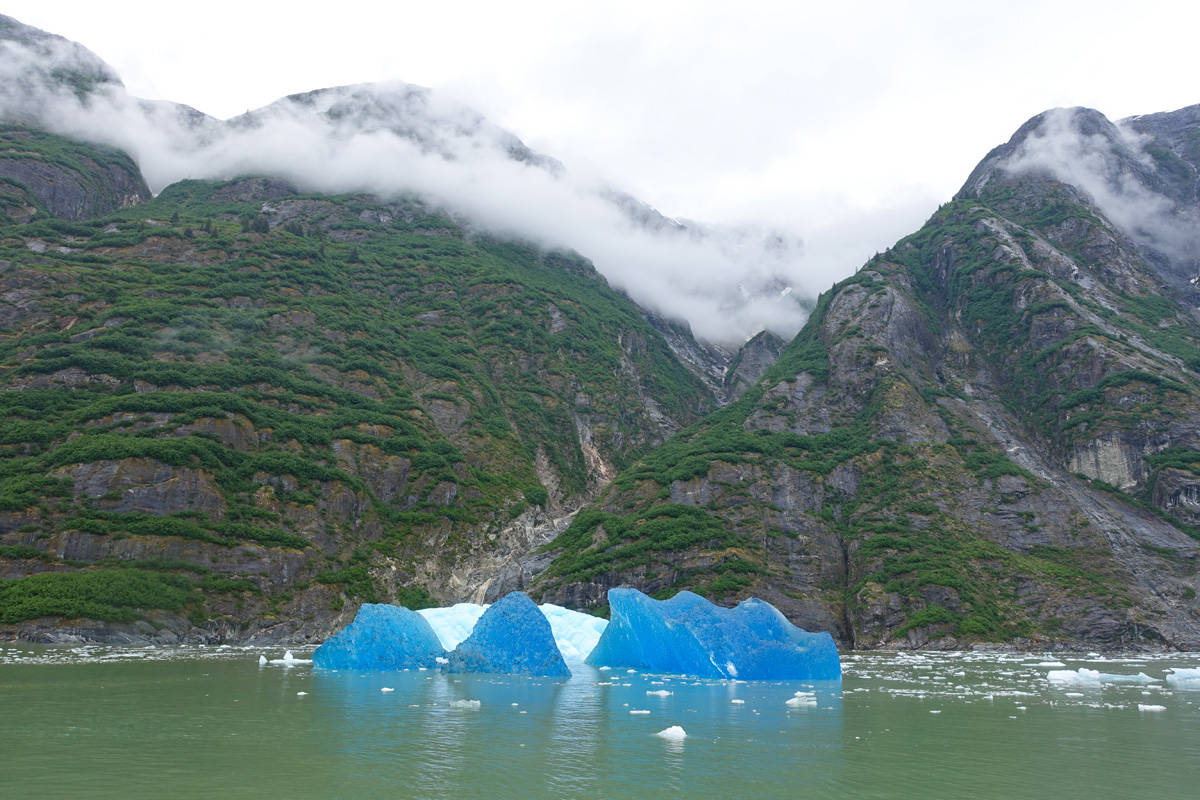
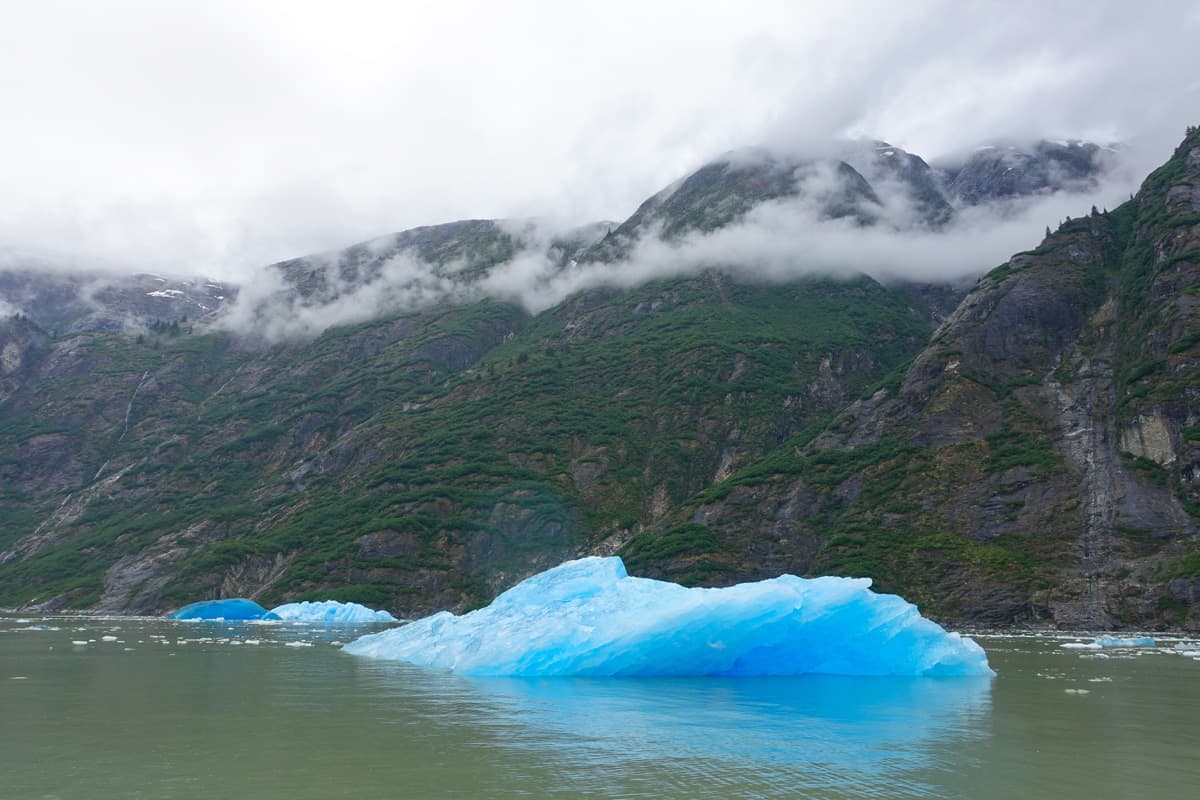
As we headed away from the glaciers, the chilly drizzle ended and the low clouds began to lift. Our captain guided us into the inlets and around islands, through the quiet jade green waters, showing off the endless beauty that Tracy Arm Fjord has to offer.
This excursion was almost 6 hours long, from boarding the catamaran at the deepest area of Tracy Arm Fjord to disembarking again in Juneau.
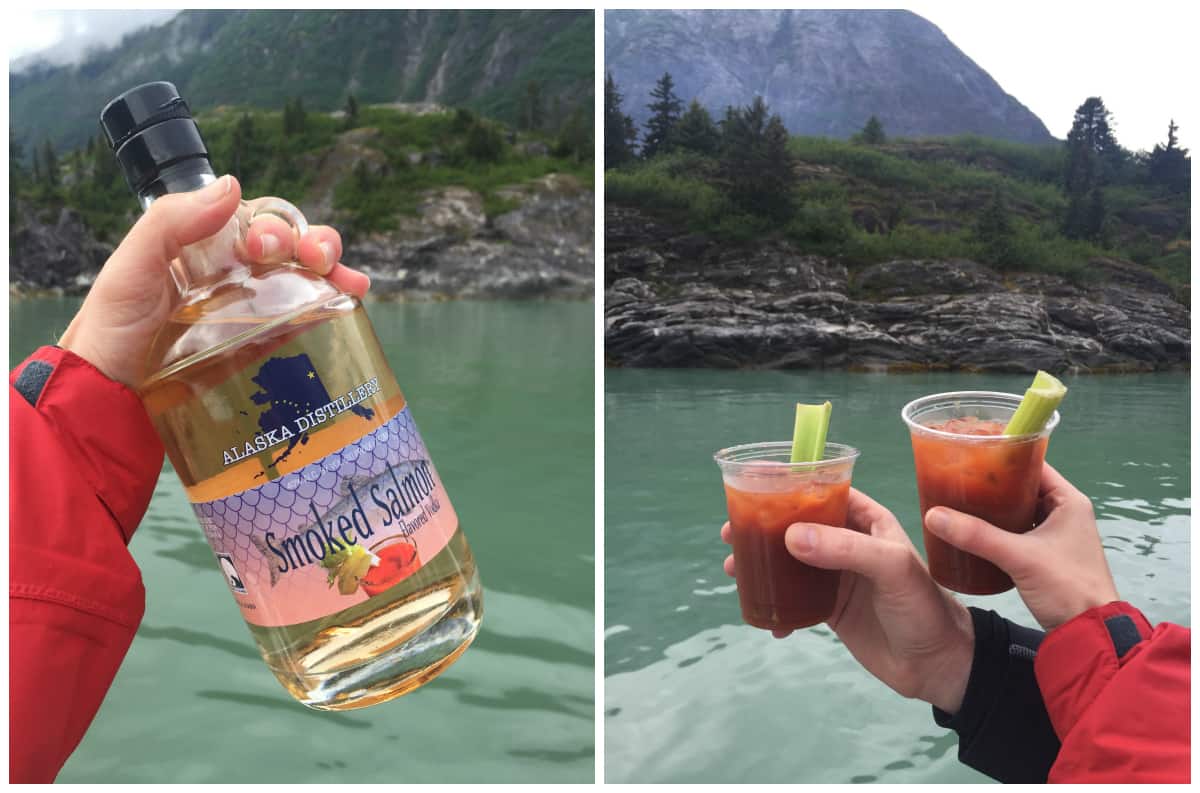
So when our guides/hosts asked us if we’d like to be a little adventurous with a Smoked Salmon Vodka Bloody Mary, Blake and I were up for the challenge. The vodka didn’t taste fishy, just nicely smoky. It actually worked very well in this classic spiced tomato drink – even though many people were not convinced to try it!
As the clouds dissipated and the warmth of the sun touched our faces, we continued to be amazed by beauty at every turn.
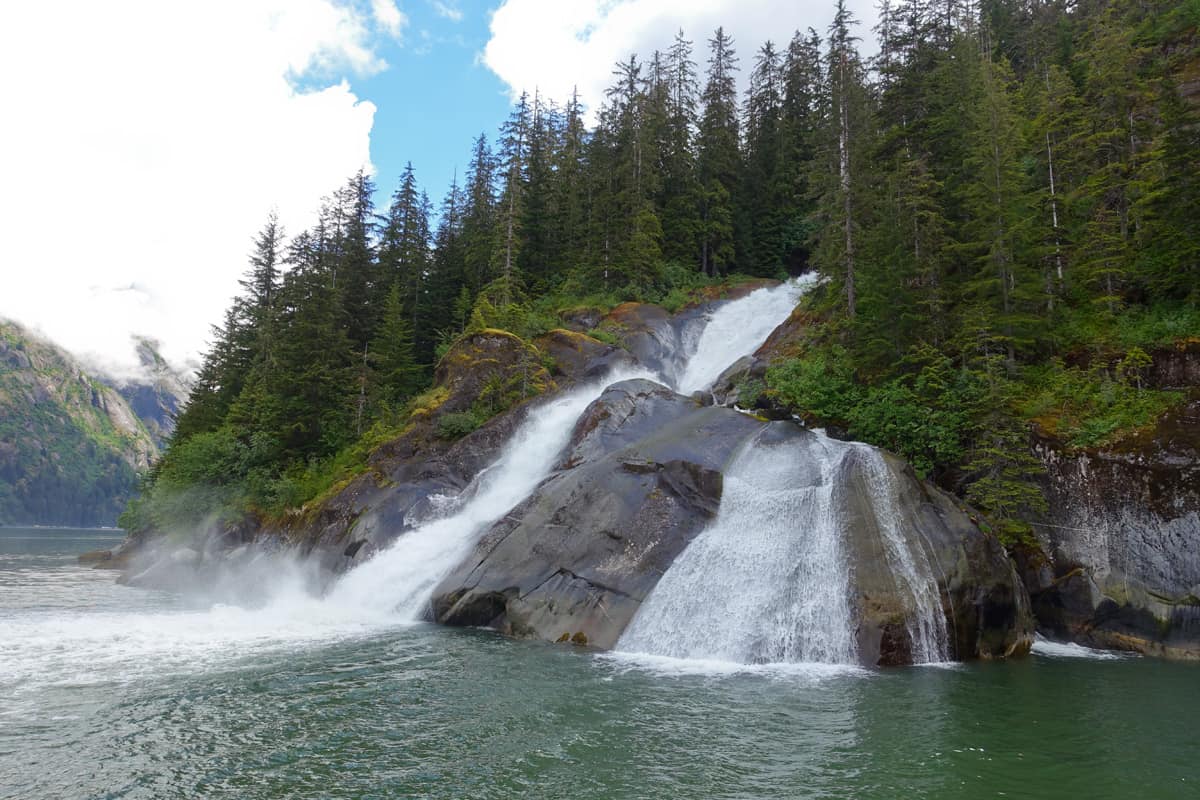
We saw cascades and waterfalls, too numerous to count. Our captain got us up close to this one, letting the mist of the rushing water spray us from the upper open-air deck.
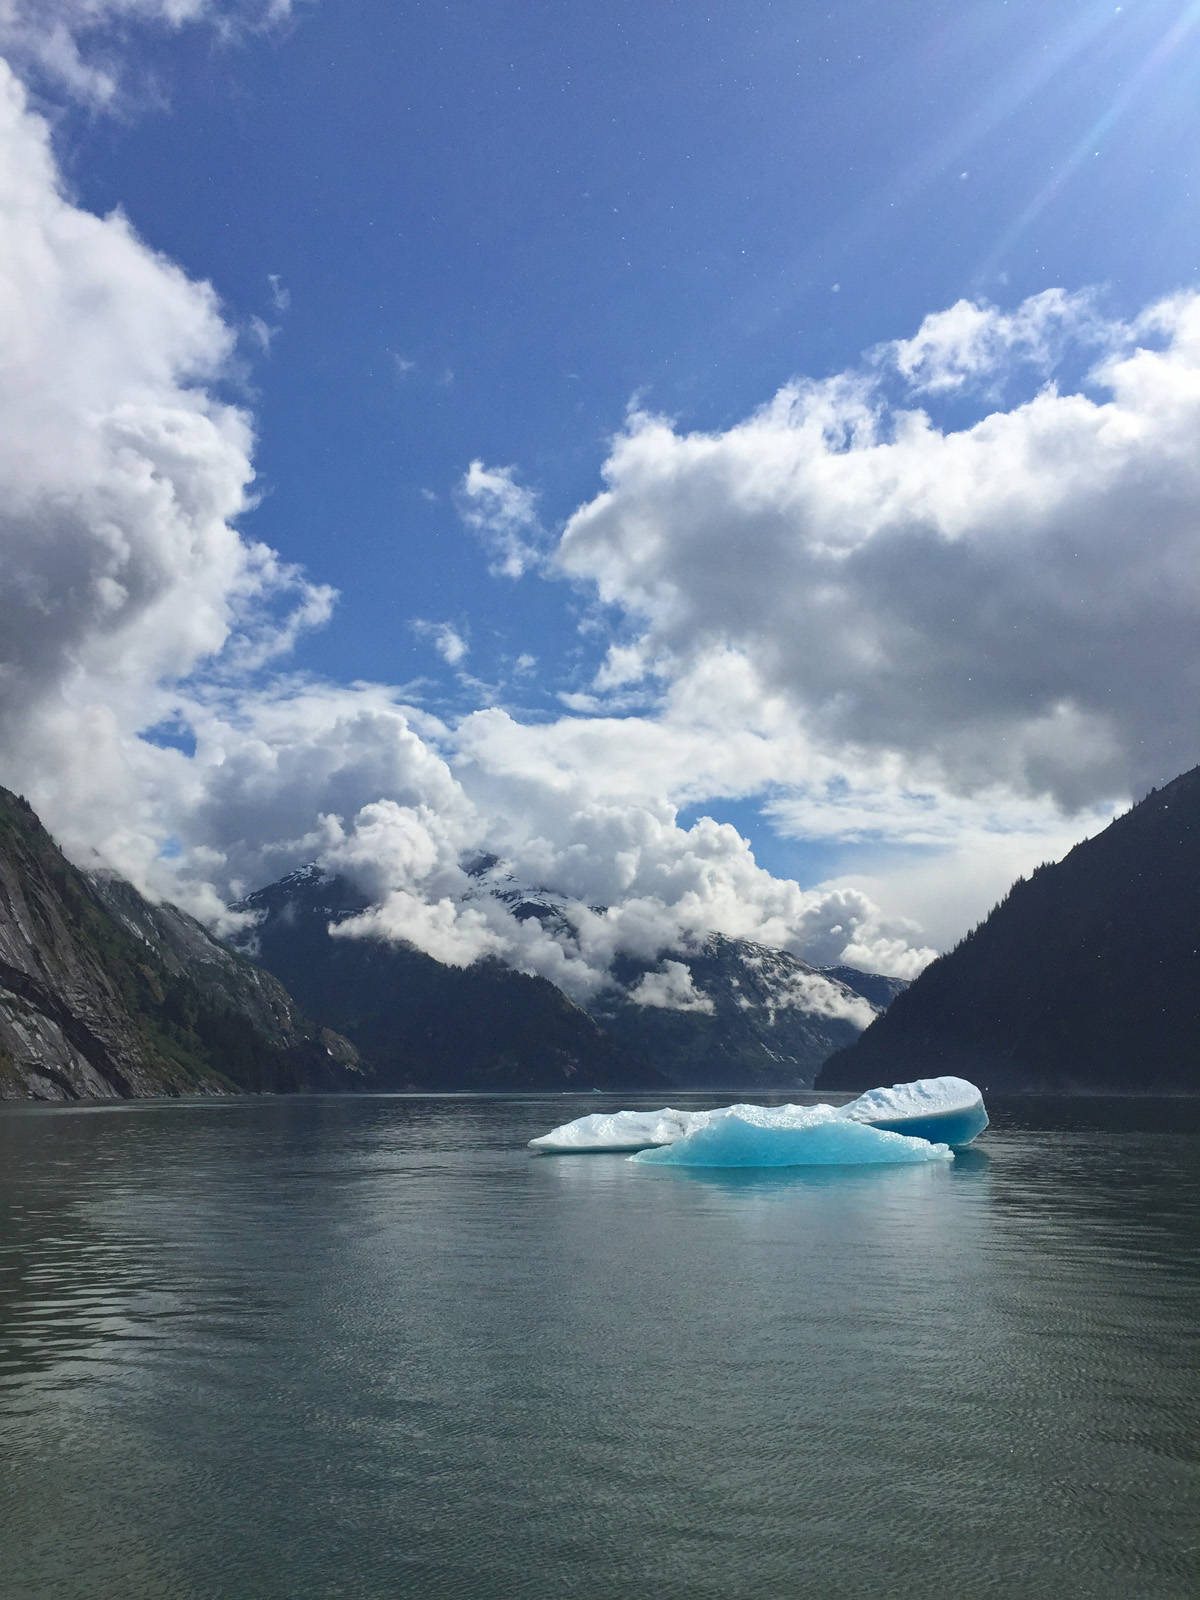
This was one of my favorite scenes. The sun, warm on our skin. The sky, vivid blue with big fluffy clouds. And those electric blue ice chunks in the middle of the waterway.
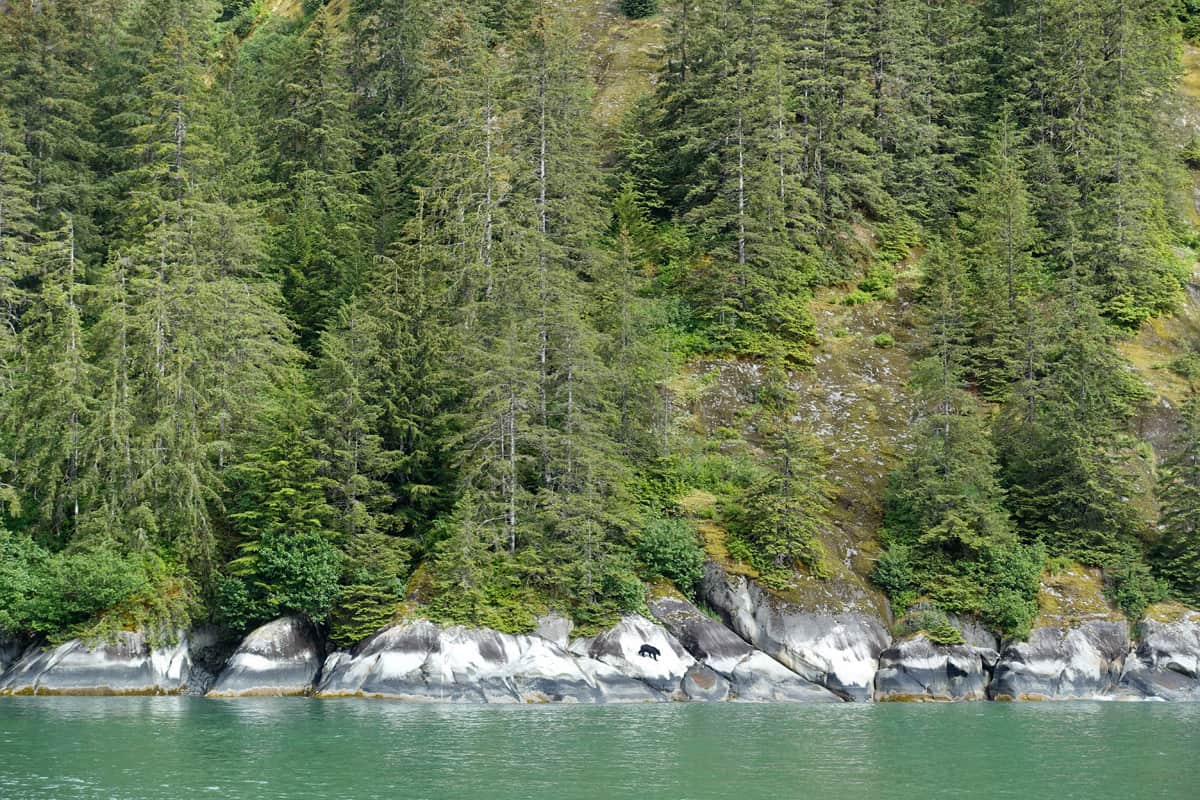
As we were making our way out of the fjord, bound for Juneau, we even spotted a black bear rambling along the water’s edge.
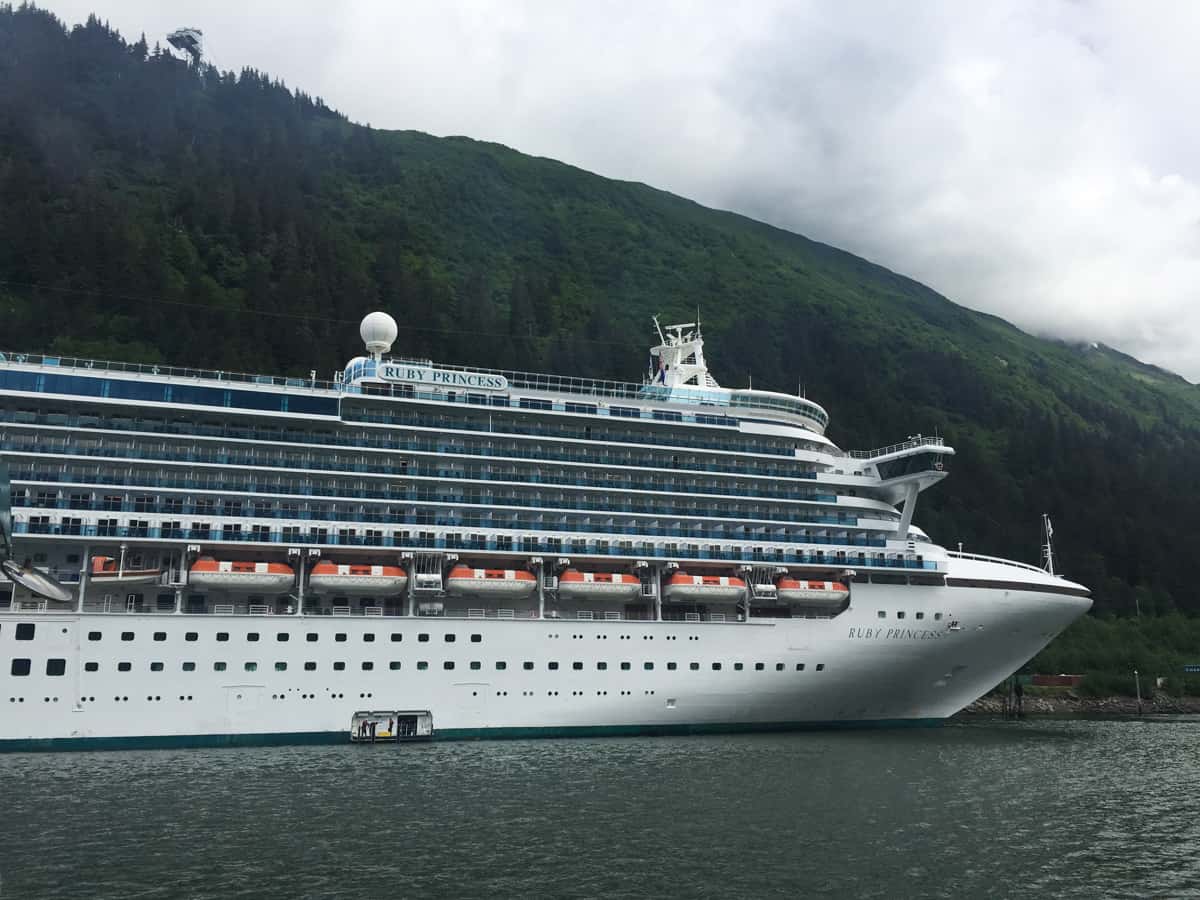
We sailed for quite some time through the waters of Stephens Passage to reach Juneau, our second port city, where the Ruby Princess was waiting for us.
Can you see where people are standing, at the water line? That was the docking area where our catamaran pulled up to let us back onto the ship.
Once back on the ship, Blake and I grabbed a super quick bite to eat as we raced through one of the ship’s buffets, and then disembarked once again for our next excursion in Juneau. There was no time to lose. Up next was another crazy awesome adventure, this time to the Mendenhall Glacier by helicopter and dogsled!
For more on our trip to Alaska, check out these posts:
- 10 Tips For Planning Your Alaska Cruise
- Ketchikan, Alaska + Misty Fjords National Monument
- Skagway, Alaska and the White Pass & Yukon Route Railroad
Disclaimer: Blake and I were honored to be guests of Princess Cruises on a 7-day Alaska Cruise. All of the experiences in this post are personal to our week in Alaska. Your experiences may vary. All opinions expressed are our own. This post was originally published in 2015, then updated in 2023.


nice post thanks to provide informATION
Nothing like a homemade drink…cheers!
I’m not a huge fan of Limoncello, but I will say that where you drink it in Italy makes a huge difference. Drinking it in the north is like choking down a horrible tasting cough syrup. But it can be quite delicious when made with Amalfi lemons along the Amalfi Coast.
My husband makes his own limoncello and yes, it is very therapeutic. There’s nothing like homemade. I’ve always thought about taking an Alaskan cruise and your photos make me want to look at our calendars and book one sooner rather than later.
Those glaciers!! Simply breathtaking.
What an amazing trip! The views of the glaciers are incredible. Thanks for sharing the limoncello recipe too!
What an amazing cruise! I’ve never been to Alaska but I’ve told my husband when I do, we have to do it cruise style. The photos are really stunning and that limoncello sounds like a great ending too. I regret not having a taste in Italy but I did get a sorbetto made with it!
Ooooooo, I’d love a limoncello sorbetto!
My husband’s originally from Alaska but we still have yet to take a cruise there. We’ve been talking about it for a while – now I’m determined to do it! Great photos, thanks for sharing!
I love keeping limoncello in the freezer – now I want to try to make my own! What an amazing trip you had – it’s on my bucket list, for sure.
What a fun post! The limoncello and those icebergs! Gorgeous photos! Thanks for sharing!
This limoncello sounds so lovely… thanks for sharing!
Oh how I wish I were on that excursion with you! The Ruby Princess seems like so much fun! And I’ve never had limoncello. That’s needs to be addressed!
That would have been awesome, Katrina. Because we really need to meet yet!
How do I love limoncello…let me count the ways. I’ve been meaning to make my own for quite some time, and now you’ve inspired me to do it! It looks as though you had an absolutely amazing trip! And that smoked salmon vodka needs to find its way to my house.
I love that you want the smoked salmon vodka!!
Gorgeous pictures!!!
Wow, these photos are incredible! What a gorgeous place to see! :)
Also, this drink gets two thumbs up!
I too had my first taste of limoncello on board the Ruby Princess last October…sailing Canada/New England. Our waiter thought it was necessary for me to have two glasses…after wine with dinner :) I have all the equipment to make limoncello…but waiting for Meyer lemon season (November-March) here in AZ. Enjoyed seeing your pictures…I’ve been on Princess to Alaska 5 or 6 times…my favorite cruise.
So awesome you’ve sailed with Princess to Alaska that many times – they do a fabulous job!
It sounds like you had an amazing trip, and your photos are stunning. Alaska is on the list. You’re right, dessert in a glass is always a good thing. This limoncello recipe sounds amazing.
My folks took a cruise to Alaska many years ago – they still talk about. I want to go! In the meantime, maybe I can enjoy a glass of this poolside!
That blue ice is AMAZING!!! How gorgeous! I totally need to try limoncello…you’ve convinced me!
I know – almost fake looking. I couldn’t help but stare. Definitely keep limoncello on your “to try” list!
I was in heaven looking at your Alaska pics! What a gorgeous part of the country. I’d like to sip this limonchello while exploring. Reasonable, right?
Totally. ;)