Chocolate Marshmallow Bunnies
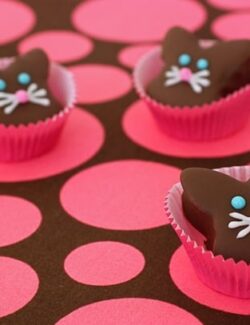
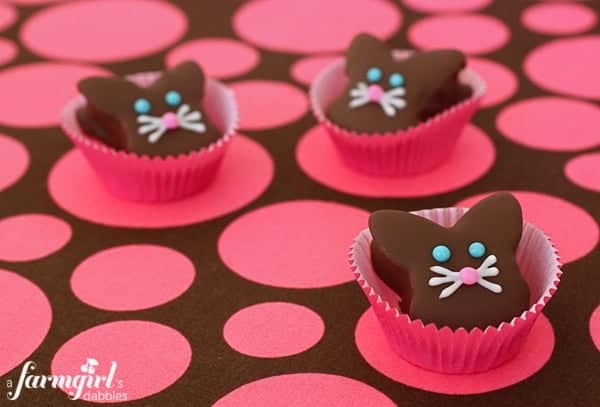
If I could have only one kind of treat in my Easter basket, it would be chocolate marshmallow bunnies. Keep all the fruity jelly beans, too sweet Cadbury eggs, Peeps, and speckled malted Robin Eggs to yourself. Just fill my blue plastic basket that I’ve had for almost forty years with these, pretty please:
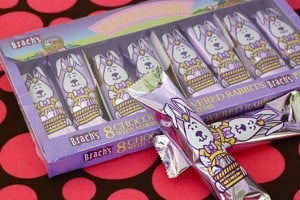
For the past few years, I’ve had to set out on a mission to find these in the stores. Not everyone carries them anymore, I’m sad to report. I’ve learned to start searching early and buy up what I can as soon as they are found. Just a tiny little obsession of mine.
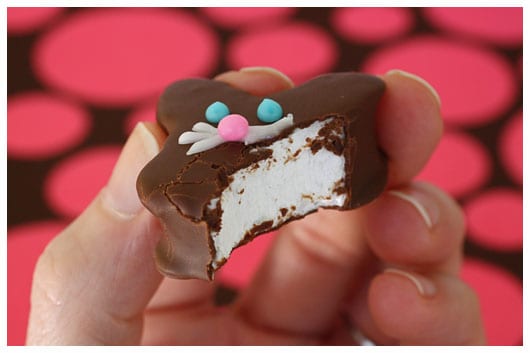
When I made my last batch of homemade marshmallows, I had a lightbulb moment. Why not try my hand at cutting this marvelous fluff into bunny shapes and dip them in chocolate to create my very own Chocolate Marshmallow Bunnies?
I had in my mind the perfect bunny, but couldn’t find a cookie cutter that fit the image. I found bunny cookie cutters in all shapes and sizes at many stores, but they were all just too big for my grand plan. Finally, I sat down at my computer to search. And Amazon had just what I was looking for: a small bunny, face only. Even though I had to purchase a whole set of cookie cutters, this was exactly what I wanted. “Sold!” to the lady with the stash of chocolate marshmallow bunnies in her pantry!
The day I made these bunnies, everything went pretty much according to plan. Until I started piping on those whiskers. Yikes! The lines kept spreading, making Mr. Bunny look like he got socked in the mouth with a banana cream pie. It just wouldn’t do. I wish I had a picture of those poor bunnies to share with you now, but I was popping the rejects into my mouth as soon as they were foiled. Some might think that was planned.
I tried to convince my husband that a whisker-less bunny was fine. Only two adoring blue eyes and a sweet pink nose. It was kinda contemporary looking. You know, hip. But Blake wasn’t buying it. He’s always the one to vote for the simplest route, but he saw the value of the whiskers.
With a hiccup in my afternoon of bunny making, I was forced to make a run for a smaller decorating tip. So much for completing my bunny herd (did you know that’s the correct term for a group of rabbits?) before Tessa’s naptime was over. But, thankfully, it was worth the extra effort.
And now you know the story of the crazy chocolate marshmallow bunny lady.
I also want to share with you the bunnies our daughters created. The past few times I’ve decorated using pastry bags, I’ve handed the bags over to Hatti & Tessa so they could practice and have some fun. Now it’s just an expected thing for them. They stand close by and wait for me to be done with my decorating, so they can get to theirs.
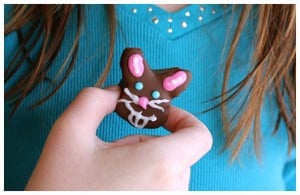
Here’s Hatti’s. Notice her great addition of bunny ears and teeth.
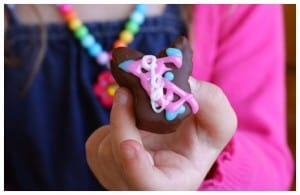
And Tessa’s. She worked so happily and diligently, and was mighty proud of her work.


Wanna guess how many chocolate marshmallow bunnies I’ve eaten?!
(Truthfully…I lost count!)
Chocolate Marshmallow Bunnies
Ingredients
- for the marshmallows:
- powdered sugar for coating pan
- ⅔ c. water divided
- 3 1/4 oz. envelopes unflavored gelatin (found by the Jell-O at the grocery store)
- 1 c. granulated sugar
- 1 c. light corn syrup
- pinch of kosher salt
- 1 tsp. vanilla
- for the chocolate coating:
- 16 oz. about 2-1/2 c. good quality semisweet chocolate chips, finely chopped (I really like Guittard.)
- 3 T. shortening
Instructions
FOR THE MARSHMALLOWS:
- Lightly spray the inside of an 9″x13″ pan with cooking spray. Generously coat with powdered sugar and set aside.
- Pour 1/3 cup of the water into the bowl of a stand mixer. Sprinkle the gelatin over the water and stir briefly to incorporate. Let stand for about 10 minutes, or until the gelatin has softened.
- In a saucepan, off the heat, combine the remaining 1/3 cup of water and the granulated sugar, corn syrup, and salt. Place the pan over medium-high heat. Clip a candy thermometer on the inside of the pan, making sure it doesn’t touch the bottom. Cook the mixture without stirring until it reaches 240°. Brush down the sides of the pan with a pastry brush, dipped in water, to gently wipe away any sugar crystals.
- With your mixer on low speed, very carefully add the hot syrup to the softened gelatin. Add the vanilla and increase the speed to medium-high. The mixture will start out clear, but quickly turns very white. Beat for about 8 minutes, or until the marshmallow gets very thick and sticky, and starts to pull away from the sides of the bowl, in string-like pieces. This will really give your mixer a workout. (Just ask my aunt, Patsy!)
- Spread the mixture into the prepared pan using a lightly oiled spatula. With wet hands, press the batter evenly into the corners of the pan. Just keep rewetting your hands to help with the stickiness. Set aside for at least 1 hour, or until the mixture is firm and cool.
- Run a wet knife around the edge of the cooled pan to loosen the marshmallow. Remove the marshmallow from the pan, onto a sheet of parchment paper.
- Dip your bunny cookie cutter (mine is from this Easter set) into a shallow bowl of water and then cut the marshmallow into bunny shapes. This is a sticky job, but just have patience. It’s worth it! It helps to dip the cutter into the water after each cut.
FOR THE CHOCOLATE COATING:
- In a small, but somewhat deep, microwave-safe bowl, melt about 14 ounces of the chocolate in 30 second increments, stirring after each increment. Be very careful to not get the chocolate too hot. When the chocolate is almost all melted, stir by hand until it is completely smooth. Then add the remaining 2 ounces of chopped chocolate and stir again until completely smooth. This will help to cool down the chocolate. Stir in the shortening until completely incorporated. This will help to thin out the chocolate.
- Place a marshmallow bunny on the tongs of a fork and dip the bunny into the melted chocolate. If needed, use a second fork to help guide the marshmallow in and out of the chocolate. Allow excess chocolate to drip off, while lightly tapping the underside of your fork against the rim of your chocolate filled bowl.
- Then slide the fork out of the bowl, scraping the underside of the tongs along the bowl’s rim. This will scrape off any remaining excess chocolate, so you don’t have a pool of chocolate form around your bunny as it cools.
- Set the chocolate covered bunny on wax paper to cool and completely set up on your kitchen counter. After about an hour, they should be dry to the touch and ready to decorate.
FOR THE GLAZE ICING FOR MR. BUNNY’S EYES, NOSE, AND WHISKERS:
- Please visit my very talented friend, Amanda, from i am baker for her glaze icing recipe and tutorial. She’s just so great at using this stuff, and really is your best teacher! Be sure to check out all her awesome decorated cookies and cakes while you’re over there!


It helped with clean-up when I covered my mixer in plastic wrap before I began, and it also worked better to use generic corn syrup because the marshmallow was fluffier with generic (weird!).
Loved this recipe! We used it for a school “market day” project, using our favorite cookie cutters to cut out the shapes.
It helped with clean-up when I covered my mixer in plastic wrap before I began, and it also worked better to use generic corn syrup because the marshmallow was fluffier with generic (weird!).
I’m so glad you liked making marshmallows, too! Thanks for letting me know. :)
We used this recipe to make chocolate covered butterflies, tulips and flowers to sell at the 4th grade “market day”. It was easier on my mixer when I covered it with plastic wrap; in addition, I found that generic corn syrup created fluffier marshmallow than name brand. (weird!)
Thanks for the great recipe.
I just found your blog. I knew after seeing your posts about marshmallows your are a girl after my own heart!!! (Plus I have a Tessa also.) I make marshmallows for Christmas gifts, but now is an excuse to make them for Easter gifts also! Thanks for fun instructions.
Awwwwww, love the Tessas. :) Nice to meet you, Kim – hope you like these!
Hi! These are great! I was wondering…can these be made a day in advance? I have made homemade marshmallows before but the ones I made weren’t as great the next day. I was just wondering how these would hold up if they were made a day in advance. Thanks so much!!
IMPRESSED WITH your work!. I love these bunnies and the hearts for Valentine´s. I´d love to make those one of these days.
Love from the north of Spai
Marialuisa
Hello Marialuisa – so nice to hear from you – thanks! :)
ridiculously cool!
Whoa! I’m so sad I saw this now, where have I been? Next Easter I’m definitely making these :)
Oh my gosh, these are too cute! They beat peeps and any other packaged candy by a mile!-and it’s pretty hard for a marshmellow bunny to run that far!
Great! Homemade marshmallows weren’t even on my radar and now suddenly, I’m feeling like I need to make these soon. They are adorable!
Oh my – sooooo fabulous!
These bunnies are too cute to eat!